Docker and Linux Networking: Custom Interfaces!
Hi All. Today my goal was to build on a previous post I wrote on Default Routing, RIP v2, and VMware Workstation NICs. The problem? I am running on AWS EC2 so nested virtualization options are lacking (Ravello Systems has a solution, but I didn’t want yet-another-layer in between my CloudFormation templates and my EC2 VMs). Therefore, Docker to the rescue – I can run all the containers on straight EC2 VMs all I want.
However – my current use case is to build a “sysadmin testing lab” on EC2 that includes some Cisco router emulators (see Dynagen / Dynamips). To do this, I want to hook some of my Docker containers in with my router emulators so I can support the following network architecture:
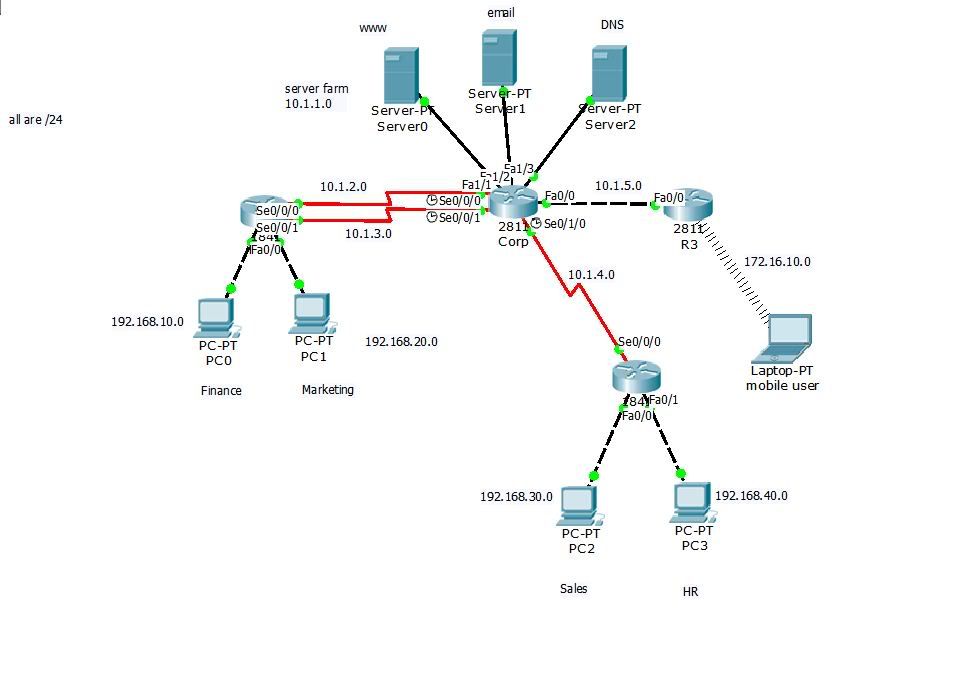
The drawing is from Chapter 8 of Todd Lammle CCNA Study Guide and I figured would be an awesome way to weed out network admin wannabe’s. I’ll just have a router or two fired up, and see if the would-be network admin can answer things like “What does show ip int br do?”
Or – better yet – maybe answer how I built such an environment without the use of VirtualBox, VMware Workstation, KVM, or other virtualization tools. In other words, how I can connect my underlying Docker containers on my EC2 instance to the Dynamips emulated routers.
Plumbing…
This article is based on a CentOS 7 minimal EC2 instance with “just-enough” software added to permit me to run Puppet, Docker, and Dynamips/Dynagen. I’m not going to cover my CloudFormation script (although that would make a great article in and of itself – constructs the networks, IAM policies, auto-scaling groups, launch configurations, and everything and then fires off Puppet to apply policy).
Instead, we’re going to cover the meat of the article: attaching a customized network interface to a Docker container.
The underlying principle: veth pairs. Before going further, I suggest you read up on veth pairs. A good reference is Fun with veth devices, Linux virtual bridges, KVM, VMware – attach the host and connect bridges via veth.
The Networks – and the “Host” Network!
First – remember that we are emulating a set of networks, so here are the network mappings:
- VMnet2 – “Core” network, 10.1.1.0/24.
- VMnet3 – “Finance” network, 192.168.10.0/24.
- VMnet4 – “Marketing” network, 192.168.20.0/24.
- VMnet5 – “Sales” network, 192.168.30.0/24.
- VMnet6 – “HR” network, 192.168.40.0/24.
- VMnet7 – “Mobile User” network, 172.16.10.0/24.
- VMnet8 – “Host” network, 192.168.81.0/24
Before going further, take a careful look at VMnet8. This corresponds to VMware’s out-of-the-box bridge created in the Windows-based article I wrote some years ago. Also, it just happens to correspond to the default Docker interface, as in:
[centos@ip-172-20-241-11 ~]$ ip addr show dev docker0
3: docker0:  mtu 1500 qdisc noqueue state UP
    link/ether 02:42:a2:35:4c:c1 brd ff:ff:ff:ff:ff:ff
    inet 172.17.0.1/16 scope global docker0
       valid_lft forever preferred_lft forever
    inet6 fe80::42:a2ff:fe35:4cc1/64 scope link
       valid_lft forever preferred_lft forever
In other words, we could simply have used docker0 as a perfectly valid bridge (with NAT capabilities). But for my purposes, I want to subvert the Docker networking process completely. (As a side note: Kubernetes is a primary area of research for me, so the more I understand about Docker networking internals and container networking as a discipline, the better.)
So let’s first create the bridges to correspond to our networks:
for i in $(seq 2 8) ; do sudo ip link add VMnet$i type bridge ; done
for i in $(seq 2 8) ; do sudo ip link set VMnet$i up ; done
Now we can see all of the bridges:
15: VMnet2: <BROADCAST,MULTICAST,UP,LOWER_UP> mtu 1500 qdisc noqueue state UNKNOWN mode DEFAULT
    link/ether 3e:bb:0d:b2:18:f0 brd ff:ff:ff:ff:ff:ff
16: VMnet3: <BROADCAST,MULTICAST,UP,LOWER_UP> mtu 1500 qdisc noqueue state UP mode DEFAULT
    link/ether ce:a9:e9:b3:64:71 brd ff:ff:ff:ff:ff:ff
17: VMnet4: <BROADCAST,MULTICAST,UP,LOWER_UP> mtu 1500 qdisc noqueue state UNKNOWN mode DEFAULT
    link/ether da:8d:f3:32:f8:71 brd ff:ff:ff:ff:ff:ff
18: VMnet5: <BROADCAST,MULTICAST,UP,LOWER_UP> mtu 1500 qdisc noqueue state UNKNOWN mode DEFAULT
    link/ether 8a:e5:b5:c4:dc:84 brd ff:ff:ff:ff:ff:ff
19: VMnet6: <BROADCAST,MULTICAST,UP,LOWER_UP> mtu 1500 qdisc noqueue state UNKNOWN mode DEFAULT
    link/ether c2:62:53:e2:da:6e brd ff:ff:ff:ff:ff:ff
20: VMnet7: <NO-CARRIER,BROADCAST,MULTICAST,UP> mtu 1500 qdisc noqueue state DOWN mode DEFAULT
    link/ether 00:00:00:00:00:00 brd ff:ff:ff:ff:ff:ff
21: VMnet8: <BROADCAST,MULTICAST,UP,LOWER_UP> mtu 1500 qdisc noqueue state UP mode DEFAULT
    link/ether c2:f3:2e:9c:87:d8 brd ff:ff:ff:ff:ff:ff
Some of the bridges are state UP and some are not; that is because we have interfaces associated with some of the bridges.
Dynamips / Dynagen Routers
This is still TBD: suffice it to say that we have four emulated routers to handle our networks, and that we have on a VLAN’ed interface on the CORP router IP address 10.1.1.2. This IP address can only be accessed if routing (and all the network plumbing) is setup correctly.
I *promise* I will get another article pushed out on how I setup the four routers – that itself is worth some words. For now, here is what the CORP router has for 10.1.1.2:
CORP#show int vlan2
Vlan2 is up, line protocol is up
  Hardware is EtherSVI, address is cc00.793b.0000 (bia cc00.793b.0000)
  Description: Switch Card to Core Network
  Internet address is 10.1.1.2/24
  MTU 1500 bytes, BW 100000 Kbit/sec, DLY 100 usec,
     reliability 255/255, txload 1/255, rxload 1/255
  Encapsulation ARPA, loopback not set
  ARP type: ARPA, ARP Timeout 04:00:00
  Last input 00:20:35, output never, output hang never
  Last clearing of "show interface" counters never
  Input queue: 0/75/0/0 (size/max/drops/flushes); Total output drops: 2
  Queueing strategy: fifo
  Output queue: 0/40 (size/max)
  5 minute input rate 0 bits/sec, 0 packets/sec
  5 minute output rate 0 bits/sec, 0 packets/sec
     0 packets input, 0 bytes, 0 no buffer
     Received 0 broadcasts, 0 runts, 0 giants, 0 throttles
     0 input errors, 0 CRC, 0 frame, 0 overrun, 0 ignored
     48 packets output, 11956 bytes, 0 underruns
     0 output errors, 1 interface resets
     0 unknown protocol drops
     0 output buffer failures, 0 output buffers swapped out
Routing and a Host Address
You will notice that we have a total of seven (7) networks we are working with. In order for us to perform testing, we need the host (really, the AWS EC2 running CentOS instance) to be able to get to each of our managed networks. For this to happen, we need a gateway to the routers we are going to provision. Let’s create an address on our host that can be used to perform NAT:
# create the "Host" interface, which we will use for NAT.
sudo ip link add dev VMnet8-host-dev type veth peer name VMnet8-host-br
sudo ip addr add 192.168.81.1/24 dev VMnet8-host-dev
sudo ip link set dev VMnet8-host-br master VMnet8
sudo ip link set VMnet8-host-br up
sudo ip link set VMnet8-host-dev up
Now we can setup routes for the internal networks we are creating:
# setup host routing - note the use of supernets
sudo ip route add 10.1.0.0/21 via 192.168.81.10
sudo ip route add 172.16.10.0/24 via 192.168.81.10
sudo ip route add 192.168.0.0/18 via 192.168.81.10
Now we can take a quick look at our work. We have a number of bridges created, and we have routing defined for our virtual networks:
[centos@ip-172-20-241-11 ~]$ sudo ip addr show VMnet8-host-dev
37: VMnet8-host-dev@VMnet8-host-br: <BROADCAST,MULTICAST,UP,LOWER_UP> mtu 1500 qdisc pfifo_fast state UP qlen 1000
    link/ether 9e:92:53:d0:c3:45 brd ff:ff:ff:ff:ff:ff
    inet 192.168.81.1/24 scope global VMnet8-host-dev
       valid_lft forever preferred_lft forever
    inet6 fe80::9c92:53ff:fed0:c345/64 scope link
       valid_lft forever preferred_lft forever

[centos@ip-172-20-241-11 ~]$ sudo ip addr show VMnet8-host-br
36: VMnet8-host-br@VMnet8-host-dev: <BROADCAST,MULTICAST,UP,LOWER_UP> mtu 1500 qdisc pfifo_fast master VMnet8 state UP qlen 1000
    link/ether c2:f3:2e:9c:87:d8 brd ff:ff:ff:ff:ff:ff
    inet6 fe80::c0f3:2eff:fe9c:87d8/64 scope link
       valid_lft forever preferred_lft forever

[centos@ip-172-20-241-11 ~]$ sudo ip route
default via 172.20.241.1 dev eth0
10.1.0.0/21 via 192.168.81.10 dev VMnet8-host-dev
172.16.10.0/24 via 192.168.81.10 dev VMnet8-host-dev
172.17.0.0/16 dev docker0  proto kernel  scope link  src 172.17.0.1
172.20.241.0/27 dev eth0  proto kernel  scope link  src 172.20.241.11
192.168.0.0/18 via 192.168.81.10 dev VMnet8-host-dev
192.168.81.0/24 dev VMnet8-host-dev  proto kernel  scope link  src 192.168.81.1

[centos@ip-172-20-241-11 ~]$ sudo ping -c 1 10.1.1.2
PING 10.1.1.2 (10.1.1.2) 56(84) bytes of data.
64 bytes from 10.1.1.2: icmp_seq=1 ttl=254 time=29.8 ms

--- 10.1.1.2 ping statistics ---
1 packets transmitted, 1 received, 0% packet loss, time 0ms
rtt min/avg/max/mdev = 29.886/29.886/29.886/0.000 ms
The Docker Container
This article is about how to attach virtual interfaces dynamically to a running Docker container; thus, we need to create a Docker container. Let’s first fire up a simple Web server (uses thtpd to serve up “Hello, World”, thanks very much to Lars Kellogg-Stedman for the container and for giving me inspiration for this research):
# create the docker container
docker run -d --name web larsks/simpleweb
Take a look at the interface that Docker created for this container:
49: vethe240a36@if48:  mtu 1500 qdisc noqueue master docker0 state UP
    link/ether c2:64:e0:c5:39:d2 brd ff:ff:ff:ff:ff:ff link-netnsid 0
    inet6 fe80::c064:e0ff:fec5:39d2/64 scope link
       valid_lft forever preferred_lft forever
The interface leverages Container Namespaces (see Attach to your Docker containers with ease using nsenter). What we’ll do now is create a new veth pair and attach it to the container manually:
# create a veth on VMnet3 for use by the container
sudo ip link add web-dev type veth peer name web-br
sudo ip link set dev web-br master VMnet3
sudo ip link set web-br up

# attach to the container via netns
sudo ip link set netns $(docker-pid web) dev web-dev
sudo nsenter -t $(docker-pid web) -n ip addr add 192.168.10.100/24 dev web-dev
sudo nsenter -t $(docker-pid web) -n ip link set web-dev up

# setup default routing in the container to use our new interface
sudo nsenter -t $(docker-pid web) -n ip route del default
sudo nsenter -t $(docker-pid web) -n ip route add default via 192.168.10.10 dev web-dev
That code snippet does a lot of work. We create the veth pair, attach it to the container by using nsenter, and then change default routing to use that new interface.
The end result? Our internal Docker container now has completely customized networking, and can communicate both with our new host interface as well as the virtual, VLAN-located IP address on the CORP router:
[centos@ip-172-20-241-11 ~]$ sudo nsenter -t $(docker-pid web) -n ping -c 2 10.1.1.2
PING 10.1.1.2 (10.1.1.2) 56(84) bytes of data.
64 bytes from 10.1.1.2: icmp_seq=1 ttl=254 time=74.5 ms
64 bytes from 10.1.1.2: icmp_seq=2 ttl=254 time=47.0 ms

--- 10.1.1.2 ping statistics ---
2 packets transmitted, 2 received, 0% packet loss, time 1001ms
rtt min/avg/max/mdev = 47.003/60.789/74.576/13.788 ms

[centos@ip-172-20-241-11 ~]$ sudo nsenter -t $(docker-pid web) -n ping -c 2 192.168.81.1
PING 192.168.81.1 (192.168.81.1) 56(84) bytes of data.
64 bytes from 192.168.81.1: icmp_seq=1 ttl=61 time=37.6 ms
64 bytes from 192.168.81.1: icmp_seq=2 ttl=61 time=60.9 ms

--- 192.168.81.1 ping statistics ---
2 packets transmitted, 2 received, 0% packet loss, time 1002ms
rtt min/avg/max/mdev = 37.624/49.310/60.997/11.688 ms
Finally, let’s prove we can get the output from the Web server:
[centos@ip-172-20-241-22 ~]$ sudo nsenter -t $(docker-pid web) -n curl http://192.168.10.100/hello.html
Hello world
And with that, it’s almost 2am and time to end this article.
Happy computing!
Team-oriented systems mentor with deep knowledge of numerous software methodologies, technologies, languages, and operating systems. Excited about turning emerging technology into working production-ready systems. Focused on moving software teams to a higher level of world-class application development. Specialties:Software analysis and development...Product management through the entire lifecycle...Discrete product integration specialist!
Leave a Reply