Auto-Harden ESXi 5.x Hosts
To run an ESXi 5.x host in a secure network requires the system to be compliant to all Information Assurance (IA) requirements. This article describes in detail how an automated hardening process was created to meet Defense Information Systems Agency (DISA) requirements based on the latest Security Technical Implementation Guide for ESXi.
ESXi 5.x Auto-STIG Scripts – Here’s the Link!
The below discusses the auto-hardening process in great, excruciating detail. As an extra, you can
download the 06-JUN-2014 version of the Auto-STIG Scripts here. This version includes the fix for ESXi 5.0 to the bad substitution reported for line 202 as well as a few other errors. Enjoy 🙂
Update as of 06 JUN 14: The script function esxi_stig_auto_persist referenced below has been updated into the ZIP file along with the required esxi_stig_is_ESXi_5_0 script.
ESXi 5.x Auto-STIG Scripts – What’s the Deal?
Within DoD and the Army, only properly secured systems can be attached to functioning networks. This article discusses what these requirements are (brief overview) and then how we addressed this need for ESXi 5.x hosts.
Hardening ESXi Hosts – Overview
This section briefly discusses what the requirements are to attach a system to a military network:
- A “STIG” exists for the server function. The DoD Information Systems Agency (DISA) provides a whole set of Security Technical Implementation Guides (STIGs) that define checklist items to make an installed system or application secure. These are located at http://iase.disa.mil/stigs/. For this article, we are looking at the ESX STIGs (http://iase.disa.mil/stigs/os/virtualization/esx.html); specifically, the ESXi 5 Server STIG (Version 1, Release 4) updated on 24-JAN-2014.
An example of a STIG checklist item is:
Rule Version (STIG-ID): SRG-OS-000126-ESXI5
Rule Title: The system must set a timeout for the ESXi Shell to automatically disable idle sessions after a predetermined period.

Vulnerability Discussion:  If ESXi Shell is enabled on the host and a user forgets to logout of their SSH session the idle connection will remain indefinitely increasing the potential for someone to gain privileged access to the host.
The STIG checklist will have typically dozens (or even hundreds) of items like this. Each checklist item must be addressed in a way that can be proved to the Information Assurance Manager (IAM). And – that proof is the point of this article 🙂
- Servers are built from approved images. As an example, Windows Server 2008 R2 is an approved operating system but the DoD has its own pre-hardened “Unified Golden Master” (UGM) which system administrators are to use when bilding new Windows Server operating systems. As of this writing (14 MAR 2014) Windows Server 2012 has no UGM and is not officially supported for installation in secured environments. For other images (such as ESXi 5.x) there is no official UGM but instead the system administrators must use the latest vendor-supplied version and then harden the system.
- Patches are applied. Prior to any other hardening, the system administrator first locates and downloads any necessary vendor-supplied security patches. For a network device like a switch, this will probably be a firmware update. For an operating system like Windows Server, this will be the set of Windows Updates that apply to that system (applied from a local DVD, as of course an insecure system will *not* be connected to the Internet). For ESXi 5.x, these patches are the set of updates downloaded and applied to that hypervisor.
- STIG(s) are applied. The number of STIG checklist items to apply to an information system vary. For a Windows Server built from the UGM, the base operating system is already highly secured (around 92% pass rate based on our observations). However, if an application (like IIS) is installed on top of the base UGM image, that application must be properly secured using the appropriate STIG. For a system like ESXi 5.x which has no UGM, the system administrator must apply STIG checklist items manually.
- Scans are performed. Depending on the system / device, different scanning tools may be available. For most operating systems, DISA provides the Security Content Automation Protocol (SCAP) tool at http://iase.disa.mil/stigs/scap/. The system administrator can run this tool and get an idea of how compliant the system under review is to the relevant STIG checklists (which are XCCDF files and can be processed electronically. Additionally, most systems can be scanned by the Retina tool to determine compliance to known Information Assurance Vulnerability Alerts (IAVAs).
- POA&Ms are Defined. “POA&M” (pronounced “POE-am”) stands for Plan of Actions & Milestones. This accounts for STIG checklist items that can’t be addressed; for example, ESXi 5.x STIG checklist item
ESXI5-VMNET-000001which applies to distributed virtual switches where the initial environment uses only standard virtual switches. In that case, the POA&M may specify that as the ESXi host is attached to a functional vCenter Server environment, that distributed virtual switches will be applied only according to policy (with verifiable proof and a timeline). The POA&M can also be used to address known deficiencies; for example, a security patch might be known to break a running system (some Windows IIS patches are infamous for doing this). The POA&M would specify which security patches cannot be applied, the rationale, the expected timeline until the patch *can* be applied, and any security mitigations that can be performed to reduce the risk to the running information system. - The system is accredited. This process is part of the overall DoD Information Assurance Certification & Accreditation Program (DIACAP). It basically means that an individual with proper authority (the Designated Approval Authority, or DAA) has reviewed the information system, the security artifacts (such as STIG checklist items and Retina scans), the POA&Ms (if any), and has accepted the risk to run the information system.
- Operations & Maintenance Commence. Once the information system is operational, it must be maintained. Security patches must be applied to meet suspense dates (normally 10 days or less from the release of a security bulletin), continuous security scans must be performed, logs must be reviewed and correlated to detect intrusion or subversion, and a plan must be executed to maintain the information system through the entire lifecycle. The entire accreditation process must be repeated at least every 3 years.
That’s a lot of steps! We won’t cover any but Step 4 above regarding applying STIG checklist to ESXi 5.x hosts. Our goal will be to have a highly-secure ESXi host with minimal manual effort.
Hardening ESXi Hosts – Why Do This?
One question is why do we have this article? Given that we know we need to harden the ESXi hosts using the DISA STIG checklist, why not just do that? After all, the STIG checklist items always fall into one of two categories: policy decisions such as ESXI5-VMNET-000001 (“All dvPortgroup VLAN IDs must be fully documented.”); and, implementation actions such as ESXI5-VMNET-000010 (“All port groups must be configured to a value other than that of the native VLAN.”). For policy decisions, there is no direct action; the system administrator must be able to prove that a written policy exists and that a process is wrapped around enforcing that policy. For the ESXI5-VMNET-000001 checklist item, this can be as simple as a one-paragraph written statement that says “We will fully document all dvPortgroup VLAN ID usage” along with a brief set of steps on how that policy will be implemented (e.g. set up a spreadsheet, document VLAN IDs within the spreadsheet, store the spreadsheet in protected version control, and have a defined change management process to make sure the spreadsheet can’t be modified without permission).
For implementation actions, however, there are some steps that can be performed. Using ESXI5-VMNET-000010 as an example, the STIG checklist text has some actions that can be performed to verify whether or not the ESXi host is compliant (e.g. run “esxcli network vswitch standard portgroup list and look for usage of VLAN 1). If the check fails, then this is a finding and the system administrator must correct the problem immediately or show that a POA&M exists. And it is these detectable checklist items that we want to automate. In many cases, we can fix the problem automatically; consider the checklist item GEN000790-ESXI5-000085 “The system must prevent the use of dictionary words for passwords.” To fix this security violation, you simply modify the /etc/pam.d/passwd file and make a single line change..hey, presto! No more security violation!
And that sums up why we want to have ESXi 5.x hardening scripts to make these simple changes (like GEN000790-ESXI5-000085) as well as to detect security violations (like ESXI5-VMNET-000010) right up front to make it easier to get the ESXi host ready to attach to a connected network.
Hardening ESXi Hosts – Doesn’t Anyone Else Have This?
So now that we know what the hardening process is and why we want scripts to automate the process, a fair question is why we should write anything ourselves.
There are options for applying DISA STIG checklists to different systems. For example, Aqueduct project at https://fedorahosted.org/aqueduct/ has all sorts of hardening scripts for Red Hat Enterprise Linux (RHEL); basically, you download the script(s) and run them and – voila! – you have a hardened RHEL. For ESXi, not so much the case. For example, a 13-OCT-2013 question to a Google Group (https://groups.google.com/forum/#!msg/pysphere/a7q_9tnyR5E/TQt1cWFER-gJ) asks the simple question “Not sure why the government has security requirements and doesn’t provide a script to apply the settings.” While the Google Group discussion does provide a Python script download, this is for the Virtual Machine (VM) STIG – not for the ESXi host STIG. So it isn’t an option for us.
VMware’s own William Lam provides a vSphere Security Hardening report script at https://github.com/lamw/vghetto-scripts/blob/master/perl/vmwarevSphereSecurityHardeningReportCheck.pl. While this is a great tool and start, it is not really DISA STIG specific.
The net result? We are stuck developing our own STIG checklist automation script. So let’s get started!
ESXi 5.x Auto-STIG Scripts – Approach
Now that we understand what the STIG process is for ESXi 5.x and why we want to build our own, let’s take a quick look at how we plan on getting this done.
ESXi 5.x Auto-STIG Scripts – Approach Overview
First, we want to concentrate on only those STIG checklist items that can be validated directly from the ESXi host. This might sound obvious – but it’s not. When managing an ESXi host you have some options; you can run scripts directly on the ESXi host itself within the slimmed-down Linux busybox shell. You can run PowerCLI or PowerShell scripts against the ESXi host from your vCenter Server. If you have the VMware Management Appliance (vMA), you can run commands against the ESXi host from the vMA.
For our use case we want to keep the process as simple as possible: we want to build our scripts to run directly on the ESXi host itself, with no dependencies on having a functional vCenter Server or vMA. This has some great advantages:
- We know that our scripts will run as-is on any ESXi host including a fresh install.
- We don’t need to integrate with other system administrators on other vSphere components just to harden our script.
- We can harden our ESXi hosts in totally disconnected mode.
These are all good things. But there are some problems:
- We can’t check some of the “non-ESXi” STIG checklist items such as those checklist items that apply to distributed virtual switches or physical switchport interfaces.
- By default, not every change made by our hardening scripts will survive an ESXi host reboot (more on that further).
- Some of the hardening scripts get very complicated due to somewhat limited nature of the VMware tools installed on a vanilla ESXi host.
The words “you pays your money, and you makes your choice” come to mind. While our approach of creating hardening scripts for use directly on the ESXi host, it simply means that we can’t hit all of the 141 STIG checklist items. That’s too bad, but it’s life. We deal with it.
ESXi 5.x Auto-STIG Scripts – Approach Specifics
Our basic approach is this:
- Perform only verifiable checks. In other words, many STIG checklist items are simply policy matters. We identified one (
ESXI5-VMNET-000001, “All dvPortgroup VLAN IDs must be fully documented”) that we simply can’t check via a script. Why not? Because policy-based STIG checklist items depend on things that exist outside of the ESXi host. For example, theESXI5-VMNET-000001requires that you have an external document like a spreadsheet or database with a list of all of your used VLAN IDs. It also requires that you have a documented process for how VLAN IDs are modified, created, or deleted. None of this has anything to do with the actual ESXi host; all we can tell from the ESXi host is whether you use a particular VLAN ID. So we don’t even bother with that STIG checklist item – and there are around 61 such “policy-only” checklist items. Instead, we concentrate on those STIG checklist items we can check for and possibly fix using standard VMware commands from tools such asesxcli. - Treat each STIG checklist item individually. Instead of writing one massive set of shell commands, we separate each STIG checklist item into its own specialized function. This allows us to test our STIG checklist scripts one at a time instead of just running the entire set of checks. As you’ll see below, we go to some pains to make sure we can properly test our work prior to running the whole thing.
- Ensure each STIG checklist script can be re-run non-destructively. This is a biggie…we do not want a solution where if by some unfortunate chance we re-run the script, the system administrator is put into an unknown state. Instead, we want each individual STIG checklist script to look for its condition and make a decision as to whether a “fix” should be performed. Consider checklist item
GEN003510-ESXI5-006660(“Kernel core dumps must be disabled unless needed”): we first check to see if kernel core dumps are disabled and we take no action if they are. What this means is that on running the script a second time, it functions as simply a verification that the STIG checklist item is still in compliance. - Account for persistence. This is another biggie; by default, almost every change made to a running ESXi host is undone when the host is rebooted. (For more information, see William Lam’s excellent write-ups on ESXi 4.x at http://www.virtuallyghetto.com/2011/08/how-to-persist-configuration-changes-in.html (Part 1) and http://www.virtuallyghetto.com/2011/08/how-to-persist-configuration-changes-in_09.html (Part 2).) This turned out to be a bit tricky for us, but it’s important as otherwise key bits of STIG checklist items (such as running weekly baseline checks, or ensuring that login banners are correct) are “undone” upon a simple ESXi host reboot.
- Make the scripts easy to apply. The best approach would be to have the ESXi STIG checklist automation scripts deployed as part of a VMware Information Bundle (“VIB”) and then apply the checklist items automatically on first boot. But we won’t do that for this first cut; instead, we’ll provide some relatively simple instructions on getting the scripts over to the ESXi host and then running them as necessary.
All this sounds good, yes? So let’s keep moving forward 🙂
ESXi 5.x Auto-STIG Scripts – Standards / Common Code
We want to have standards for our automated STIG scripts, so we define the following:
- Naming conventions. For our use case, we’ll make every script named
esxi_stig_[XXX]where the[XXX]identifies the specific function and theesxi_stig_prefix makes it easy to identify our particular scripts. - Common code. We want to minimize our work; for things like printing script status or common actions to update a configuration file, we want to use the same process all of the time. Let’s take a look at what this means practically. For example, script output…we want a single function that outputs the result of a STIG checklist item analysis so that we can modify all output from a single location. This makes our code more manageable. For our use case, we named our common function esxi_stig_showresult and defined it as such:
#######################################################################
# show result of an effort
esxi_stig_showresult() {
  if [ "$1" = "0" ]; then
    echo "[ok]"
  else
    if [ "$1" = "1" ]; then
      echo "Fixed!"
    else
      if [ "$1" = "2" ]; then
        echo "[n/a]"
      else
        echo "[ERROR!]"
      fi
    fi
  fi
  return 0
}
The advantages of this approach are that we can change our output logic once and have it apply to every checklist function consumer. We ended up with a number of functions that are similar in concept: updating common configuration files (
esxi_stig_updateconfig); modifying an ESXi service to meet our needs (esxi_stig_service_setup); making common changes to the SSH configuration file (esxi_stig_sshd_SimpleChange); and, several others. - Documentation. We are big believers that if work isn’t documented, it simply isn’t complete. So our scripts need documentation all over the place. Consider the following:
esxi_stig_SRG_OS_000120_ESXI5() {
  l_rulename="SRG-OS-000120-ESXI5"
  l_first=1
  echo -n "$l_rulename..."
  l_FIXED=0

  # first check to see if sha512 already in use
  if grep "^password[ \t]\+sufficient[ \t]" /etc/pam.d/passwd | grep sha512 2>&1 >/dev/null; then
    # it's OK
    echo -n "Using sha512..."
  else
    # remove any others
    l_FIXED=1
    if cat /etc/pam.d/passwd \
      | grep -e "\(^password[ \t]\+sufficient[ \t]\)\(.*\)\(md5\|des\|sha256\)\(.*\)" \
      2>&1 >/dev/null; then
      echo -n "Replacing with sha512..."
      cat /etc/pam.d/passwd \
        | sed -e \
        "s#\(^password[ \t]\+sufficient[ \t]\)\(.*\)\(md5\|des\|sha256\)\(.*\)#\1\2sha512\4#g" \
        > /etc/pam.d/passwd-new
    else
      echo -n "Adding sha512..."
      cat /etc/pam.d/passwd \
        | sed -e "s#\(^password[ \t]\+sufficient[ \t].*\)#\1 sha512#g" \
        > /etc/pam.d/passwd-new
    fi
    esxi_stig_updateconfig /etc/pam.d/passwd
  fi
  esxi_stig_showresult ${l_FIXED}
}
The above script checks to see if Secure Hash Algorithm (SHA) using 512 bits (“sha512”) is in use for incoming SSH connections. If it isn’t, we update the SSH server configuration file to require it. We can tell all of this just by reading the code, and that is a good thing!
There are plenty of other things we could do for standards, but the above is a good starting point and definitely highlights our good intentions 🙂
ESXi 5.x Auto-STIG Scripts – Persistence
Ah, persistence. That turned out to be quite difficult for us to get right with many ESXi host reboots and false starts. But we solved it!
First the problem: by default, almost all changes to an ESXi host are discarded upon a reboot. This is a Good Thing for a hypervisor; it is a great security feature and helps to ensure that the hypervisor image itself remains as small as possible (after all, the image is effectively being laid down fresh on every boot). In fact, the only files which are “persistent” are those which meet the following criteria as documented in William Lam’s article at http://www.virtuallyghetto.com/2011/08/how-to-persist-configuration-changes-in.html:
- The file must have the “sticky” bit set.
- The file must have a backup copy created as “
.#[filename]“.
As William’s post points out, this is not some that the user can do; instead, it’s a function of the VisorFS. To find the files which meet this criteria, simply run the following command from the root folder:
find etc -follow -type f -name ".#*"
You’ll get quite a bit of output, such as “etc/rc.local.d/#.local.sh” (at least under ESXi 5.x). Each file listed will be persisted across ESXi host reboots…as long as the magic command “/sbin/auto-backup.sh” is run (William’s post talks about this in greater detail). The auto-backup.sh command runs once every hour, so it’s possible to lose up to 59 minutes worth of changes (normally, a clean reboot won’t have this problem as auto-backup.sh is run automatically as part of a clean reboot).
But this approach does mean that if we simply create files or folders then – upon an ESXi host reboot – we will *lose* those files / folders. Not such a good thing for the following reasons:
- Certain configuration files such as
/etc/bannermust be modified to meet STIG requirements, but these configuration files are *not saved* across reboots. - If you depend on the existence of third-party (non-VMware) files across reboots such as to run
cronscripts, you will be out of luck.
So how do we solve this problem? Simple! We write our own special esxi_stig_auto_persist script function that makes sure our automated functions survive an ESXi host reboot. We first compress our scripts, copy that compressed image to the protected (and persistent) /bootbank area, then modify the persistent /etc/rc.local.d/local.sh file to decompress and process our scripts as necessary on each reboot. Here’s the actual code:
esxi_stig_auto_persist() {
  # name of the compressed file we use
  l_compressed=esxi_stig.tgz
  l_bootbank=/bootbank
  l_boot_cfg=boot.cfg
  l_bootbank_boot_cfg="$l_bootbank/$l_boot_cfg"
  l_bootbank_compressed="$l_bootbank/$l_compressed"
  l_boot_cfg_new="$l_bootbank_boot_cfg-new"
  l_esxi_stig_sh='ESXi_STIG.sh'

  # get the current folder
  l_pwd=$PWD

  # create the compressed file we store with ESXi
  echo "Creating compressed file $l_compressed..."
  rm -f $l_pwd/$l_compressed
  cd / && tar -czvf $l_pwd/$l_compressed $l_pwd/ESXi_STIG* 2>/dev/null | sed -e 's/^/  .../' && cd $l_pwd

  # copy to ESXi bootbank for persistent storage
  echo "Copying to $l_bootbank..."
  cp -f ./$l_compressed $l_bootbank

  # check to see if we are already in the boot.cfg script
  if grep -e "^modules=.* --- $l_compressed" $l_bootbank_boot_cfg 2>&1 >/dev/null; then
    echo "[Already installed to $l_bootbank_boot_cfg...]"
  else
    # learned from experience *not* to put a reference to the tgz file in boot.cfg
    echo "[Not modifying $l_bootbank_boot_cfg; this leads to boot failures...]"
    #echo "Modifying $l_bootbank_boot_cfg to contain $l_compressed..."
    #cat $l_bootbank_boot_cfg | sed -e "s/^\(modules=.*\)/\1 --- $l_compressed/" > $l_boot_cfg_new
    #esxi_stig_updateconfig $l_bootbank_boot_cfg
  fi

  # now setup rc.local to update the banner
  l_rclocal_tag="# -- esxi_stig_auto_persist"
  l_is_5_0=$(esxi_stig_is_ESXi_5_0)
  if [ "$l_is_5_0" = "1" ]; then
    l_etc_rc=/etc/rc.local
  else
    l_etc_rc=/etc/rc.local.d/local.sh
  fi
  l_etc_rc_new="$l_etc_rc"-new
  echo "Setting up $l_etc_rc_new to contain our startup commands..."
  grep -v -e "$l_rclocal_tag" $l_etc_rc | grep -v -e "^exit 0" > $l_etc_rc_new
  echo "$l_rclocal_tag - BEGIN" >> $l_etc_rc_new
  echo "l_pwd=\$PWD $l_rclocal_tag" >> $l_etc_rc_new
  echo "echo 'Uncompressing $l_compressed' $l_rclocal_tag" >> $l_etc_rc_new
  echo "cd / $l_rclocal_tag" >> $l_etc_rc_new
  echo "tar -xzf $l_bootbank_compressed $l_rclocal_tag" >> $l_etc_rc_new
  echo "if [ -d '$l_pwd' -a -f '$l_pwd/$l_esxi_stig_sh' ]; then $l_rclocal_tag" >> $l_etc_rc_new
  echo "  echo 'Setting banners...' $l_rclocal_tag" >> $l_etc_rc_new
  echo "  cd $l_pwd $l_rclocal_tag" >> $l_etc_rc_new
  echo "  ESXI_STIG_DEFINE_ONLY=1 $l_rclocal_tag" >> $l_etc_rc_new
  echo "  . $l_esxi_stig_sh $l_rclocal_tag" >> $l_etc_rc_new
  echo "  esxi_stig_SRG_OS_000023_ESXI5 $l_rclocal_tag" >> $l_etc_rc_new
  echo "  unset ESXI_STIG_DEFINE_ONLY $l_rclocal_tag" >> $l_etc_rc_new
  echo "else $l_rclocal_tag" >> $l_etc_rc_new
  echo "  echo 'Unable to uncompress $l_bootbank_compressed...check logs' $l_rclocal_tag" >> $l_etc_rc_new
  echo "fi $l_rclocal_tag" >> $l_etc_rc_new
  echo "cd \$l_pwd $l_rclocal_tag" >> $l_etc_rc_new
  echo "$l_rclocal_tag - END" >> $l_etc_rc_new
  if [ "$l_is_5_0" = "0" ]; then
    # must put in an 'exit 0' for ESXi 5.x (not 5.0)
    echo "exit 0" >> $l_etc_rc_new
  fi
  echo "Updating $l_etc_rc..."
  esxi_stig_updateconfig $l_etc_rc

  return 0
}
That’s a lot of code – but it’s commented and performs exactly the actions described. The neat part is the update to /etc/rc.local.d/local.sh, which is the equivalent of the old AUTOEXEC.BAT file in MS-DOS – it gets run automatically at boot so we can do things such as verify that we run the esxi_stig_SRG_OS_000023_ESXI5 function to ensure that our banners are set correctly to meet DISA STIG requirements.
Note: You must copy this code down locally to run it…it’s not part of the ZIP file above. For your convenience,
Last point – the magic function esxi_stig_updateconfig runs the auto-backup.sh process to make sure that our changes are persistent. In fact, we’ll put in the esxi_stig_updateconfig function here just so you can see for yourself…it’s quite instructive in its own right:
# update config file from -new
esxi_stig_updateconfig() {
  l_config="$1"
  l_config_new="$1"-new

  # check if file exists
  l_perms=""
  l_chmod_perms=""
  if [ -f "$l_config" ]; then
    # get orig file permissions
    l_perms=$(ls -la "$l_config" | cut -d ' ' -f 1)

    # xlat to octal
    l_chmod_perms=$(esxi_stig_xlat_perms "$l_perms")

    # save the config file
    esxi_stig_saveconfig "$l_config"
  fi

  # copy the new if given
  if [ -f "$l_config_new" ]; then
    cp -f "$l_config_new" "$l_config"
    rm -f "$l_config_new"

    # set permissions and indicate that problem was "fixed" via return code
    if [ ! "$l_chmod_perms" = "" ]; then
      chmod $l_chmod_perms "$l_config"
    fi
    return 1
  fi
  # make changes persistent
  /sbin/auto-backup.sh 2>&1 >/dev/null

  # FIXME: indicate "fixed" in any event
  return 1
}
And with this, we’ve covered all the groundwork and now we can discuss how to apply the auto-STIG scripts.
ESXi 5.x Auto-STIG Scripts – Policy Checklist Items
Before we present the complete solution to running the auto-STIG scripts, let’s jump back to these “policy-only” STIG checklist items. These are items which must meet the following criteria:
- They are specifically addressed by the system administrator.
- There is a formal (written) policy on how the checklist item is to be managed.
- There is a defined process that demonstrates how the STIG checklist item is managed.
We’re not going to cover all of these requirements here; the wise system administrator knows to perform these steps in any case as they are simply common sense. Instead, we quickly cover the “policy-only” STIG checklist items along with our simple policy statement. You’ll notice that we generally refer to other documents where appropriate (for example, our “Server Functions.docx” document covers a lot of material, and “Tech Guide.docx” covers much of the rest) or we reference how we address the STIG checklist item directly in the table. The key takeaway here? Be sure you can defend your hardening approach to your local IAM!
| STIG Checklist Item | Addressed How? |
| GEN007740-ESXI5-000118 | IPv6 explicitly disabled on each ESXi host |
| GEN007700-ESXI5-000116 | IPv6 explicitly disabled on each ESXi host |
| GEN000240-ESXI5-000058 | NTP servers set as documented in Server Functions.docx |
| GEN000100-ESXI5-000062 | ESXi servers patched as documented in this Guide. |
| GEN008680-ESXI5-000056 | Removable media not used for booting ESXi hosts except for initial install or major upgrade. Disabled within BIOS. |
| GEN001375-ESXI5-000086 | At least 2 name servers used as documented in Server Functions.docx. |
| ESXI5-VMNET-000024 | Management network separated from VM network as documented in Tech Guide.docx. |
| ESXI5-VMNET-000023 | Management network separated from VM network as documented in Tech Guide.docx. |
| SRG-OS-000231-ESXI5 | Remote connections set as required within Tech Guide.docx. |
| SRG-OS-000152-ESXI5 | Host-based boundaries set as required within Tech Guide.docx. |
| SRG-OS-000145-ESXI5 | Default router set as required within Tech Guide.docx. |
| SRG-OS-000132 | Management traffic is set to VLAN 210 (Tech Guide.docx) |
| SRG-OS-000109-ESXI5 | Special note about root login access via SSH given with Tech Guide.docx. |
| SRG-OS-99999-ESXI5-000138 | Special note about enabling SSH access given with Tech Guide.docx. |
| SRG-OS-000090-ESXI5 | Addressed within Tech Guide.docx during ESXi host setup. |
| SRG-OS-000092-ESXI5 | Lockdown mode addressed via policy within Tech Guide.docx. |
| GEN008600-ESXI5-000050 | Addressed within Tech Guide.docx during ESXi host setup. |
| SRG-OS-000056-ESXI5 | Time servers are local to enclave, tied to DoD timeservers. See Tech Guide.docx. |
| SRG-OS-000080-ESXI5 | BIOS passwords are set as specified in Tech Guide.docx. |
| GEN008640-ESXI5-000055 | BIOS bootloader set as specified in Tech Guide.docx. |
| GEN005460-ESXI5-000060 | SYSLOG is set for each ESXi host as specified in Tech Guide.docx. |
| GEN005440-ESXI5-000078 | Same steps as for GEN005460-ESXI5-000060. |
| GEN008460-ESXI5-000121 | Disable USB devices within BIOS as specified in Tech Guide.docx. |
| GEN008480-ESXI5-000122 | Same steps as for GEN008460-ESXI5-000121. |
| GEN008500-ESXI5-000123 | Firewire disabled within BIOS as specified in Tech Guide.docx. |
| SRG-OS-99999-ESXI5-000139 | Setup CIM access as specified in Tech Guide.docx. |
| SRG-OS-99999-ESXI5-000141 | iSCSI access (software and hardware) must use bidirectional CHAP even on an isolated network – this is by policy. |
| SRG-OS-99999-ESXI5-000143 | Use SSL for Network File Copy within the vCenter Server (this is *not* applicable to individual ESXi hosts). |
| SRG-OS-99999-ESXI5-000145 | The default vpxuser user auto-password change is 30 days – leave this at that value. |
| SRG-OS-99999-ESXI5-000146 | Leave the vpxuser password length at default of 32. |
| SRG-OS-99999-ESXI5-000147 | Per policy: iSCSI access (software and hardware) must use unique CHAP authentication secrets for each host. |
| SRG-OS-99999-ESXI5-000150 | If fibre channel is used, setup LUN masking appropriately. |
| SRG-OS-99999-ESXI5-000151 | Set dvFilter masking appropriately based on whether a dvfilter-based network security appliance is in use. |
| SRG-OS-99999-ESXI5-000160 | Policy is to use vSphere Authentication Proxy when an Active Directory domain is used. |
| SRG-OS-99999-ESXI5-000161 | When deleting VMDK files, the policy is to use either vmkfstools –writezeroes |
| ESXI5-VMNET-000001 | Fully document the use of all VLAN IDs |
| ESXI5-VMNET-000002 | All private VLAN IDs must be documented. |
| ESXI5-VMNET-000003 | All virtual switches must have a clear network label and documentation. |
| ESXI5-VMNET-000004 | Virtual switch VLAN IDs must be fully documented and only required VLANs used. |
| ESXI5-VMNET-000005 | All vSwitch / VLAN IDs must be fully documented. |
| ESXI5-VMNET-000006 | Isolate storage traffic to a dedicated physical adaptor. |
| ESXI5-VMNET-000036 | All IP-based storage traffic must be isolated to a management-only network using a dedicated, management-only vSwitch. |
| ESXI5-VMNET-000046 | All IP-based storage traffic must be isolated using a vSwitch containing management-only port groups. |
| ESXI5-VMNET-000007 | Only authorized administrators must have access to virtual networking components. |
| ESXI5-VMNET-000008 | All physical switch ports must be configured with spanning tree disabled. |
| ESXI5-VMNET-000009 | All port groups must be configured with a clear network label. |
| ESXI5-VMNET-000014 | Cannot be checked within script from ESXi host; all dvsPortgroups must be set not to be promiscuous. The default setting is secure. |
| ESXI5-VMNET-000015 | Cannot be checked within script from ESXi host; all dvsPortgroups must be set not to permit MAC address changes. The default setting is secure. |
| ESXI5-VMNET-000017 | Non-negotiate option to external switches cannot be verified from ESXi hosts. |
| ESXI5-VMNET-000020 | Unable to determine the number of VM NICs attached to a dvPortgroup from a single ESXi host; dvPortgroup usage must be analyzed based upon the vCenter Server settings. |
| ESXI5-VMNET-000021 | vMotion isolation cannot be determined from an ESXi host as vMotion can be enabled on dvSwitch. Policy is that vMotion traffic is always isolated. |
| ESXI5-VMNET-000025 | STP / Portfast settings on physical switches cannot be checked from ESXi host. Policy is that virtual machines that route or bridge traffic must have spanning tree protocol enabled and BPDU guard / Portfast disabled on upstream physical switch ports. |
| ESXI5-VMNET-000026 | VDS dvPortgroup auto-expand option cannot be determined from the ESXi host. Policy is that the system must disable the autoexpand option for VDS dvPortgroups. |
With policy STIG checklist items out of the way, let’s get onto auto-STIG scripts themselves.
ESXi 5.x Auto-STIG Scripts – Script Table of Content
This section describes the auto-STIG scripts created for hardening ESXi 5.x hosts. The scripts are portable to ESXi 5.0 and ESXi 5.x – which are *different* in key aspects. For example, persistent commands on ESXi 5.0 are stored in /etc/rc.local while ESXi 5.x uses /etc/rc.local.d/local.sh – so the hardening scripts must account for this difference.
- Get scripts from the designated archive folder; check with the System Administrator for your enclave.
- Copy the following shell script files to the ESXi host; this requires SSH to be enabled:
- ESXi_STIG.sh – Main script that applies STIG checklist items.
- ESXi_STIG_WeeklyTasks.sh – Driver script to setup weekly tasks such as checking for baseline changes.
- ESXi_STIG_WeeklyTasks_setgidCheck.sh – Support script: Verifies that group ID (“GID”) is set correctly.
- ESXi_STIG_WeeklyTasks_setuidCheck.sh – Support script: Verifies that user ID (“UID”) is set correctly.
- Run the ESXi_STIG.sh script and capture output. It identifies the STIG checklist ID as well as whether a change was required or not. Sample output from one command is shown for
SRG_OS_000069_ESXI5(“The system must require that passwords contain at least one uppercase alphabetic character.”):/STIG # esxi_stig_SRG_OS_000069_ESXI5 SRG-OS-000069-ESXI5...[ok]The results can be verified by reviewing the STIG checklist, in the example case it is that the
/etc/pam.d/passwdfile is properly updated. - On the vCenter Server, copy the following PowerShell files:
- ps_utils.ps1 – Utility program to setup PowerShell functions used by the auto-STIG scripts.
- esx_host_baseline.ps1 – Runs weekly tasks to verify that baseline ESXi files have not changed since the preceding check.
The next section details a typical auto-STIG script installation.
ESXi 5.x Auto-STIG Scripts – Typical Install Case
This section uses screenshots to guide the system administrator through an actual installation.
- Install the ESXi hypervisor. For our use case we configured HDS Blades to run ESXi 5.5 with all VMware service packs installed. We have already taken care of switch configurations to permit controlled access to the management interface, setup a root password, and applied IP addresses / hostnames as necessary.
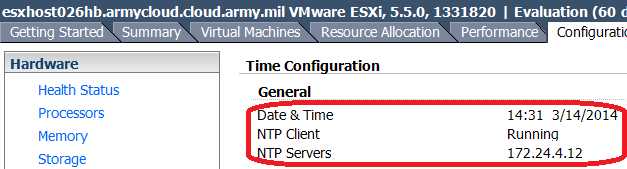
- Setup NTP Time Server. This is a STIG requirement but not one we do automatically. You have an NTP server you connect to, correct? (Hint: The proper answer is “Yes, Sir!”). Here’s a screenshot of NTP set correctly to an enclave-local time server:

- Enable SSH access. This is a common requirement; simply login to the Direct Console User Interface (DCUI) and select the Troubleshooting Options, then select to Enable SSH. See the screenshot:
- Copy the auto-STIG scripts. We used WinSCP; follow these substeps:
- Connect as root – this is an IA finding, but it will be corrected soon.
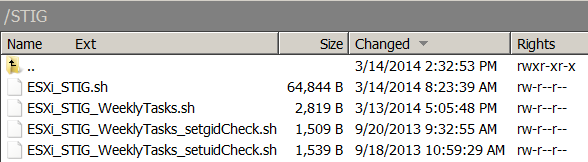
- Create the /STIG folder and copy the files. A screenshot is presented with the files in place.
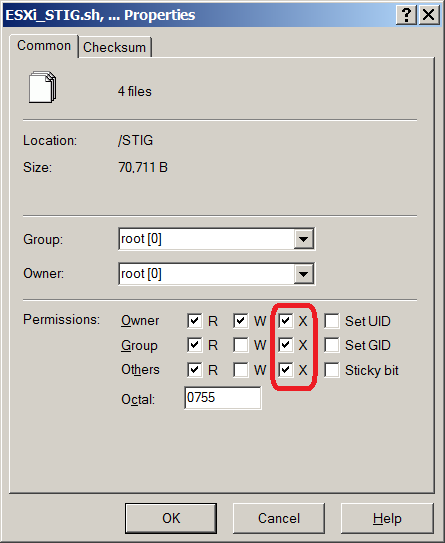
- Set the “Execute” bit for each copied file. Once again, this is detailed below:
- Connect using SSH Client. In our case we used the PuTTY client which you can find for download, but there are a lot of SSH clients available. Connect in as root and then follow these steps:
- Change to the
/STIGfolder. Use the command:
cd /STIG - Verify the
/STIGfolder contents. Check out the following command and output, which shows that the files are copied over and have the execute bit set as necessary./STIG # ls -la total 84 drwxr-xr-x 1 root root 512 Mar 14 13:58 . drwxr-xr-x 1 root root 512 Mar 14 13:59 .. -rwxr-xr-x 1 root root 64844 Mar 14 12:23 ESXi_STIG.sh -rwxr-xr-x 1 root root 2819 Mar 13 21:05 ESXi_STIG_WeeklyTasks.sh -rwxr-xr-x 1 root root 1509 Sep 20 13:32 ESXi_STIG_WeeklyTasks_setgidCheck.sh -rwxr-xr-x 1 root root 1539 Sep 18 14:59 ESXi_STIG_WeeklyTasks_setuidCheck.sh
- Change to the
- Run the Auto-STIG Scripts. Now we actually get to exercise the functions we’ve discussed:
- Load in the Auto-STIG Script Definitions. This is a two-step process. We first set a flag that we do *not* want the scripts to fire, then we “source” in the scripts:
/STIG # ESXI_STIG_DEFINE_ONLY=1 /STIG # source ./ESXi_STIG.sh - Setup ESXi Host Reboot Persistence. We have a special command to verify that our auto-STIG scripts survive ESXi host reboots properly. Let’s run it now with the output displayed:
/STIG # esxi_stig_auto_persist
Creating compressed file esxi_stig.tgz...
  ...STIG/ESXi_STIG.sh
  ...STIG/ESXi_STIG_WeeklyTasks.sh
  ...STIG/ESXi_STIG_WeeklyTasks_setgidCheck.sh
  ...STIG/ESXi_STIG_WeeklyTasks_setuidCheck.sh
Copying to /bootbank...
[Not modifying /bootbank/boot.cfg; this leads to boot failures...]
Setting up /etc/rc.local.d/local.sh-new to contain our startup commands...
Updating /etc/rc.local.d/local.sh...
This process does a lot of work on our behalf, including setting up the
/etc/rc.local.d/local.shfile to recreate our/STIGfolder and do any required work on a new ESXi host reboot. Let’s take a quick peek at what got created in/etc/rc.local.d/local.sh:
/STIG # cat /etc/rc.local.d/local.sh
#!/bin/sh

# local configuration options

# Note: modify at your own risk!  If you do/use anything in this
# script that is not part of a stable API (relying on files to be in
# specific places, specific tools, specific output, etc) there is a
# possibility you will end up with a broken system after patching or
# upgrading.  Changes are not supported unless under direction of
# VMware support.

# -- esxi_stig_auto_persist - BEGIN
l_pwd=$PWD # -- esxi_stig_auto_persist
echo ‘Uncompressing esxi_stig.tgz’ # -- esxi_stig_auto_persist
cd / # -- esxi_stig_auto_persist
tar -xzf /bootbank/esxi_stig.tgz # -- esxi_stig_auto_persist
if [ -d ‘/STIG’ -a -f ‘/STIG/ESXi_STIG.sh’ ]; then # -- esxi_stig_auto_persist
  echo ‘Setting banners...’ # -- esxi_stig_auto_persist
  cd /STIG # -- esxi_stig_auto_persist
  ESXI_STIG_DEFINE_ONLY=1 # -- esxi_stig_auto_persist
  . ESXi_STIG.sh # -- esxi_stig_auto_persist
  esxi_stig_SRG_OS_000023_ESXI5 # -- esxi_stig_auto_persist
  unset ESXI_STIG_DEFINE_ONLY # -- esxi_stig_auto_persist
else # -- esxi_stig_auto_persist
  echo ‘Unable to uncompress /bootbank/esxi_stig.tgz...check logs’ # -- esxi_stig_auto_persist
fi # -- esxi_stig_auto_persist
cd $l_pwd # -- esxi_stig_auto_persist
# -- esxi_stig_auto_persist - END
exit 0
We’ve marked the changes we made with italics. Note that each line has a "tag" associated with it (the "
-- esxi_stig_auto_persist" on each line). This allows us to identify the changes we made and update the file *in-place* if we need to re-run the auto-STIG scripts. Basically, what these commands do are first to look for the compressed ESXi STIG archive, uncompress it, then re-run the specialesxi_stig_SRG_OS_000023_ESXI5script to ensure that all banners are updated correctly for the ESXi host. It’s a lot of steps, but it works well 🙂 - Apply the STIG checklist items. This is the money shot and the goal of our hard work. We get lots of STIG checklist items completed with a status for each one. Let’s take a look:
/STIG # unset ESXI_STIG_DEFINE_ONLY
/STIG # ./ESXi_STIG.sh
GEN002420-ESXI5-00878...[n/a]
GEN002430-ESXI5...[n/a]
GEN003510-ESXI5-006660...Fixed!
GEN005300-ESXI5-000099...[ok]
SRG-OS-000112-ESXI5...Updating /etc/ssh/ssh_config...Fixed!

[...output cut...]

GEN007700-ESXI5-000116...ESXi host reboot necessary...Fixed!

[...output cut...]

GEN000945-ESXI5-000333...[ok]
SRG-OS-000152-ESXI5...Disable ‘All IPs’: CIMHttpServer,CIMHttpsServer,CIMSLP,sshServer,vSphereClient,webAccess...[ERROR!]
We cut a lot of the output, but there’s enough left for you to get the idea. If we could fix something, we did. If we couldn’t (such as
SRG-OS-000152-ESXI5, which has to do with firewall rules) then we output the problems we found and indicate that it’s an error. If we performed a fix that requires an ESXi host reboot (such asGEN007700-ESXI5-000116, which disables IPv6 support) then we tell you. - Setup weekly tasks. Our scripts do even more - some of the STIG checklist items require the system administrator to maintain ESXi host baselines so that any unauthorized file changes can be detected. We handle this by creating, persisting, and automatically-executing scheduled tasks to perform these baselines. Let’s see what we do:
/STIG # source ./ESXi_STIG_WeeklyTasks.sh
/STIG # esxi_stig_weekly_setup
Adding: /STIG/ESXi_STIG_WeeklyTasks_setuidCheck.sh
Killing cron with pid 33750...
Restarting cron...
Adding to /etc/rc.local.d/local.sh...
Adding: /STIG/ESXi_STIG_WeeklyTasks_setgidCheck.sh
Killing cron with pid 39833...
Restarting cron...
Adding to /etc/rc.local.d/local.sh...
Now...we don’t *do* anything with these baselines or if we detect a baseline change - that’s something that falls to you as the system administrator. However, you can simply check the contents of the
/var/log/setgidand the/var/log/setuidfolders from a vCenter Server script to take action if a failure is detected. Also, take a look at the output from how we write to the cron file for root:/STIG # cat /var/spool/cron/crontabs/root #min hour day mon dow command 1 1 * * * /sbin/tmpwatch.py 1 * * * * /sbin/auto-backup.sh 0 * * * * /usr/lib/vmware/vmksummary/log-heartbeat.py */5 * * * * /sbin/hostd-probe ++group=host/vim/vmvisor/hostd-probe # Fri Mar 14 18:56:23 UTC 2014 : added by esxi_stig_weekly_setupcron 5 8 * * 6 /STIG/ESXi_STIG_WeeklyTasks_setuidCheck.sh # Fri Mar 14 18:56:25 UTC 2014 : added by esxi_stig_weekly_setupcron 7 8 * * 6 /STIG/ESXi_STIG_WeeklyTasks_setgidCheck.shSee how we added the two tasks and identified our work? Once again, this allows us to detect whether we’ve already performed our work if the scripts must be run again.
- Make sure changes are stored persistently. Our scripts go to a lot of trouble to run the
/sbin/auto-backup.shscript when necessary. However, it does *not* hurt to run it again manually! Let’s do that now:/STIG # /sbin/auto-backup.sh --- /etc/ssh/sshd_config +++ /tmp/auto-backup.38889//etc/ssh/sshd_config @@ -59,7 +59,6 @@ # SRG-OS-000027-ESXI5 MaxSessions 1 # SRG-OS-000109-ESXI5 +PermitRootLogin yes # SRG-OS-000250-ESXI5 Macs hmac-sha1 -# SRG-OS-000109-ESXI5 -PermitRootLogin no Saving current state in /bootbank Clock updated. Time: 19:58:23 Date: 03/14/2014 UTCDo you see what we do? There were some unsaved changes...and now we know - for sure - that all of our changes are saved persistently.
- Load in the Auto-STIG Script Definitions. This is a two-step process. We first set a flag that we do *not* want the scripts to fire, then we “source” in the scripts:
At this point we are done - we have our STIG checks performed, and our ESXi host is patiently waiting for us to reboot it (due to the IPv6 change). So let’s do the reboot and quickly verify that we continue to have all of our files in place. Upon the reboot you’ll notice lots of changes already:
- You can’t login to the DCUI.
- You can’t login via SSH.
Now you can "fix" the DCUI login by enabling DCUI access (although this is a STIG finding). However, even if you enable SSH access...you won’t be able to login 🙂 That’s right, we disabled root access to SSH so you’d have to create a local user and give it permissions in the root group. That’s the price of security with ESXi 5.x.
Happy computing!
Team-oriented systems mentor with deep knowledge of numerous software methodologies, technologies, languages, and operating systems. Excited about turning emerging technology into working production-ready systems. Focused on moving software teams to a higher level of world-class application development. Specialties:Software analysis and development...Product management through the entire lifecycle...Discrete product integration specialist!
This appears to be very awesome and I can’t believe the work that went into this. Very impressive. I am however having a problem right at the beginning. When I run “/STIG # source ./ESXi_STIG.sh” I get “-sh: source: can’t open ./ESXi_STIG.sh”
I am on ESXi 5.0, and I am not sure if that requires me to run the script differently as I know you mentioned that the persistent commands are in a different location.
Again, if this works out, it’s incredible.
The good news is that (using the latest scripts) I have successfully STIG’ed many 5.0 and 5.x ESXi hosts. Don’t get me wrong…even with the scripts there’s still plenty to do to get the hosts to pass the IAM! But the scripts are a start.
Thanks, appreciate the comments!
Well, I was able to overcome that but now I get a “line 202: syntax error: Bad substitution”.
Hi Michael – Just saw your nice comments. Thanks for trying it out…yup, I uploaded the wrong zip file with the 5.x version but without the 5.0 hacks. Here’s the problem: line 202 has the following:
if [ "${l_perms:1:1}" = "r" ]; then l_p1=$(expr $l_p1 + 4); fiThat works fine under ESXi 5.x but *not* under ESXi 5.0 because the bash expression syntax to extract the first character (length 1) from the
l_permsargument is not supported.Here’s my fix:
if echo $l_perms | grep -e "^.r........" >/dev/null 2>&1; then l_p1=$(expr $l_p1 + 4); fiIt could be cleaner with either Perl or awk but it’s pretty straightforward. If you take a look at the output from
ls -layou’ll see it’s in format as follows:So I take the first column (up through the first space) using a
cutcommand and feed it to my routine. With the change I made to usegrepto look for individual characters then all now works on both ESXi 5.0 and 5.x.Thanks for the catch and for trying out the system! I’m updating the link to use the correct file.
I’m getting stuck on the esxi_stig_auto_persist command as well. I’m getting “not found”
I’m running ESXi 5.0 Update 3
Hi Dave – the script
esxi_stig_auto_persistisn’t in theESXi_STIG.shscript in the ZIP file–my bad. I’ve put a link to the script text at the top of the article, and I’ll update the ZIP file properly when I get the chance. Thanks for your help!Hi Andrew, great work on these! Do you plan on putting this work on github? Also, do you know of a way to remediate V-39296 SRG-OS-99999-ESXI5-000137 for disabling the MOB service via PowerCLI? From what I can see, it is only accessible from the ESXi shell.
Thanks so much, Paul! I hadn’t thought about github or sourceforge but that’s definitely a good idea. I will look up the MOB service and get back to you…but thanks again for taking the time to review the article and to share with me!
No problem! You did a great deed here by making this information public. DISA and VMware are behind the curve for not doing this for government contractors. I’m surprised by the disconnect I read in the remediation fixes listed in the STIG checklists and the recommended automation from VMware. For example:
The DISA STIGS require a lot of modifications to the VMX files of the VM guests: http://www.stigviewer.com/check/V-39453
Their recommended fix is to manually edit the VMX file for each guest machine. VMware, however, has PowerCLI and vCLI sample scripts for accomplishing the same action: http://blogs.vmware.com/vsphere/2012/06/automate-the-hardening-of-your-virtual-machine-vmx-configurations.html
Why doesn’t VMware just create DISA hardening scripts, or why doesn’t DISA use better practices to prescribe the fixes to their systems? It’s really annoying how disjoint the entire ecosystem is despite the importance of VMware in defense.
An opensource repo of scripts and processes for hardening would be great for the VMware community. Let me know if I can help!
Hey Bruce, I actually stumbled upon someone else’s project to automate ESXi remediation: https://software.forge.mil/sf/projects/esxi-stig-toolset
This is hosted on a special DISA website that requires CAC to access any of the repos. The original author announced here his intention: http://www.vmfieldtips.com/2014/01/20/esxi-stig-toolset-announcement/
The automation is going to use a community developed VIB to apply the remediations. Sounds turn key!
Ran your 6/4/2014 script. Had some errors but the script completed. Now I have no access to my server and all of my dvportgroups still show autoexpand enabled and I cannot ssh or gain shell access.
I guess I have to reinstall and re-stig manually then continue with cloning my esxi hosts from a stig’ed gold master.
Yes, you must go in from the console and modify /etc/ssh/sshd_config if you want to permit root login. The script disables root login.
Thanks,
Andy
Hello,
Thank you for this awesome tool. The process was going fine for me until I got to the “source ./ESXi_STIG_WeeklyTasks.sh” command. My result is “not found_STIG_WeeklyTasks.sh: md5sum” I am running ESXi 5.5. Any ideas? I am still researching as well.
Probably a little too late….
run this:
vi ESXi_STIG_WeeklyTasks.sh
and check the ending charecters of each line. if you see ^M at the end of each line you have carry return charecters in the file and they will need to be remove. Exit vi by :q!
fix is pretty easy:
run this:
sed ‘s/.$//’ new-filename.sh1
You cannot overwrite the source file. Simply delete original(or rename) and rename the new file to match the original. In my case, all the original weekly task scrips had carry returns in them.
caution with the above command, it removes the last character from the end of each line so running it twice will remove another character.
Editor did not write the command correctly. it omitted the greater then and less then signs.
Go here and look at the update towards the bottom
http://technodrone.blogspot.com/2012/03/removing-m-characters-from-files-in.html
The is a life saver. I am struggle to do the same thing with my environment. Thank you for the awesome script.
Hi Paul / Andrew, I’m the one that started that Forge.mil project and write the vmfieldtips.com blog. Great stuff here Andrew, love it. Feel free to join the Forge.mil project and add your stuff to it. My goal there is to do what we in DoD do not do well, share! I’m in the GAL if you need additional.
Eric – Going through the Forge post now. Excellent work by all parties involved. I’m getting ready to go through the script now. Who would have thought there would actually be collaboration efforts within the DoD???
Andrew,
Great script! Definitely a time saver. I look forward to a coordinated effort with Forge.mil project.
Again, thanks for sharing.
What is the best approach to undo one of the settings in the script? In our case, we need SSH service running even though the STIG calls for it to be disabled. We’ve tried modifying the script so when it calls “esxi_stig_service_setup” we pass the value of 1 but the SSH service is still being disabled every 15 minutes.
Thanks in advance – great script overall.
Hi David – First off…running with a one (numeric ‘1’ option) doesn’t do anything at all beyond sourcing in the functions. The idea being, you can source in the big shell script, then execute specific hardening functions. That option won’t prevent the SSH daemon from being stopped.
Now…to answer why the SSH daemon is stopped and what you can do about it. First, look at line 1499 of the script:
The
esxi_stig_service_setupfunction is a wrapper that invokes the real worker functionesxi_stig_chkconfig_op. ESXi uses RHEL-type service startup options via thechkconfigcommand. Ultimately, running the script results in:NB: That’s not a typo; ESXi uses
SSHfor the service name.To disable this check, you could simply comment out line 499. Cheers!
Looks like he’s hitting ESXiShellTimeout, not a service stop from the above mentioned check, but a service stop from the ESXiShellTimeout value being set. Hitting the STIG required 900 seconds would stop Shell and SSH, but not disconnect existing connections if established. He would need to not only bypass the SSH service stop, but also turn the timeout from 900 down to 0 in order for it to remain on indefinitely.
Just my opinion.
Yes, Eric, you are absolutely right. The 15 minute timeout is one I should have remembered and is a good call. I simply worked around it by enabling SSH from the vCenter UI. If you don’t have a local user for SSH login you also must enable DCUI and login from the *console*, then modify /etc/ssh/sshd_config to permit root login (which is another STIG finding).
Thanks!
Nice job Andy. I’ve been working on implementing these stigs and this looks to potentially save me a lot of time and work. I need a little help though if possible, for some reason the ssh_config isn’t persisting across restarts. Is there something special that you can think of that I have to do to make this stick. The banner persists through the modifications the persistence script makes to the rc.local but the etc/ssh does not. Also I got an error on line 1632 too many on the shifts, it appears by removing one shift on line 1621 it took care of the issue. I’m running 5.0u3
Do you have a list of the items in the script and their correlation to the STIG list? We’d like to go down the list and see exactly what the script modifies.
Best is to look at the script – I was careful to label all check functions with the relevant STIG IDs. Cheers!
Hello Andrew,
First I want to say, Thank you! for providing us with such an amazing product. It really is a time saver and stress reliever. I can tell you put alot of work into this product. From the comments in the scripts to the step by step instructions it’s top notch work.
I am having a problem with one script though. when I try to run the “source ./ESXi_STIG_WeeklyTasks.sh” I get an exception:
: not found_STIG_WeeklyTasks.sh: md5sum
-sh: return: line 15: Illegal number: 127
Any help would be appricated. Thank you again!
Hi Ivory – The problem is that md5sum is not valid on the host where you’re running the script.
I just checked on an ESXi5.5 host I’m running at work and md5sum is there – are you running on an ESXi5.0 host?
You can try running the whole command directly on your ESXi host to verify it all works:
find /dev -type c -name "*" | awk '{print $1}' | sort | md5sumGood luck, thanks for writing to me!
Hello! Great work here to help out us USAF folks with automating STIG fix actions and enforcement. I’m running your script for the 1st time on a 5.5 ESXi server running HP Customized Image ESXi 5.5.0 Update 2 version 5.77.3 released on November 2014 and based on ESXi 5.5.0 Update 2 Vmkernel Release Build 2068190.
While running the ./ESXi_STIG.sh i’m getting a couple errors.
The 1st error in the module for GEN001375 that shows the following on the output which should have reported OK since we already populated two entries as the STIG requires:
GEN001375-ESXI5-000086…Must have 2 DNSServers (xxx.xx.xx.12, xxx.xx.xxx.13)…[ERROR!]
Secondly, at line 1958 that is basically at the end of your script.
GEN000945-ESXI5-000333…[ok]
SRG-OS-000152-ESXI5…Disable ‘All IPs’: CIMHttpServer,CIMHttpsServer,CIMSLP./ESXi_STIG.sh: line 1958: /etc/init.d/iked: not found
,snmp,sshServer,vSphereClient,webAccess…[ERROR!]
Please advise if there are any newer updates or fixes that could be cleaned up. Again a huge thanks for saving numerous hours of manual work.
Hi Aaron – try running this command for DNS check:
esxcli network ip dns server list | grep DNSServers | sed -e 's/.*DNSServers: \(.*\)/\1/'I take the output and run it through
grep -e '[0-9]\+\.[0-9]\+\.[0-9]\+\.[0-9], [0-9]\+\.[0-9]\+\.[0-9]\+\.[0-9]\+'so it could just be that there’s no space between the 2 DNS server IPs?As for
SRG-OS-000152-ESXI5– that whole section of code is dodgy. I couldn’t find a better way to identify firewall rules but I think the procedure needs to be rewritten.Hey Andrew – I also got the exact same error as Ivory.
Running the whole command directly on the ESXi host as suggested to verify the md5sum worked as prescribed. Perhaps an update is needed for this portion.
Again I’m testing this script out on a 5.5 ESXi server running HP Customized Image ESXi 5.5.0 Update 2 version 5.77.3 released on November 2014. I can provide the md5sum if necessary that successfully output as well.
Discovered the issue. Looks like whenever you added the file to the .zip file it added the erroneous ^M to the end of every line in the ESXi_STIG_WeeklyTasks.sh contents. This can happen when copying or modifying files in windwos to Linux. Hope this helps and the contents of the zip file can be updated. Cheers!
Wow! Thank you for checking that out…I’ll update the article to make a note of this. What a great catch you made!
Andrew,
Regarding SRG-OS-000023-ESXI5 the STIG check content calls for the SSHD banner file in /etc/issue yet in your wonderful script it stops short of this accomplishment by only inputting the required DoD logon banner contents into the /etc/banner. Therefore, the STIG finding would be positive and a finding. An easy fix is to simply copy the final contents of /etc/banner into /etc/issue
# cat /etc/banner > /etc/issue
However I believe you will need to also update the persistence as well.
You are correct – do you mind updating the script and shooting it to me? I’ll update the link in the post with full credit to you (of course).
I’m doing almost all OpenStack / KVM lately and I don’t even have a proper vSphere (just a few random ESXi 5.5 hosts). So it’s harder for me to test ESXi changes…Thanks, Aaron!!
Thank you for replying!
I am running the script on an fresh install of HP’s ESXi 5.5 update 2 host. When I run the command you give me, I get what looks like a md5 hash and then a “-” at the end with nothing after it. I still get the error when trying to source the weekly tasks script though. Thanks for taking the time to help me out! I really appreciate it!
Hi Ivory – I think this is a line ending problem. I’m looking at my script and I don’t even use the function
esxi_stig_weekly_md5sum_dev. I’d say comment it out, but the error you’re getting looks like it’s a general shell script parse problem. You can try runningunix2doson a different system to convert the shell script. I’ll take a look at it when I can (lots going on now…) Thanks for trying out the scripts!I ran your script and it looks to be completed because I back at a prompt however, I am greeted with an Error that says…
ESXI-VMNET-000010 …../ESXi_STIG.sh: shift: line 1632: can’t shift that many
and then the script stops….Not sure if this is the end or an error that stopped it.
I am running ESX 5.0 Update 2.
P.S. Finding this has become a LIFESAVER!!!
I’ll take a look at it as soon as I get a breather 🙂 Thanks for the comments!
Hello Andrew and Fellow Readers,
First, thanks for this script. I’m new to the DoD security requirements and working with STIGs. It’s been quite challenging.
I’m setting up a new ESXi 5.5 host, ran this script and couldn’t SSH back even with accounts other than root. I get access denied. I’m going through the STIGs to see which group I need to allow for SSH but it’s been slow going as I’m also working on other projects and day-to-day support issues.
I can still log on at the console because I remmed that line out. Basically, I want to secure my ESXi hosts but leave enabled SSH, shell and console access…or at least understand how I can enable them as needed.
Thanks,
Greg
Hello,
Thanks for the script. I’m new to the DoD environment and applying STIGs. It’s been very challenging, especially with ESXi as my Linux experience is limited.
I applied the script but then could not SSH back into the server even with accounts other than root. I can access the console\DCUI because I remarked out the section that disables it.
I’m going through the STIG items to see which item disables SSH and attempt to change it. Can you advise on how I can lock down ESXi hosts yet still be able to SSH and log on at console when needed.
Thanks,
Greg
Has this been updated to work for v6 yet?
No, I haven’t been on the STIG checklist in quite a long time. Interested to see how it will work!
Thanks for this! It’s going to be a lifesaver! Has this script been updated to include the January 2015 release of the DISA STIG? Thanks again Andrew!
Sorry Chris – I have not updated the STIG in a long time. I need to put this thing on Github and see if it can become the standard (it’s – by total accident on my part – apparently useful to the community!)
Will this script produce a checklist?
Unfortunately, it just prints out the STIG items with “OK” or not. An exported CSV would be awesome…I’m just swamped (which is why no posts from me in, like, 4 months!!) Not that I’m not working all the time, just not formatting / writing 🙁
Andrew,
I ran the script and it appears to have work great, except it is not setting up the login banner (DOD). Any ideas?
Thank very much Andrew all the time and work you put into this script!! I ran the script and now I’m unable to SSH into the standalone ESXi Host. I check my user permissions and start back up the SSH service. But still not working. I’m still working through each STIG to see what to modify to allow SSH access again. Thank you again.
A bit late, but since no-one responded, I will for others. it is most likely the “allowgroups root” that is causing the problem. The STIG that requires this was removed since this program was written. This is keeping AD integrated users from logging in as well as any local users that are not explicitly set to be members of the root group.
Does anyone know if these changes work with a host profile? I.e. run the script on the first host and then Host Profile the rest? do the changes made by the script stick with the host profiles?
Just curious – didn’t see that in any discussions.