VMware dvSwitches and Port Mirroring
When debugging a network problem, the first one wants to do is to…get the packets! In the past watching network traffic in real-time required either “promiscuous” mode network cards (NICs) or using hardware-based “port mirroring” on physical switches. Read below for a quick primer on port mirroring using VMware distributed virtual switches!
What’s the Problem?
Lots of times you will find that debugging a problem requires looking at the actual network traffic. For example, debugging Kerberos issues almost always devolves into checking packets to see the negotiation between the supplicant and the Key Distribution Center (KDC) on acquisition of the Ticket Granting Ticket (TGT) as well as the Service Ticket (ST). And while Microsoft does offer some level of “verbose” Kerberos debug logging to the Windows Event Log (see How to enable Kerberos event logging by Microsoft for an example), at the end of the day to see the actual negotiation you *must* resort to packet tracing.
vSphere to the Rescue!
It is certainly possible to trace network traffic using either switch-specific commands such as Utilizing the New Packet Capture for Cisco switches; or, alternatively to put a NIC into “promiscuous” mode to capture traffic sent at the broadcast domain (Layer 2 / VLAN level). However, what about traffic that is entirely within a given physical ESXi host? In that case, the network traffic never actually leaves the ESXi hypervisor on that host but instead is directly delivered to the target machine. Thus, classic network trace approaches fail.
But all is not lost! VMware has the ability to support packet capture directly between any two VMs connected by a distributed virtual switch (I call these a dvSwitch; others call these a vdSwitch but we mean the same thing). In this case – regardless of whether the VMs are on the same physical ESXi host or completely different hosts makes no difference. The traffic always traverses the dvSwitch so vSphere can track it.
In the next sections we walk through setting up a port mirroring session using real VMs and a real dvSwitch – let’s get started!
Port Mirroring – VMware dvSwitch Configuration
The VMware documents the port mirror setup process (especially the vSphere 5.1 Networking Guide). In this section, we simply cover the steps as we went through them in our environment.
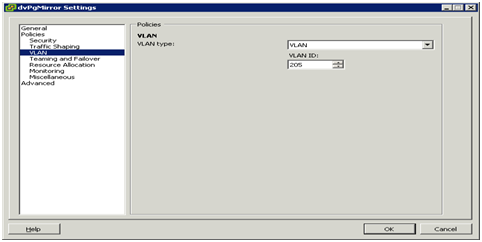
- Assign a “Mirroring VLAN”. This will be a VLAN that exists just to transmit captured traffic to a destination VM. In our example, we selected VLAN 205 but you can select any available (unused) VLAN. As with any VLAN, be sure that you understand the impact on upstream physical switches! For example, if you have a physical switch connecting two ESXi hosts each of which is part of a dvSwitch you must be ensure that you have properly “trunked” the switchport to allow this VLAN to traverse. On a Cisco switch, this might be a command like
switchport trunk allowed vlan 205. - Create a new portgroup (we named ours
dvPgMirror) to use the assigned mirroring VLAN (205). This portgroup must be associated with an distributed virtual uplink (dvUplink) that is connected to a physical switchport trunked to allow that VLAN. Our environment used what we call our “standard” dvUplink (which shares traffic with a number of other VLANs. See shot below:

-
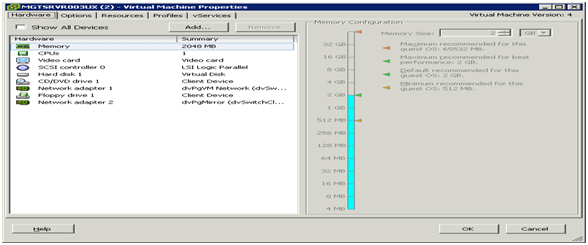
Assign dvPgMirror to a VM that has a network monitor installed. The following shot shows it assigned to VM named MGTSRVR003UX:
-
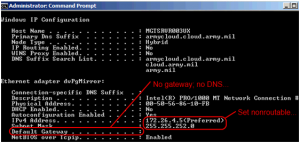
Within the running VM (still MGTSRVR003UX in our example), perform any network-specific configuration. In the following shot, the VM has had the adapter renamed to
dvPgMirrorto make it obvious that it is the port mirror adapter. The adapter has also had a nonroutable IP address assigned…there is neither gateway nor DNS set:
- Install appropriate packet capturing software. For this use case, we fell back on old’n’reliable Network Monitor (see this Microsoft download site for a free download link). Depending upon your guest OS, you could use different tools…as long as the tool can capture network traffic, you’re golden.

This completes the port mirroring setup for a dvSwitch. Next…let’s start using that puppy and tracing some traffic!
Execute Port Mirroring on VMware dvSwitches
Follow along with us in these steps to see how an administrator can perform a port mirroring session.
-
Ensure mirror portgroup networking is configured. Basically – be sure you have the basic
dvPgMirrorportgroup created, assigned the correct “mirror VLAN” (205 for us), and that a VM has thedvPgMirrorportgroup assigned to it. In short…the previous section :)and that the related NIC is configured – these steps are all documented in the Tech Guide. (Note that the VM should have appropriate packet capture software such as Network Monitor 3.4 already installed.) -
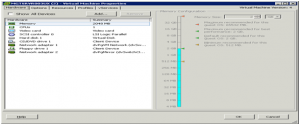
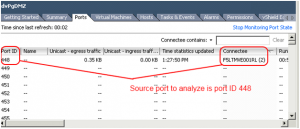
Determine the source port. The source port is the port to analyze. For this example session, we are analyzing traffic on the our F5 Load Balancer through what we’ve labeld our “DMZ subnet”. This subnet has its own portgroup (
dvPgDMZ) connected to the same dvSwitch as thedvPgMirrorportgroup. Within the standalone vSphere Client, we navigated to Home -> Inventory -> Networking, expanded the dvSwitch (dvSwitchCloud), and then selected the DMZ portgroup (dvPgDMZ). Finally, we located the connected F5 virtual machine as shown below and identified that the source port is 448:
-
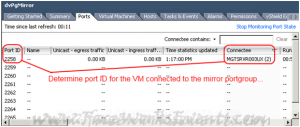
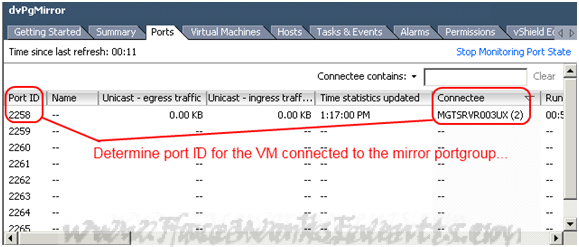
Determine the destination “mirror†port. Open the vCenter and navigate to Home -> Inventory -> Networking, then expand the dvSwitch (dvSwitchCloud), and then select the mirror portgroup (
dvPgMirror). Determine the VM connected to the mirror port as shown below (MGTSRVR003UX is the VM connected to thedvPgMirrorportgroup in this example). In the following example, destination port ID 2258 is identified:
-
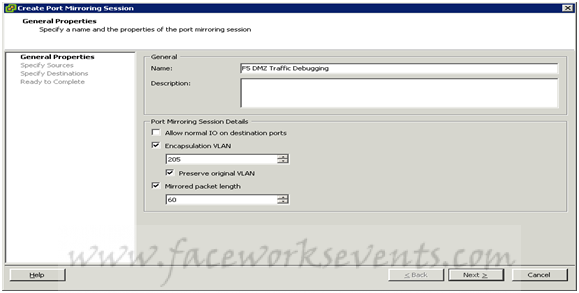
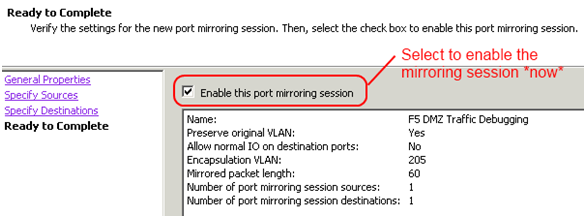
Create a port mirroring session. Right-click on the dvSwitch name (dvSwitchCloud in this example) and select Properties. Then from the Port Mirroring tab, use the “Create Port Mirroring Session†option. In the first screen enter the descriptive name for the session and be sure to select VLAN encapsulation as the captured packets must be tagged to meet the
dvPgMirrorportgroup VLAN requirements (VLAN 205). Also, to minimize performance impact, the “Mirrored packet length†option can be enabled to limit the number of bytes captured (60 bytes in the following screenshot):
 On the next screen, enter the source port(s). For this example, it’s the single port 448 identified from the F5 DMZ portgroup. Note that traffic can be captured based in ingress, egress, or ingress / egress combination:
 Finally, select whether to enable the mirroring session as shown below:


That’s it…we have our mirroring session setup. Next, we want to verify it’s working by capturing some traffic.
Verify Port Mirroring Works – Let’s Capture Traffic!
If you’ve gotten here, congrats! You are just about ready to reap the fruits of your labor by seein’ some traffic flow. Follow these steps along with us:
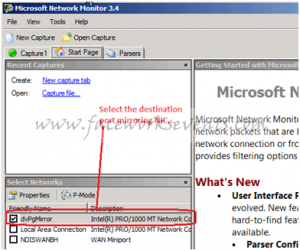
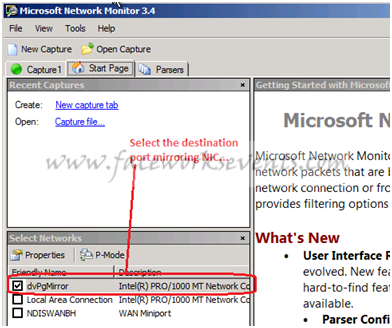
- On the port mirroring destination (the VM with dvPgMirror portgroup, port 2258) open Network Monitor (or other sniffing tool). Remember that for us this is the MGTSRVR003UX server.
-
Start a session on the destination port mirror NIC (the one labeled “dvPgMirror†below):
-
Within the session, put in any required filters. The below filter captures traffic initiated or returned from IP 172.24.4.52 (note that this is *not* the IP of the NIC on the VM running Network Monitor; it is an IP from another unrelated VM):
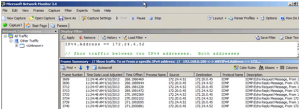

And – hey presto – it works! I ran some ping commands to hit my F5 load balancer box from the 172.24.4.52 VM, and all the traffic was captured and *redirected* to my network monitor box.
Sweet! Hope you enjoyed this as much as we did, let me know if it helped.
Team-oriented systems mentor with deep knowledge of numerous software methodologies, technologies, languages, and operating systems. Excited about turning emerging technology into working production-ready systems. Focused on moving software teams to a higher level of world-class application development. Specialties:Software analysis and development...Product management through the entire lifecycle...Discrete product integration specialist!
Leave a Reply