Maximize NetApp FAS2240 Disk Space
Sometimes raw disk space trumps all else – especially in the smaller environment where disks are at a premium and consumers are actively waiting. This article describes how to use the NetApp FAS2240 to maximize disk space while still providing acceptable resilience.
The Update!
Thanks to some great responses from this NetApp Administrators feedback on LinkedIn.com I have even a bit more space 🙂 Now have 14.4TB of usable space by using the following approach:
- One aggregate per filer: the 12 Tier2 10K disks on one, and the 24 Tier1 15K disks on the other
- The 12 Tier2 10K disks in a RAID-DP with one hot spare (9 disks usable)
- The 24 Tier1 15K disks in a RAID-DP with one hot spare (21 disks usable)
- Add the above…30 disks! At 0.48TB per disk, that’s 14.4TB
The above relies on the fact that – in fact – it’s not necessary to have separate aggregates for boot *and* for data – just have a single aggregate containing both.
The steps on migrating the boot volumes are below…read on for the gory details and you too can up your disk space in the smaller deployments with very low risk. Just make sure you keep that maintenance current 🙂
Thanks again to the NetApp Admins LinkedIn.com Group for all the feedback and guidance! Online collaboration is awesome…
The Storage Problem
As part of a small virtualization project we had a problem: a single NetApp FAS2240 with a total of 36 disks: 12 in the FAS2240 controller module (2.5″ 600GB 10K/RPM) and a 4U disk shelf with 24 HDDs (3.5″ 600GB 15K/RPM). The array had been created using typical best practices:
- Filer 1:
aggr0 / vol0created using RAID-DP with 6 six disks (1 hot spare) - Filer 2:
aggr0 / vol0created using RAID-DP with 6 six disks (1 hot spare) - Remaining 24 disks were allocated as a single
aggr1which was initially owned by Filer 1 but (under failover) could be managed / presented by Filer2.
Under the covers, the 24-disk aggr1 consisted of *two* 16-disk “raid groups.” Each “raid group” supported RAID-DP with a hot spare. Of course, the math appears not to add up; remember that an aggregate’s “raid group” size is 16 by default (the -r option for aggr create). Thus, adding 24 disks to an aggregate results in two separate raid groups – one of 16 and one of 8.
The above is all pretty standard and ensures that not only can the FAS2240 withstand up to 2 disk failures from any aggregate (via RAID-DP) but also that the primary data aggregate aggr1 had 4 hot spares associated with it. Unless the entire shelf failed, this FAS2240 was setup to run forever (given the occasional disk replacement).
Cursing the Darkness: Turning 17.28TB of storage into 10.56TB!
But there is an obvious downside to the above: available disk space. Specifically, the theoretical “safe” maximum of 17.8TB somehow gets shrunk to 10.56TB usable space! To start, let’s take a look at aggr0 from one of the filers:
FAS2240002SX*> sysconfig -r
Aggregate aggr0 (online, raid_dp) (block checksums)
  Plex /aggr0/plex0 (online, normal, active)
    RAID group /aggr0/plex0/rg0 (normal, block checksums)

      RAID Disk Device          HA  SHELF BAY CHAN Pool Type  RPM  Used (MB/blks)    Phys (MB/blks)
      --------- ------          ------------- ---- ---- ---- ----- --------------    --------------
      dparity   0a.01.1         0a    1   1   SA:B   -   SAS 10000 560000/1146880000 572325/1172123568
      parity    0a.01.3         0a    1   3   SA:B   -   SAS 10000 560000/1146880000 572325/1172123568
      data      0a.01.5         0a    1   5   SA:B   -   SAS 10000 560000/1146880000 572325/1172123568
      data      0a.01.7         0a    1   7   SA:B   -   SAS 10000 560000/1146880000 572325/1172123568
      data      0a.01.9         0a    1   9   SA:B   -   SAS 10000 560000/1146880000 572325/1172123568
In the above – only three disks in that aggregate can contain data. (And of those three, at least one is reserved for the NetApp filer “boot” code.) Two disks are used for parity, one disk (not shown) is the hot spare, and three disks are in use. Moreover, as learned from the NetApp NCDA Bootcamp, the total disk space used by NetApp for any disk is always some percentage less than the physical (this explains the difference between the 572325 “Phys” megabytes compared to 560000 “Used” megabytes). In fact, the actual space from a 600GB disk is closer to 0.48TB – thus, total space for this aggregate is therefore (3 * 0.48TB) or right around 1.44TB of disk space. We are losing well over half of the available space!
The storage experts out there may be thinking this is no big deal…after all, aggr0 is really supposed to hold only the NetApp boot volume (vol0 with /etc and so forth). Moreover, the big 24-disk aggregate has room for data and if space runs short then…simply add another shelf of disks!
That approach fails if the $$ are not available for another shelf. In fact, what happens is that out of the 36 total disks, a sizeable amount is simply not available. As we saw:
- The 12 disks divided between the two filers for boot code, result in only *six disks* available for data. And that data really is intended only for the boot record per page 154 in the NetApp “Data ONTAP 8.1 (7-Mode) Storage Management Guide”:
It is recommended that the root volume be in a separate aggregate that does not include data volumes or other user data.
- The 24 disks in the big
aggr1data aggregate are – as mentioned above – in *two separate* “raid groups”. One RAID group is 16 disks and the other is 8 disks; each RAID group has 2 parity disks and a hot spare. So out of the 24 disks, only 18 are available for data.
The result: not much usable space. There is a total of:
- Filer 1
aggr0– 1.44TB minus the 480GB currently used by the boot volume gives around 0.96TB for data - Filer 2
aggr0– 1.44TB minus the 480GB currently used by the boot volume gives around 0.96TB for data - 24-disk
aggr1– (18 * 0.48GB) results in around 8.64TB of space.
So do the math: around 10.56TB total space between all of the disks. That’s a big loss from the theoretical 17.28TB amount of storage NetApp makes available from all 36 disks (36 * 0.48GB, which of course includes all parity / spares).
Setting the Stage: What’s the Real Risk?
Let’s start with a few facts about our situation:
- Non-production Site. This means that the bar is lower for this virtualized environment. If something horrible happens, no one loses their job. This is self-evident by the fact that we are talking about a single FAS2240 box (no SnapMirror or MetroCluster going on).
- 24-hour Maintenance. The virtualized environment has a standard 4-hour replacement on the hard disks. Plus, the filers notify the admins if a disk goes out (AutoSupport is disabled to NetApp site but the admins get the emails). So in the event of a failure there is *at least* 24 hours of time where the filers can run in degraded mode.
- Backups. The virtualized environment already has non-NetApp solutions for backing up critical VMs and data plus a tested basic IT contingency plan. If something does go horribly awry (such as *two disks* going bad, or an entire shelf going out) then it is possible to rebuild the environment within the recovery time objective.
- Reliability. Given a large enough set of disks, it is possible to count on a known failure rate for disks and / or shelves. However, a single shelf is not even on the NetApp storage benchmarks – take a look at the NetApp Tech Report 3437: Storage Subsystem Resiliency. Anything under 300 disks is considered an entry-level system (page 13). Moreover, the expected failure rate for the 36-disk environment is right around 0.825 disks over 5 years (page 6).
What does all this tell us? Something that a good storage engineer would never knowingly tell a client: it’s OK to have some failure risk. Especially since the failure risk is almost non-existent. Given the reliability of the drives, the redundancy at the filer controller / network cabling / switching, and the 4-hour disk replacement policy, there’s very little chance of catastrophe. Thus, there is no need for us to have multiple spares. In fact, there’s no need for spares at all (except that the filer controller software itself likes to have a couple of spares at all times). Plus, there’s no need for RAID-DP with a double-disk resiliency capability. The simple fact is that – failing a catastrophe to the datacenter – this FAS2240 will work as expected for the full 5-year warranty period. At which point standard Operations and Maintenance (O&M) *should* kick in with automatic replacement / upgrade of the FAS2240 unit.
Of course, no vendor in their right mind would advocate such a statement. After all, the vendor’s job is to deliver a solid product with the minimum risk possible following standard best practices. That’s how you ensure quality and eliminate the inevitable support phone calls. It’s up to the customer to get the education and knowledge to make an *informed decision* to increase risk for a valid business reason. In this case, the business reason is to get back more space.
A Quick Aside: NetApp, RAID-DP, and RAID-4
Before moving on, it’s important to understand the storage limits imposed by NetApp:
- NetApp devices always subtract a percentage of space from all disks based on manufacturing tolerances. Normally around 10% of space but could be more or less; the idea is that *every* disk has errors. (In our use case, the effective disk space from a 600GB drive is actually 0.48TB usable “real” GB space.) The more of the disk one uses, the more chance of hitting that particular bad sector; the best approach is simply to subtract some portion of the disk from being used. This is space we simply cannot get back. Call it the result of many hard-won lessons NetApp has learned from decades of storage management.
- NetApp can use either RAID-DP (double-parity) or RAID-4 (single-parity). With RAID-DP (a NetApp invention based on RAID-6 technology), a “raid group” can withstand two disk failures. With RAID-4, the same raid group can withstand only a single disk failure.
- NetApp software can require a specific number of “spare” disks. Specifically, the “NetApp Maintenance Center” (see the NetApp Storage Management Guide) requires at least two spare disks. Moreover, by default NetApp has the option
raid.min_spare_countset to one – this means that each raid group must have at least one hot spare of the filer sends frantic warning notices.
A full discussion of Redundant Array of Independent Disks (RAID) is beyond this article but see the Wikipedia link for more info. Suffice it to say that RAID-4 is somewhat dangerous for larger raid groups as it uses a dedicated disk for parity (compared to, say, RAID-5 which “stripes” parity across all disks in the raid group).
The point is that we will never get the theoretical maximum from any disk using NetApp. Plus, NetApp requires us to use either RAID-DP (2 parity disks) or RAID-4 (1 parity disk). Finally, NetApp really wants to ensure that individual RAID arrays (“raid groups”) have at least one hot spare. Keep these in mind as we go forward.
Lighting the Candle: Getting Back the Space
So having understood the problem (loss of around 5TB of space), the reasons (best practices for a large storage install do not necessary scale well to a smaller install), and the goal (get as much space back as possible) – how do we proceed?
We start with laying out the framework for what we want:
- Filer 1 Boot: Make this 2 disks from the 12-disk set
- Filer 2 Boot: Make this 2 disksfrom the 12-disk set
- Use remaining 8 disks from the 12-disk set as a data aggregate
- Use the 24-disk set as a single aggregate
This doesn’t sound much different than what we had before, right? But here is are the differences:
- Each “filer boot” will consist of a single RAID group of exactly 2 disks running at RAID-4. No hot spare!
- The remaining 8 disks (from the 12-disk set) will run as a single RAID-4 group with one hot spare disk.
- The remaining 24-disk set will run as two 12-disk RAID-4 groups with one spare for the both of them.
Now do you see the changes? We will end up with a total of 27 data disks – plus, around 300GB of space from each of the RAID-4 “filer boot” groups. Multiply it out and you get (27 * 0.48TB) + 600GB = 13.56TB. Plus, we continue to have resiliency: each array can stand the loss of a disk. Given the fact that we have a 4-hour replacement warranty *and* that replacing a failed disk in a NetApp device does not require downtime…we have exceedingly low risk. Does that strike you as an informed and educated decision to accept a small amount of risk for over 28% increase in available space? It sure did to us!
We Can Always Back Out…
Given the above, one might think that this is a drastic solution. After all, what if another shelf of disks becomes available? Then we will have done all of this work that puts us at some additional risk that isn’t necessary.
The answer is that none of the steps below are limiting – none are “one-time-only” decisions. We can always change our RAID type from RAID-4 back to RAID-DP with a single command. We can add more disks to a “raid group”. In the worst case, we can easily migrate a running set of aggregates or volumes to the new disk shelf with the modified RAID type of and additional “spare” disks. So the steps below are both valuable now, instructive because they help the admin to understand the NetApp filer, and do not prevent future growth (with a more standard disk layout).
“Make It So!”
Moving on to execution, there are a number of tasks to perform. Remember, we have the two sets of disks: 12 disks in one set at 10K/RPM, and 24 disks in the other set at 15K/RPM. Our goal is to maximize disk space, minimize risk, and allocate resources so that the 15K/RPM disks are used most often for data. We’ll call the 12-set 10K/RPM disks “Tier2” below while the 24-set 15K/RPM disks are labeled “Tier1”.
The following sections detail these steps:
- Prepare the filer options
- Free up the existing disks
- Repurpose the boot disks to new, smaller aggregates in the 12-disk set
- Verify that the boot disks are set correctly (via reboot)
- Create the 8-disk RAID-4 (one hot spare) aggregate with the remaining “Tier2” disks
- Create the 24-disk RAID-4 (one hot spare) aggregate with all of the 24 “Tier1” disks
Prepare the NetApp Filer options
Because we want to use no hot spares (as we *understand* and *accept* the risk) we have to set the following options within the /etc/rc configuration file on each filer:
options cf.takeover.on_network_interface_failure off– This is very important! The NetApp 8.1 “7-mode” still uses the termcfwhich stands for “Cluster Failover.” (Of course, true NetApp 8.1 “ClusterMode” is fundamentally different from the 7-mode term “cluster.”) For these operations to migrate boot disks you need to make sure your filers do not try to “recover” for each other – so be sure that there is no cluster failover enabled.options disk.auto_assign off– Set this to ensure that, as we move data around and free disks between our filer controllers, the disks aren’t automatically assigned as “owned” by a particular filer controller. This just makes certain tasks easier.options raid.min_spare_count 0– Set this option to zero so that we don’t get warned about not having sufficient spares.options disk.maint_center.enable off– This disables the built-in “maintenance center”. Because we aren’t using sufficient hot spares (at least two) the maintenance center is of no use to us. As noted above, if we get additional disk shelves we can always reconfigure the NetApp – on the fly, while the NetApp is running!
Free Up the Disks
This was more complex than expected. First, we backed up / evacuated all data off of the existing aggregates within the NetApp filer. Then, we decided we wanted to “sanitize” the disks. What a pain! Here are the steps:
options licensed_feature.disk_sanitization.enable on– This will prompt you that sanitization cannot be undone.disk sanitize start [disk_list]– Replace[disk_list]with the names of the disks to sanitize. In our case, this was a list like0b.03.0 0b.03.1 0b.03.2 ... 0b.03.23(list all 24 disks explicitly).- After the sanitization completes – which can be hours later – you must release the disks:
disk sanitize release [disk_name]. Note that you cannot use multiple disk names – you must do this one at a time. - Finally – after the disks are sanitized and released, they still show up either as “broken” or with a “bad volume label”. Use the
priv set advancedto executedisk unfail -s [disk_name]for *each disk*. The-soption adds the “unfailed” disk to the spare pool.
Repurpose Boot Disks using “Tier2” 12-disk Set
As noted above, we have a total of 36 disks: 12 in our “Tier2” 10K/RPM set, and 24 in our “Tier1” 15K/RPM set. We certainly don’t want to use up our more valuable Tier1 disks, but we have a problem in that all the existing 12 “Tier2” disks are in use. What to do??
The Answer? Use the Tier1 disks temporarily to create a new boot volume in the format we want. Verify we can boot from that new boot volume, then free up the disks from our “Tier2” and reconfigure them as we want.
Please note this is the longest section in the article…bear with us and follow along carefully. The commands are simple and straightforward, but if something goes awry—there goes your filer. You have been warned!
Use disk assign to assign 2 disks from the “Tier1” 15K/RPM set of disks to each filer. The following output shows the original six disks running the boot volume for the filer FAS2240001SX and two of the Tier1 15K/RPM disks added.
Please remember that there are *two* filer heads (controllers) involved; the examples below are for the filer head named FAS2240001SX. The same steps – with different disks – would be performed for the second filer head FAS2240002SX. Just making sure we get this agreed-upon…
FAS2240001SX*> disk assign -p 1 0b.03.2
FAS2240001SX*> disk assign -p 1 0b.03.3
FAS2240001SX*> disk show
  DISK       OWNER                      POOL   SERIAL NUMBER         HOME
------------ -------------              -----  -------------         -------------
0b.03.3      FAS2240001SX(1788261151)    Pool1  XXXXXXXX              FAS2240001SX(1788261151)
0b.03.2      FAS2240001SX(1788261151)    Pool1  XXXXXXXX              FAS2240001SX(1788261151)
0a.01.8      FAS2240001SX(1788261151)    Pool0  XXXXXXXX              FAS2240001SX(1788261151)
0a.01.4      FAS2240001SX(1788261151)    Pool0  XXXXXXXX              FAS2240001SX(1788261151)
0a.01.10     FAS2240001SX(1788261151)    Pool0  XXXXXXXX              FAS2240001SX(1788261151)
0a.01.2      FAS2240001SX(1788261151)    Pool0  XXXXXXXX              FAS2240001SX(1788261151)
0a.01.0      FAS2240001SX(1788261151)    Pool0  XXXXXXXX              FAS2240001SX(1788261151)
0a.01.6      FAS2240001SX(1788261151)    Pool0  XXXXXXXX              FAS2240001SX(1788261151)
NOTE: Currently 20 disks are unowned. Use 'disk show -n' for additional information.
The first two commands assign two specific disks to a new “disk pool” (-p 1). This isn’t strictly necessary but it does help to keep things nice and tidy during this boot transfer. (Disk pools are really a function of NetApp “SyncMirror” – which is beyond scope of this article.) As can be seen above, 20 disks are unowned: that is because 2 of the 15K/RPM disks are owned by this filer controller (FAS2240001SX) and 2 are owned by the other filer controller (FAS2240002SX).
Also, before creating the aggregate, be sure to check the disk status to make sure they are not “failed”:
FAS2240001SX*> sysconfig -r
Aggregate aggr0 (online, raid_dp) (block checksums)
  Plex /aggr0/plex0 (online, normal, active)
    RAID group /aggr0/plex0/rg0 (normal, block checksums)

      RAID Disk Device          HA  SHELF BAY CHAN Pool Type  RPM  Used (MB/blks)    Phys (MB/blks)
      --------- ------          ------------- ---- ---- ---- ----- --------------    --------------
      dparity   0a.01.0         0a    1   0   SA:A   -   SAS 10000 560000/1146880000 572325/1172123568
      parity    0a.01.2         0a    1   2   SA:A   -   SAS 10000 560000/1146880000 572325/1172123568
      data      0a.01.4         0a    1   4   SA:A   -   SAS 10000 560000/1146880000 572325/1172123568
      data      0a.01.6         0a    1   6   SA:A   -   SAS 10000 560000/1146880000 572325/1172123568
      data      0a.01.8         0a    1   8   SA:A   -   SAS 10000 560000/1146880000 572325/1172123568
      data      0a.01.10        0a    1   10  SA:A   -   SAS 10000 560000/1146880000 572325/1172123568


Spare disks

RAID Disk       Device          HA  SHELF BAY CHAN Pool Type  RPM  Used (MB/blks)    Phys (MB/blks)
---------       ------          ------------- ---- ---- ---- ----- --------------    --------------
Spare disks for block checksum
spare           0b.03.2         0b    3   2   SA:B   -   SAS 15000 560000/1146880000 560879/1148681096 (not zeroed)

Broken disks

RAID Disk       Device          HA  SHELF BAY CHAN Pool Type  RPM  Used (MB/blks)    Phys (MB/blks)
---------       ------          ------------- ---- ---- ---- ----- --------------    --------------
bad label       0b.03.3         0b    3   3   SA:B   -   SAS 15000 560000/1146880000 560879/1148681096
In the output above, disk 0b.03.3 is “broken” with a “bad label”. Never fear! Run the disk unfail from privileged mode to fix:
FAS2240001SX*> disk unfail -s 0b.03.3
disk unfail: unfailing disk 0b.03.3...
FAS2240001SX*> sysconfig -r
Aggregate aggr0 (online, raid_dp) (block checksums)
  Plex /aggr0/plex0 (online, normal, active)
    RAID group /aggr0/plex0/rg0 (normal, block checksums)

      RAID Disk Device          HA  SHELF BAY CHAN Pool Type  RPM  Used (MB/blks)    Phys (MB/blks)
      --------- ------          ------------- ---- ---- ---- ----- --------------    --------------
      dparity   0a.01.0         0a    1   0   SA:A   -   SAS 10000 560000/1146880000 572325/1172123568
      parity    0a.01.2         0a    1   2   SA:A   -   SAS 10000 560000/1146880000 572325/1172123568
      data      0a.01.4         0a    1   4   SA:A   -   SAS 10000 560000/1146880000 572325/1172123568
      data      0a.01.6         0a    1   6   SA:A   -   SAS 10000 560000/1146880000 572325/1172123568
      data      0a.01.8         0a    1   8   SA:A   -   SAS 10000 560000/1146880000 572325/1172123568
      data      0a.01.10        0a    1   10  SA:A   -   SAS 10000 560000/1146880000 572325/1172123568


Spare disks

RAID Disk       Device          HA  SHELF BAY CHAN Pool Type  RPM  Used (MB/blks)    Phys (MB/blks)
---------       ------          ------------- ---- ---- ---- ----- --------------    --------------
Spare disks for block checksum
spare           0b.03.2         0b    3   2   SA:B   -   SAS 15000 560000/1146880000 560879/1148681096 (not zeroed)
spare           0b.03.3         0b    3   3   SA:B   -   SAS 15000 560000/1146880000 560879/1148681096 (not zeroed)
Ahh..all better! Next, create an aggregate that targets these two disks. The command below uses RAID-4 and specifies a “raid group” size of 2. Moreover, it specifies *exactly* which two disks to use:
FAS2240001SX*> aggr create aggr0new -r 2 -t raid4 -d 0b.03.2 0b.03.3
Creation of an aggregate has been initiated.  2 disks need to be zeroed before
they can be added to the aggregate. The process has been initiated. Once zeroing
completes on these disks, all disks will be added at once and you will be
notified via the system log. Note however, that if system reboots before
the disk zeroing is complete, the aggregate will not exist.

FAS2240001SX> aggr status aggr0new
           Aggr State           Status            Options
       aggr0new creating        raid4, aggr       raidsize=2, snapshot_autodelete=off,
                                initializing      lost_write_protect=off
                                64-bit
                Volumes:

                Plex /aggr0new/plex0: offline, empty, active
Now we wait for the aggregate to complete initializing (use aggr status aggr0new as shown above). When complete, we can add the volume to the aggregate. (Note that below we are working on the FAS2240002SX filer controller – remember that the boot migration must occur for both filer heads!)
FAS2240002SX> vol create vol0new -s volume aggr0new 162g
Creation of volume 'vol0new' with size 160g on containing aggregate
'aggr0new' has completed.
In the above, we create the volume with size 162GB based on the NetApp “System Administration Guide” (7-mode) – see page 77 for the list of sizes. (Note that the listed size of 160GB is not quite the *required* size of 162GB – but the filer warns you if you make it too small.) The next step is to copy the volume over:
FAS2240002SX> ndmpd on
FAS2240002SX> ndmpcopy /vol/vol0 /vol/vol0new
Ndmpcopy: Starting copy [ 1 ] ...
Ndmpcopy: FAS2240002SX: Notify: Connection established
Ndmpcopy: FAS2240002SX: Notify: Connection established
Ndmpcopy: FAS2240002SX: Connect: Authentication successful
Ndmpcopy: FAS2240002SX: Connect: Authentication successful
Ndmpcopy: FAS2240002SX: Log: DUMP: creating "/vol/vol0/../snapshot_for_backup.0" snapshot.
Ndmpcopy: FAS2240002SX: Log: DUMP: Using Full Volume Dump
Ndmpcopy: FAS2240002SX: Log: DUMP: Date of this level 0 dump: Fri Jul  5 20:24:13 2013.
Ndmpcopy: FAS2240002SX: Log: DUMP: Date of last level 0 dump: the epoch.
Ndmpcopy: FAS2240002SX: Log: DUMP: Dumping /vol/vol0 to NDMP connection
Ndmpcopy: FAS2240002SX: Log: DUMP: mapping (Pass I)[regular files]
Ndmpcopy: FAS2240002SX: Log: DUMP: mapping (Pass II)[directories]
Ndmpcopy: FAS2240002SX: Log: DUMP: estimated 3703391 KB.
Ndmpcopy: FAS2240002SX: Log: DUMP: dumping (Pass III) [directories]
Ndmpcopy: FAS2240002SX: Log: RESTORE: Fri Jul  5 20:24:15 2013: Begin level 0 restore
Ndmpcopy: FAS2240002SX: Log: RESTORE: Fri Jul  5 20:24:15 2013: Reading directories from the backup
Ndmpcopy: FAS2240002SX: Log: DUMP: dumping (Pass IV) [regular files]
Ndmpcopy: FAS2240002SX: Log: RESTORE: Fri Jul  5 20:24:15 2013: Creating files and directories.
Ndmpcopy: FAS2240002SX: Log: RESTORE: Fri Jul  5 20:24:16 2013: Writing data to files.
Ndmpcopy: FAS2240002SX: Log: ACL_START is '2716167168'
Ndmpcopy: FAS2240002SX: Log: RESTORE: Fri Jul  5 20:25:11 2013: Restoring NT ACLs.
Ndmpcopy: FAS2240002SX: Log: DUMP: dumping (Pass V) [ACLs]
Ndmpcopy: FAS2240002SX: Log: DUMP: 2652514 KB
Ndmpcopy: FAS2240002SX: Log: DUMP: DUMP IS DONE
Ndmpcopy: FAS2240002SX: Log: RESTORE: RESTORE IS DONE
Ndmpcopy: FAS2240002SX: Notify: restore successful
Ndmpcopy: FAS2240002SX: Log: DUMP: Deleting "/vol/vol0/../snapshot_for_backup.0" snapshot.
Ndmpcopy: FAS2240002SX: Log: DUMP_DATE is '5668037549'
Ndmpcopy: FAS2240002SX: Notify: dump successful
Ndmpcopy: Transfer successful [ 0 hours, 1 minutes, 11 seconds ]
Ndmpcopy: Done
Now make the new volume active (the “root” volume) and reboot:
FAS2240002SX> vol options vol0new root
Volume 'vol0new' will become root at the next boot.
FAS2240002SX> reboot
After the reboot, check the volume options and verify they begin with root, diskroot as shown below:
FAS2240002SX> vol options vol0new
root, diskroot, nosnap=off, nosnapdir=off, minra=off,
no_atime_update=off, nvfail=off, ignore_inconsistent=off,
snapmirrored=off, create_ucode=off, convert_ucode=off,
maxdirsize=45875, schedsnapname=ordinal, fs_size_fixed=off,
guarantee=volume, svo_enable=off, svo_checksum=off, svo_allow_rman=off,
svo_reject_errors=off, no_i2p=off, fractional_reserve=100, extent=off,
try_first=volume_grow, read_realloc=off, snapshot_clone_dependency=off,
dlog_hole_reserve=off, nbu_archival_snap=off
Next, offline and destroy the old volume. Rename the new volume to vol0 and verify it…perform a final reboot and verify that all comes back up.
FAS2240002SX> vol offline vol0
Volume 'vol0' is now offline.
FAS2240002SX> vol destroy vol0
Are you sure you want to destroy volume 'vol0'? y
Volume 'vol0' destroyed.
FAS2240002SX> vol rename vol0new vol0
'vol0new' renamed to 'vol0'
FAS2240002SX> df -sh
Filesystem                used      saved       %saved
/vol/vol0/              3635MB        0MB           0%
FAS2240002SX> reboot
[...wait for reboot...]
Repeat this process for *both* filers (FAS2240001SX and FAS2240002SX in our case). Then, destroy the original aggr0 aggregate from both filers. At the end of this process, all of the 10K/RPM “Tier2” disks should be completely emptied and unowned. For completeness, we’ll print out the commands we used here for the FAS2240001SX filer (the same commands were used – for different disk names – on the second FAS2240002SX filer):
aggr offline aggr0
aggr destroy aggr0
disk assign 0a.01.0 -s unowned
disk assign 0a.01.2 -s unowned
disk assign 0a.01.4 -s unowned
disk assign 0a.01.6 -s unowned
disk assign 0a.01.8 -s unowned
disk assign 0a.01.10 -s unowned
At the end of the process, you will have a total of 4 disks online: 2 for filer1 and 2 for filer2. 32 disks will be unowned and available: 12 from the “Tier2” 10K/RPM set, and 20 from the “Tier1” 15K/RPM set:
FAS2240001SX> disk show -v
  DISK       OWNER                  POOL   SERIAL NUMBER           HOME                     CHKSUM
------------ -------------          -----  -------------           -------------            ------
0b.03.0      FAS2240002SX(1788770152)    Pool1  XXXXXXXX              FAS2240002SX(1788770152)  Block
0b.03.1      FAS2240002SX(1788770152)    Pool1  XXXXXXXX              FAS2240002SX(1788770152)  Block
0b.03.5      Not Owned                  NONE   XXXXXXXX             Block
0b.03.2      FAS2240001SX(1788261151)    Pool1  XXXXXXXX              FAS2240001SX(1788261151)  Block
0b.03.9      Not Owned                  NONE   XXXXXXXX             Block
0b.03.16     Not Owned                  NONE   XXXXXXXX             Block
0b.03.17     Not Owned                  NONE   XXXXXXXX             Block
0b.03.22     Not Owned                  NONE   XXXXXXXX             Block
0b.03.21     Not Owned                  NONE   XXXXXXXX             Block
0b.03.18     Not Owned                  NONE   XXXXXXXX             Block
0b.03.3      FAS2240001SX(1788261151)    Pool1  XXXXXXXX              FAS2240001SX(1788261151)  Block
0b.03.4      Not Owned                  NONE   XXXXXXXX             Block
0b.03.20     Not Owned                  NONE   XXXXXXXX             Block
0b.03.19     Not Owned                  NONE   XXXXXXXX             Block
0b.03.6      Not Owned                  NONE   XXXXXXXX             Block
0b.03.10     Not Owned                  NONE   XXXXXXXX             Block
0b.03.8      Not Owned                  NONE   XXXXXXXX             Block
0b.03.14     Not Owned                  NONE   XXXXXXXX             Block
0b.03.23     Not Owned                  NONE   XXXXXXXX             Block
0b.03.12     Not Owned                  NONE   XXXXXXXX             Block
0b.03.13     Not Owned                  NONE   XXXXXXXX             Block
0b.03.11     Not Owned                  NONE   XXXXXXXX             Block
0b.03.15     Not Owned                  NONE   XXXXXXXX             Block
0b.03.7      Not Owned                  NONE   XXXXXXXX             Block
0a.01.7      Not Owned                  NONE   XXXXXXXX             Block
0a.01.4      Not Owned                  NONE   XXXXXXXX             Block
0a.01.11     Not Owned                  NONE   XXXXXXXX             Block
0a.01.3      Not Owned                  NONE   XXXXXXXX             Block
0a.01.9      Not Owned                  NONE   XXXXXXXX             Block
0a.01.1      Not Owned                  NONE   XXXXXXXX             Block
0a.01.0      Not Owned                  NONE   XXXXXXXX             Block
0a.01.6      Not Owned                  NONE   XXXXXXXX             Block
0a.01.5      Not Owned                  NONE   XXXXXXXX             Block
0a.01.8      Not Owned                  NONE   XXXXXXXX             Block
0a.01.10     Not Owned                  NONE   XXXXXXXX             Block
0a.01.2      Not Owned                  NONE   XXXXXXXX             Block
Now – we migrate the boot volume *back* to the “Tier2” 10K/RPM disks. This is simply a repeat of much of the other commands; let’s keep in mind our current state is: a) we have an aggr0new on each filer; b) each aggr0new consists of 2 “Tier1” 15K/RPM disks; c) each aggr0new has a boot volume on it which we already renamed to vol0new above.
- Grab ownership of necessary “Tier2” 10K/RPM disks (2 for each filer).
- Create the 2-disk RAID-4 aggregate named
aggr0on the “Tier2” disks for each filer. - On the newly-created 2-disk
aggr0aggregate for each filer, create the 162GB volume and usendmpcopyto transfer the boot volume from the existing boot. - Make the new boot volume active and verify with a reboot.
- Offline and destroy the original boot aggregate / volume (
aggr0new/vol0) for each filer. - Rename the
vol0newboot volume created in step 2 above tovol0to keep everything consistent. - Final reboot to verify all comes up correctly.
Piece of cake! For completeness, here are the commands for each filer.
FAS2240001SX> disk assign 0a.01.0 -p 0
FAS2240001SX> disk assign 0a.01.2 -p 0
FAS2240001SX> aggr create aggr0 -r 2 -t raid4 -d 0a.01.0 0a.01.2
Creation of an aggregate has been initiated.  2 disks need to be zeroed before
they can be added to the aggregate. The process has been initiated. Once zeroing
completes on these disks, all disks will be added at once and you will be
notified via the system log. Note however, that if system reboots before
the disk zeroing is complete, the aggregate will not exist.
[...wait for disk zeroing to complete...]
FAS2240001SX>  vol create vol0new -s volume aggr0 162g
FAS2240001SX> ndmpcopy /vol/vol0 /vol/vol0new
[...output from ndmpcopy...]
FAS2240001SX> vol options vol0new root
FAS2240001SX> reboot
[...wait for reboot...]
FAS2240001SX> vol options vol0new
[...look for root, diskroot in output...]
FAS2240001SX> aggr offline aggr0new
Aggregate 'aggr0new' is now offline.
FAS2240001SX> aggr destroy aggr0new
Are you sure you want to destroy this aggregate? y
Aggregate 'aggr0new' destroyed.
FAS2240001SX> vol rename vol0new vol0
'vol0new' renamed to 'vol0'
FAS2240001SX> df -sh
Filesystem                used      saved       %saved
/vol/vol0/              4796MB        0MB           0%
FAS2240001SX> reboot
[...wait for reboot...]
And for the second filer:
FAS2240002SX> disk assign 0a.01.1 -p 0
FAS2240002SX> disk assign 0a.01.3 -p 0
FAS2240002SX> aggr create aggr0 -r 2 -t raid4 -d 0a.01.1 0a.01.3
Creation of an aggregate has been initiated.  2 disks need to be zeroed before
they can be added to the aggregate. The process has been initiated. Once zeroing
completes on these disks, all disks will be added at once and you will be
notified via the system log. Note however, that if system reboots before
the disk zeroing is complete, the aggregate will not exist.
[...wait for disk zeroing to complete...]
FAS2240002SX> vol create vol0new -s volume aggr0 162g
FAS2240002SX> ndmpcopy /vol/vol0 /vol/vol0new
[...output from ndmpcopy...]
FAS2240002SX> vol options vol0new root
FAS2240002SX> reboot
[...wait for reboot...]
FAS2240002SX> vol options vol0new
[...look for root, diskroot in output...]
FAS2240002SX> aggr offline aggr0new
Aggregate 'aggr0new' is now offline.
FAS2240002SX> aggr destroy aggr0new
Are you sure you want to destroy this aggregate? y
Aggregate 'aggr0new' destroyed.
FAS2240002SX> vol rename vol0new vol0
'vol0new' renamed to 'vol0'
FAS2240002SX> df -sh
Filesystem                used      saved       %saved
/vol/vol0/              4796MB        0MB           0%
FAS2240002SX> reboot
[...wait for reboot...]
Whoo! After all these steps, you should now have both filers fully migrated to use RAID-4, 2-disk RAID groups for booting. The only thing left to do is to force the “Tier1” disks that were previously used for the boot migration…to be unowned (so they are in the free pool).
Take a look at this:
FAS2240002SX> disk show -v
  DISK       OWNER                  POOL   SERIAL NUMBER           HOME                     CHKSUM
------------ -------------          -----  -------------           -------------            ------
0a.01.2      FAS2240001SX(1788261151)    Pool0  XXXXXXXX              FAS2240001SX(1788261151)  Block
0a.01.0      FAS2240001SX(1788261151)    Pool0  XXXXXXXX              FAS2240001SX(1788261151)  Block
0b.03.2      FAS2240001SX(1788261151)    Pool1  XXXXXXXX              FAS2240001SX(1788261151)  Block
0b.03.3      FAS2240001SX(1788261151)    Pool1  XXXXXXXX              FAS2240001SX(1788261151)  Block
0b.03.12     Not Owned                  NONE   XXXXXXXX             Block
0b.03.4      Not Owned                  NONE   XXXXXXXX             Block
0b.03.21     Not Owned                  NONE   XXXXXXXX             Block
0b.03.7      Not Owned                  NONE   XXXXXXXX             Block
0b.03.22     Not Owned                  NONE   XXXXXXXX             Block
0b.03.8      Not Owned                  NONE   XXXXXXXX             Block
0b.03.13     Not Owned                  NONE   XXXXXXXX             Block
0b.03.18     Not Owned                  NONE   XXXXXXXX             Block
0b.03.20     Not Owned                  NONE   XXXXXXXX             Block
0b.03.1      FAS2240002SX(1788770152)    Pool1  XXXXXXXX              FAS2240002SX(1788770152)  Block
0b.03.14     Not Owned                  NONE   XXXXXXXX             Block
0b.03.0      FAS2240002SX(1788770152)    Pool1  XXXXXXXX              FAS2240002SX(1788770152)  Block
0b.03.9      Not Owned                  NONE   XXXXXXXX             Block
0b.03.19     Not Owned                  NONE   XXXXXXXX             Block
0b.03.11     Not Owned                  NONE   XXXXXXXX             Block
0b.03.23     Not Owned                  NONE   XXXXXXXX             Block
0b.03.17     Not Owned                  NONE   XXXXXXXX             Block
0b.03.5      Not Owned                  NONE   XXXXXXXX             Block
0b.03.16     Not Owned                  NONE   XXXXXXXX             Block
0b.03.10     Not Owned                  NONE   XXXXXXXX             Block
0b.03.15     Not Owned                  NONE   XXXXXXXX             Block
0b.03.6      Not Owned                  NONE   XXXXXXXX             Block
0a.01.4      Not Owned                  NONE   XXXXXXXX             Block
0a.01.8      Not Owned                  NONE   XXXXXXXX             Block
0a.01.3      FAS2240002SX(1788770152)    Pool0  XXXXXXXX              FAS2240002SX(1788770152)  Block
0a.01.1      FAS2240002SX(1788770152)    Pool0  XXXXXXXX              FAS2240002SX(1788770152)  Block
0a.01.7      Not Owned                  NONE   XXXXXXXX             Block
0a.01.6      Not Owned                  NONE   XXXXXXXX             Block
0a.01.11     Not Owned                  NONE   XXXXXXXX             Block
0a.01.5      Not Owned                  NONE   XXXXXXXX             Block
0a.01.10     Not Owned                  NONE   XXXXXXXX             Block
0a.01.9      Not Owned                  NONE   XXXXXXXX             Block
You will clearly see the disks that need to be “un-owned” – they are the ones we threw into Pool1 to keep everything nice and tidy and segregated. (Remember from above?) Using the above as a guide, on each filer simply run disk assign [disk_name] -s unowned as shown below for our use case:
FAS2240001SX> disk assign 0b.03.2 -s unowned
FAS2240001SX> disk assign 0b.03.3 -s unowned
And for the second filer:
FAS2240002SX> disk assign 0b.03.1 -s unowned
FAS2240002SX> disk assign 0b.03.0 -s unowned
And – finally – you will see the finished result. All disks are unassigned (“Not Owned”) except for the 4 “Tier2” disks we’ve made our boots:
FAS2240002SX> disk show -v
  DISK       OWNER                  POOL   SERIAL NUMBER           HOME                     CHKSUM
------------ -------------          -----  -------------           -------------            ------
0a.01.2      FAS2240001SX(1788261151)    Pool0  XXXXXXXX              FAS2240001SX(1788261151)  Block
0a.01.0      FAS2240001SX(1788261151)    Pool0  XXXXXXXX              FAS2240001SX(1788261151)  Block
0b.03.2      Not Owned                  NONE   XXXXXXXX             Block
0b.03.3      Not Owned                  NONE   XXXXXXXX             Block
0b.03.12     Not Owned                  NONE   XXXXXXXX             Block
0b.03.4      Not Owned                  NONE   XXXXXXXX             Block
0b.03.21     Not Owned                  NONE   XXXXXXXX             Block
0b.03.7      Not Owned                  NONE   XXXXXXXX             Block
0b.03.22     Not Owned                  NONE   XXXXXXXX             Block
0b.03.8      Not Owned                  NONE   XXXXXXXX             Block
0b.03.13     Not Owned                  NONE   XXXXXXXX             Block
0b.03.18     Not Owned                  NONE   XXXXXXXX             Block
0b.03.20     Not Owned                  NONE   XXXXXXXX             Block
0b.03.0      Not Owned                  NONE   XXXXXXXX             Block
0b.03.14     Not Owned                  NONE   XXXXXXXX             Block
0b.03.9      Not Owned                  NONE   XXXXXXXX             Block
0b.03.19     Not Owned                  NONE   XXXXXXXX             Block
0b.03.11     Not Owned                  NONE   XXXXXXXX             Block
0b.03.23     Not Owned                  NONE   XXXXXXXX             Block
0b.03.17     Not Owned                  NONE   XXXXXXXX             Block
0b.03.5      Not Owned                  NONE   XXXXXXXX             Block
0b.03.16     Not Owned                  NONE   XXXXXXXX             Block
0b.03.10     Not Owned                  NONE   XXXXXXXX             Block
0b.03.15     Not Owned                  NONE   XXXXXXXX             Block
0b.03.6      Not Owned                  NONE   XXXXXXXX             Block
0a.01.4      Not Owned                  NONE   XXXXXXXX             Block
0a.01.8      Not Owned                  NONE   XXXXXXXX             Block
0a.01.3      FAS2240002SX(1788770152)    Pool0  XXXXXXXX              FAS2240002SX(1788770152)  Block
0a.01.1      FAS2240002SX(1788770152)    Pool0  XXXXXXXX              FAS2240002SX(1788770152)  Block
0a.01.7      Not Owned                  NONE   XXXXXXXX             Block
0a.01.6      Not Owned                  NONE   XXXXXXXX             Block
0a.01.11     Not Owned                  NONE   XXXXXXXX             Block
0a.01.5      Not Owned                  NONE   XXXXXXXX             Block
0a.01.10     Not Owned                  NONE   XXXXXXXX             Block
0a.01.9      Not Owned                  NONE   XXXXXXXX             Block
0b.03.1      Not Owned                  NONE   XXXXXXXX             Block
At this point, you can proceed to the next section.
Verify that the boot disks are set correctly (via reboot)
Well…we already did this in the previous section 🙂 In fact, we did this to a nauseating degree of detail. But feel free to issue reboot to verify once again that the filers come back online no problems.
Create the 8-disk RAID-4 (one hot spare) aggregate with the remaining “Tier2” disks
This is easy but time-consuming for the disks to be initialized. On either filer, simply issue the command disk assign [disk_name] for all of the disks and then create the aggregate. Remember that – when we’re all done – the filer failover will be re-established and upon a failure the other filer will happily take over serving this 8-disk aggregate:
FAS2240001SX> disk assign 0a.01.4
FAS2240001SX> disk assign 0a.01.5
FAS2240001SX> disk assign 0a.01.6
FAS2240001SX> disk assign 0a.01.7
FAS2240001SX> disk assign 0a.01.8
FAS2240001SX> disk assign 0a.01.9
FAS2240001SX> disk assign 0a.01.10
FAS2240001SX> disk assign 0a.01.11
FAS2240001SX> aggr create aggr_t2 -t raid4 -r 8 -d 0a.01.4 0a.01.5 0a.01.6 0a.01.7 0a.01.8 0a.01.9 0a.01.10
Creation of an aggregate has been initiated.  7 disks need to be zeroed before
they can be added to the aggregate. The process has been initiated. Once zeroing
completes on these disks, all disks will be added at once and you will be
notified via the system log. Note however, that if system reboots before
the disk zeroing is complete, the aggregate will not exist.
Note that in the above we created the aggregate named aggr_t2 as our “Tier2” disks with only 7 disks although the “raid group” (the -r option in aggr create) size is 8 disks. This means we have a single spare disk Also, we used the name to help us identify the storage class for future reference.
While this aggregate is creating, you can continue to the next section.
Create the 24-disk RAID-4 (one hot spare) aggregates with all of the 24 “Tier1” disks
This is the last section of this *very long* article. Simply add all the disks to a filer, and then create the RAID-4 group with a single hot-spare as shown below. Note that we can use the shortcut disk assign all as we are taking *all* of the remaining disks for our “Tier1” disk group. Also note that a limitation of RAID-4 is that a single “raid group” can contain only up to 14 disks. So…we create *two* aggregates (aggr_t1_a and aggr_t1_b) each with 12 disks in two different raid groups.
FAS2240002SX*>  disk assign all
FAS2240002SX*>  aggr create aggr_t1_a -t raid4 -r 12 12
Creation of aggregate aggr_t1_a has been initiated. 12 disks need to be zeroed before they
can be added to this aggregate. If system reboots before all the disks are zeroed, the aggregate
may not have been entirely created. Upon reboot, you should check the aggregate status and
recreate if needed.
FAS2240002SX*>  aggr create aggr_t1_b -t raid4 -r 12 11
Creation of aggregate aggr_t1_b has been initiated. 11 disks need to be zeroed before they
can be added to this aggregate. If system reboots before all the disks are zeroed, the aggregate
may not have been entirely created. Upon reboot, you should check the aggregate status and
recreate if needed.
In the above, the second aggr_t1_b aggregate has only 11 disks specified…the 12th disk is our single spare.
To Sum Up…
This has been a long and involved article. It’s goal is to *break* with classic NetApp practices to maximize storage while still keeping the overall risk low. We started this journey with only around 10.56TB of usable space for our NetApp FAS2240 device with 2 filer heads and 36 disks. We’ve ended this process with quite a different amount of storage. The screenshot below from NetApp System Command shows the results from Filer1 (the FAS2240001SX element). Note that we actually got 329GB free on the boot volume, plus 2.88TB from the RAID-4 volume as our “Tier2” storage:
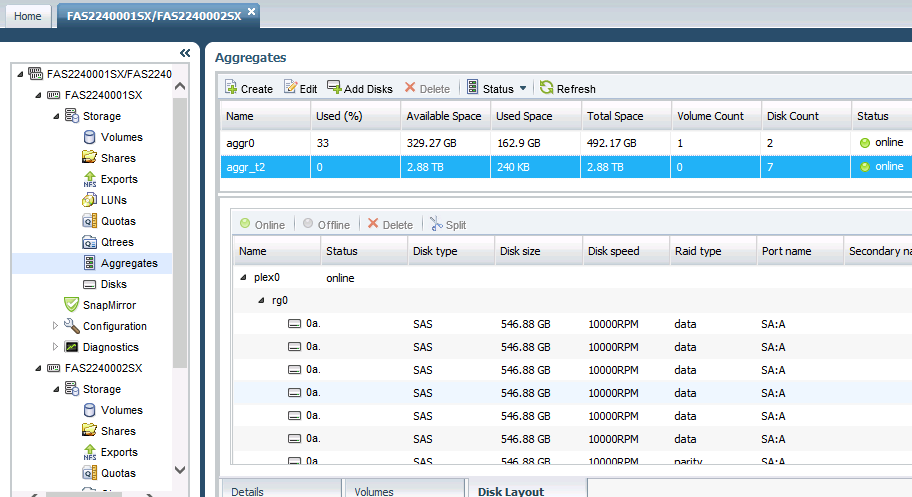
Moving onto the Filer2 (the FAS2240002SX element), we see the big 24-disk shelf allocated into two “Tier1” aggregates. The reason for the size difference is that we have a single hot-spare disk for the entire shelf, which is subtracted from the second aggr_t1_b aggregate:

We did it…we went from around 10.56TB actual space, to around 13.58TB usable space. That’s over 28% storage increase from the same set of disks with almost zero additional risk. Plus, now we know *exactly* how our NetApp filers are configured.
Thanks for coming by and we hope you enjoyed the ride!
Team-oriented systems mentor with deep knowledge of numerous software methodologies, technologies, languages, and operating systems. Excited about turning emerging technology into working production-ready systems. Focused on moving software teams to a higher level of world-class application development. Specialties:Software analysis and development...Product management through the entire lifecycle...Discrete product integration specialist!
Good doc , can i know how to create Pools and assgin disks to it please