LAMP Stack on Gentoo Linux on Amazon EC2
Hello all, in a previous post we discussed running Gentoo Linux on Amazon EC2. In this post we’re going to the next step: installing the Linux, Apache, MySQL, and PHP (LAMP) Stack on our new Gentoo Linux system. And, of course, we are still running on Amazon EC2. So let’s get started!
Starting Points: Resources
When we wrote this article we first looked at Google searches such as “ec2 lamp stack gentoo”, “gentoo lamp stack”, “lamp stack ec2” and so on. We found a lot of articles but none specifically on running a LAMP stack on Gentoo within EC2. Thus we know this is a good space for an article because there is literally nothing out there on the topic. Kewl!
For completeness, here are some resources that we used:
- Set Up a LAMP Server on Gentoo – This is an older page but is still relevant as a starting point.
- Setup Joomla on Gentoo – Although our goal is a self-hosted WordPress site on Amazon EC2, the underlying LAMP stack is identical for Joomla and WordPress. So this was a good reference article.
- Installing Apache, MySQL, PHP in Gentoo Server – This is another good starting site although it is not specific to Amazon EC2.
Now onto our steps.
NOT-working 🙂
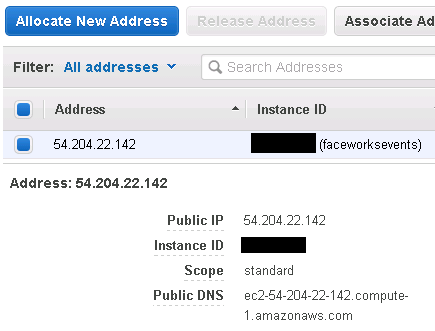
Normally when setting up a single Web server the first thing to do is make sure that hostnames are correct. Under Gentoo this means editing /etc/conf.d/hostname as well as /etc/hosts. In the EC2 world this is unnecessary. That is because EC2 controls the public IP via what they call Elastic IPs, which are allocated to EC2 accounts and can be remapped to any EC2 running instance at any time.
The result is that at the individual Web server level which we are using, we don’t need to do any hostname setting. In fact we don’t need to make any networking configuration changes at all…when we start the instance, the network IP address is automatically set and the Internet-routable EC2 Elastic IP can be mapped directly to the running instance. See the following screenshot:
This approach works out great for the future as well: if we decide to implement load balancing on EC2 then all we do is point our Elastic IP at the Amazon Elastic Load Balancer we setup and we have zero changes required for the individual Web server – at least as long as we build our LAMP server to separate our Web server (Apache) from our database server (MySQL) – which we are not going to do for this article – but which we *would* do for a true production-quality system 🙂
Setup Gentoo Build Environment
Gentoo is designed to build applications from source. So when we compile our Web server, the PHP language, and even the MySQL database they will all be compiled on our Amazon EC2 running instance. This means we have the option to optimize our Gentoo server so that the LAMP stack software gets built as we desire.
For this article we won’t go nuts on this topic. Instead, here are the few steps that will get you to a working and running system:
- Setup
/etc/portage/make.conf. The/etc/portage/make.conffile describe the system you are building via the USE Flags. For our LAMP stack we’ll specify that we are using the Apache Web server and the PHP programming language. Modify the/etc/portage/make.confso that it contains:USE="... apache2 php gd ..."The
apache2above indicates that we want to use the Apache Web server version 2.x which is the latest. Thephpindicates that we want to run the PHP Programming Language on this server, and thegdindicates that we want to use the GD Graphics Library – which the WordPress installation we ultimately use will run. - Setup
/etc/portage/package.use. Just as the/etc/portage/make.confcontainsUSEflags that describe the overall Gentoo system, the/etc/portage/package.usefile describes specificUSEflags required by individual applications. For our example, we only need one entry here for the PHP programming language. Add the following line to the/etc/portage/package.usefile on your Gentoo system:dev-lang/php xml curl gd mysql mysqli postgres truetype -recode soap zipIn the above, the
xml,mysql, andmysqliare all required for WordPress (which we’ll setup in a different post).
Once those two tasks are taken care of, move onto setting up your Web server.
Setup Apache Web Server
First of all a disclaimer: you do *not* need to use the Apache Web Server if you do not want to. There are other Web servers that work equally well: the Nginx Web server is awesome and edges out Apache as most popular for the top 1000 Web sites. Also, the lighttpd Web server works as a lightweight and fast alternative. But for this article we concentrate on Apache.
Within Gentoo we found a few references to setting up Apache, and our steps are below:
- Build Apache. Simply run the
emerge apachecommand and wait for the process to complete. It will take a while; as of this writing the Apache version is 2.2.25. - Setup Virtual Host. This is the process of allowing our single Apache Web server to process multiple sites. Each site will be completely self-contained. This means that if we want to run multiple WordPress sites we can do so where each WordPress install will have no impact on the other WordPress sites. To do this requires some thought and setup. Our approach is to use our 20GB EBS data volume for all hosting as well as for a backup of our Apache virtual host files.
- Learn about virtual hosts. Gee, after we started getting into this article we realized that we assume a lot of knowledge on Apache and virtual hosts. See this Apache article on virtual hosts for details. Then come back and tag along with us 🙂
- Create structure in EBS volume. This got more complicated because we wanted to have each hosted Web site keep its data completely separate from all other data. Here’s what we ended up with:
/ebs_data_1/sites            -> top-level folder
 /-> faceworksevents_com     -> folder for one site
      /-> apache_configs     -> files to feed to apache
      /-> logs               -> all error / access logs
      /-> public_html        -> home directory for site
The first step is to link the
/ebs_data_1/sitesdirectory to the default Apache directory home:ln -fs /ebs_data_1/sites /var/www/sitesThen what we will do is link the site-specific Apache configuration file(s) as soft links back to the default Apache configuration folder
/etc/apache2/vhosts.d. Follow along for details. - Store each hosted site in its own soft-linked file. We only do a single example for this article for our site faceworksevents.com. However, our article example does have the nifty requirement that an alternate URL www.annetteabramson.com must use the *same* site (we need that for testing). So, we performed the following:
ip-10-180-193-238 vhosts.d # touch /ebs_data_1/sites/faceworksevents_com/apache_configs/20_faceworksevents_com.conf
ip-10-180-193-238 vhosts.d # ln -fs /ebs_data_1/sites/faceworksevents_com/apache_configs/20_faceworksevents_com.conf /etc/apache2/vhosts.d/
Those commands create a new file named
20_faceworksevents_com.confand link it to a location where Apache will automatically find it. - Setup virtual host information. Within the virtual host file (
20_faceworksevents_com.confin our example) we setup basic permissions and logging information. That way we can have full knowledge that our site is getting hit and that Virtual Host Name Matching is correct within Apache. Here’s our setup with some comments:# created for faceworksevents.com <VirtualHost *:80> # send me the email :) ServerAdmin andy@softwareab.net # this is the primary domain name when we get migrated ServerName faceworksevents.com # here are some aliases; second one allows us to test ServerAlias www.faceworksevents.com www.annetteabramson.com # this is the location for the site HTML DocumentRoot /var/www/sites/faceworksevents_com/public_html <Directory "/var/www/sites/faceworksevents_com/public_html"> Options Indexes FollowSymLinks AllowOverride All Order allow,deny Allow from all </Directory> # keep track of Web traffic separately for each site ErrorLog /var/www/sites/faceworksevents_com/logs/apache.error.log CustomLog /var/www/sites/faceworksevents_com/logs/apache.access.log common </VirtualHost>As the clever will already have noticed, we aren’t touching SSL or WordPress…yet. That will come in a future post, never fear 🙂
- Verify that it all works. Verification is performed by hitting site and checking that: a) we get a response back (be sure to create an index.html file!); and, b) we get hits to our customized log file locations. Answer is affirmative for both, Captain!

- Set Apache to start on each boot. Simply run the command
rc-update -v add apache2 defaultand you’re done.

While there will be more to write about Apache integration (especially multiple sites and SSL) we have enough to keep going for the LAMP stack.
Setup MySQL Database
As with Apache, you aren’t necessarily forced to use the MySQL database but for this article it’s what we’re going to use. First off we install it using the command emerge mysql…this can take a while so be patient. Upon completion the system will prompt you to run emerge --config =dev-db/mysql-5.1.70 if this is a new install. Since this is a new install, go ahead and do that now. You are prompted for the root password for the database; be sure to keep up with that for the following steps.
Once installed, start the MySQL database instance using /etc/init.d/mysql start and verify that you receive no errors. If not, then continue by installing the database to start at each boot using rc-update add mysql default.
Finally…let’s check that we can actually connect to the running MySQL database. Use command mysql -u root -p and then enter the password you keyed in above. Here’s a full output from our environment:
ip-10-180-193-238 ~ # mysql -u root -p
Enter password:
Welcome to the MySQL monitor.  Commands end with ; or \g.
Your MySQL connection id is 1
Server version: 5.1.70-log Gentoo Linux mysql-5.1.70

Copyright (c) 2000, 2013, Oracle and/or its affiliates. All rights reserved.

Oracle is a registered trademark of Oracle Corporation and/or its
affiliates. Other names may be trademarks of their respective
owners.

Type 'help;' or '\h' for help. Type '\c' to clear the current input statement.

mysql> select 42;
+----+
| 42 |
+----+
| 42 |
+----+
1 row in set (0.00 sec)

mysql> quit
Bye
We’ll worry about the specific steps for installing / configuring the WordPress databases later on. For now we’re done with the database.
Setup PHP Programming Language
The last step for a LAMP Stack is to get the PHP language up and running. To do that, there is an excellent guide at this link which is almost correct 😉 Let’s do the steps together as we found them to be best:
- Verify PHP
USEFlags. As doocuemented above, the file/etc/portage/package.useshould already be setup as documented above. - Build PHP. Use
nohup emerge dev-lang/php &just as we did the other packages. - Setup Portage
make.conf. Be sure to update the file/etc/portage/make.confto have the following lines for PHP version 5.5:PHP_TARGETS="php5-3" PHP_INI_VERSION="production"The
productionreference above is really your choice for which PHP initialization file is used when PHP scripts run. - Setup Apache to use PHP5. Simply modify the file
/etc/conf.d/apache2to specify PHP5 as shown below:APACHE2_OPTS="... -D PHP5"The
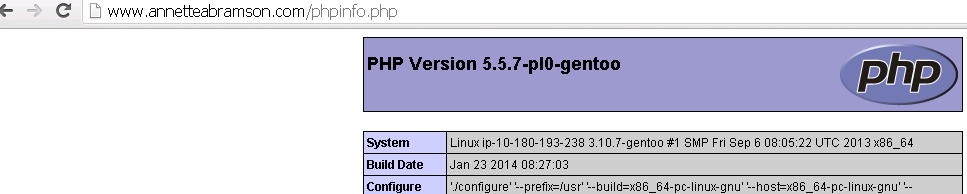
-D PHP5can be anywhere in the line. Be sure to use/etc/init.d/apache2 restartwhen you are done to restart the Web server. - Verify PHP works. This is the money shot…all of your hard work will pay off here for the LAMP stack. You’ll simply need to create a
phpinfo()call and put it into a folder accessible from your system. Because we used VHOST name entries for our site, we created a file named/ebs_data_1/sites/faceworksevents_com/public_html/phpinfo.php:<?php // Show all information, defaults to INFO_AL phpinfo(); ?>Then you load the web page; for our test case we setup DNS so this works:
http://www.annetteabramson.com/phpinfo.php. The result is shown below:

Setting up a LAMP stack is a trivial task. But as we’ve seen in this article, it still requires a lot of knowledge and can be quite a bit of work for a platform like Gentoo Linux. The rewards? Not only do you get the running software, but you also gain a wealth of knowledge and you have a Web server that is fast and configurable to *your* desires and not someone else’s. It’s all about empowerment, baby!
Join us next time when we setup WordPress on our shiny new Gentoo-powered Web server. That will be a blast!
Happy Computing!
Team-oriented systems mentor with deep knowledge of numerous software methodologies, technologies, languages, and operating systems. Excited about turning emerging technology into working production-ready systems. Focused on moving software teams to a higher level of world-class application development. Specialties:Software analysis and development...Product management through the entire lifecycle...Discrete product integration specialist!
Leave a Reply