Gentoo Linux on Amazon EC2
Hello All! In this post we discuss how we run the Gentoo Linux operating system on Amazon’s Elastic Cloud Compute (EC2). Join along for the fun!
Quick Fix Up Front! Broken GNU Compiler!
For those of you finding this blog and wanting a Gentoo Linux on Amazon EC2 – congratulations on a great choice. But, here’s a problem we just found that is so typical of Gentoo Linux work…after running emerge --update @world that we discuss below, we were unable to build the Apache Web server. Why? Because the emerge command rebuilt the GNU C++ compiler, which in turn caused the following beautiful little error message for us to debug 🙂
configure:5369: checking for C compiler version
configure:5378: x86_64-pc-linux-gnu-gcc --version >&5
 * gcc-config: Active gcc profile is invalid!
gcc-config: error: could not run/locate 'x86_64-pc-linux-gnu-gcc'
The problem? The GNU C++ compiler was updated a couple of version numbers and it is required to run the command gcc-config 1 to fix the problem. And then…because this is Linux…one must also run . /etc/profile to update the current shell profile.
Just wanted to get this in so that you can add the gcc-config 1 command below. We updated the rest of the blog but this problem is so typical of Gentoo Linux errors we couldn’t resist throwing it in at the top also! Now onto to the article…
What are we Doing? Why write this Article?
In this first section let’s do a quick analysis of what this article is all about and our basic underlying technology selections. Namely, our Goal followed by the interesting choices we make to accomplish our Goal.
The Goal: Self-host a Web Site
Let’s start with a goal: we want to self-host a Web site for a friend that is currently hosted through a low-cost but difficult-to-work-with provider. That is not such a big deal, is it? We could easily purchase a small server and just run the site in the house; however, that seems like a lot of time and effort plus we have to find a place for the computer. We could move to another hosting provider; however, we want full control over our Web site. While it’s not hard to get full control, the last thing we want to hear a few months from now is something like “Gee, we can’t modify the database the way we want because that requires sysadmin privileges…which we don’t have.” So we decided to take advantage of the Cloud and run the Web site using a free Linux-based distribution on a computer server that we effectively treat just like a lightbulb: in our case; this means we are using Amazon’s EC2 to host the computer server, and the Gentoo Linux distribution as the operating system. Let’s get started on that!
What is Gentoo Linux Anyways?
Every computer runs an operating system. Most smartphones run variants of the Linux operating system; most desktops in the world run Microsoft Windows. There are even plenty of “mainframe” computers still around and they run variants of the z/OS operating system; what all these operating systems have in common is that they handle the memory, cpu, and disks within or attached to the computer. To run a Web site one normally uses an operating system such as Microsoft Windows or a mainstream Linux distribution such as RedHat, Ubuntu, BSD, or any one of a number of alternatives. So why would we select the Gentoo Linux operating system?
Gentoo Linux is an operating system for which we have a peculiar fondness. It’s claim to fame initially was pure, raw speed; the guiding spirit behind Gentoo Linux is Daniel Robbins who was dissatisfied with the speed and configuration capabilities of existing Linux distributions. Gentoo Linux has always appealed to the highly technical and to the true computer geeks because it offers the end-user the ability to control *all* aspects of the running operating system. Original Gentoo distributions allowed end-users to build from what was called a “Stage 1” tarball; in this most basic case the user literally builds the operating system from the ground up – compiler, linker, build tools, everything – with fine control over the specific compilation options used at each step. It would be the equivalent of installing Windows by starting just with a compiler (such as for C or C++) and the Windows operating system source code. In its raw state, such an operating system has no graphical user interface, no file explorer, not even any tools for setting up network connections or communicating with printers. Only exactly what the end-user wants the system to have.
Such an approach appealed to me immensely as it requires the end-user installing the system truly to understand the entire process…how all the different pieces of the computer’s operating system work with each other and with any desired peripherals (such as fancy-shmancy disk drives beyond good old IDE parallel drives). Simply getting a Gentoo Linux distribution to run could take days of effort (more if starting from a Stage 1 distribution). By the end of such a process, one has amassed a wealth of knowledge and capability that has, in my own case, contributed greatly to my continued success in IT. While such an approach would leave a commodity-focused individual cold (“I don’t care about the computer, just about what the computer can do for me”), for anyone passionate about technology Gentoo Linux is the perfect expression of individualism, creativity, and craftsmanship. Your system running Gentoo Linux can be as optimized, minimal, or complex as *you* can envision.
Starting in 2005 Gentoo moved away from the Stage 1 tarball; this was decried by some as in this post. However, for many users building from the Stage 3 proved still be to educational, fun, and capable of resulting in a (relatively) optimized Linux environment.
To sum up: we could have used just about any operating system. We selected Gentoo Linux because it’s fun to setup, and (in theory) will allow us to optimize our Amazon EC2 “instance” so that we can run our Web site using the least amount of system resources possible. However, that begs the question: What is Amazon EC2 and what does it have to do with our Web site? Read on!
What is this Amazon EC2 Thing?
This article discusses how we setup Gentoo Linux on Amazon’s Elastic Cloud Compute (EC2) public cloud-computing platform. In EC2, one treats computing resources such as a computer “server” just like we treat utilities like electricity or water: when we want a light in the room, we turn on a switch; when we want to brush our teeth, we turn on the faucet. We only pay for the electricity or water we use, and if we need more then we have instant access to it. For example, we can turn on every light in the house and run every faucet; in that case, we increased our demand temporarily and we pay only for the amount of utilities we are consuming. It is exactly the same with EC2. One defines the number of computer “instances” one wants, and one pays for those instances only when they are running. There is no need to purchase expensive computer hardware or network components; Amazon provides all of these for us. If we want more computer instances such as to handle a very busy web site, we simply use Amazon’s convenient EC2 console to request more resources. The prices are low especially for small business people or individuals who do not have high computing performance requirements, and the approach allows consumers to budget exactly how much they want to spend on computing power for a given year. There is greatly reduced risk of a critical server crashing, because Amazon is managing the physical computers. It is possible to purchase true “high-availability” such that if a physical server at Amazon does actually crash, it has little or no effect on our running Web site. In short, EC2 is a great way for businesses to insulate themselves from the problems inherent in buying and maintaining physical computer systems.
That is the upside; but the corresponding truth is just as real: computing resources purchased through Amazon EC2 are not free. Plus, you pay for the computing resources you want. This applies especially to these “instances” we discuss; when you create a computer instance in EC2 then you give it a size. Larger size instances have more CPU and memory than smaller size instances, hence you can run more powerful Web sites on them. But those larger size instances cost more than smaller-size instances. So it comes down to a choice of how much money you want to pay, and how much computing power you need to use. This is exactly the same issue as you have if you wanted to buy a new computer…you can get a blazingly-fast premium system and pay a bundle, or get a cheapie stripped-down closeout model that costs less but runs everything much more sl-o-o-owly.
So now that we’ve discussed what we are doing (self-hosting a Web site) and what our basic model is (use Gentoo Linux running as the operating system for a Web server running in Amazon EC2) we can get to the meat of this article: the specific steps for accomplishing our mission.
The Steps: Setting up Gentoo Linux on Amazon EC2
In this section we cover the specific steps to support our goal of self-hosting our own Web site within Amazon EC2.
Setup Amazon EC2 Account
This step is straightforward…after all, how can we run a server inside Amazon EC2 unless we can login to Amazon EC2? And how can we login except with an account?
There are lots of articles on this step, so we don’t feel particularly compelled to do a lot of screenshots and verbiage. Let’s just cover the basics:
- Register with EC2. From the Amazon EC2 page select to create a free account. Or if you already have an Amazon account (and I bet you all do) then just use that account to login.
- Launch the EC2 Instance. Within EC2 the computing power comes in predetermined slices. Unlike other virtualization environments where the designer can assign physical resources to virtual machines as desired, an Amazon EC2 instance comes preconfigured with RAM and CPU based upon the size you select when you first launch it. (See the Amazon EC2 Instance Types page for more details.) And – once launched – it is non-trivial to migrate from one Amazon EC2 instance size to another.
A complete discussion of Amazon EC2 instances and best practice for using Amazon EC2 computing is beyond the scope of this article. Suffice it to say that one absolutely valid approach is to treat all EC2 computing as ephemeral; you simply spin up instances as you need and have auto-configuration scripts that adapt the instances to join your larger workload. For this article, we are taking a much different approach and treating our EC2 server as we would a physical one in our office…we build and install it as we would any other physical server, and this means we are rewarded for choosing our Amazon EC2 instance size carefully up front.
For our example, we used the Gentoo Linux Amazon Machine Image (AMI). There are many AMIs already pre-built in the Amazon EC2 Marketplace and while we would have gotten technical props for building our own Gentoo AMI (as this post describes) but we really couldn’t justify the extra time. So we resorted to a prebuilt Gentoo AMI from the Amazon Community.
- Setup Security and Access. All access to our EC2 instance will be via Secure Shell (SSH) and private keys. (See this post for an overview of SSH, key login, and so on.) Within EC2 you can generate an SSH keypair, save the generated private key to a safe location on your local system, and then associate that keypair with a particular instance. We did that and made sure we have the corresponding *private key* available and safe.
- Setup Storage. For storage we used Amazon Elastic Block Storage (EBS), which is low-cost and persistent data storage that stays with the EC2 instance just like a physical hard disk does with a physical server.
There are alternative storage options for Amazon EC2 instances. For instance, Amazon EC2 Instance Storage as well as Amazon Simple Storage Service (S3). The Instance Storage is the “classic” Amazon cloud computing storage model in that this storage – disappears after the instance stops! While not useful for our example, the Instance Storage model is great for scenarios such as adding additional Web servers to a load-balanced server farm. In that case, there’s no need for persistent storage as long as the instance can auto-configure itself when it launches and attach to the central database (which would use either EBS or S3 persistent storage). Amazon S3 is another persistent storage solution; see this article on differences between EBS and S3 for more information on which to select.
- Setup Elastic IP. By default, new Amazon EC2 instances have unique public IP addresses on each instance launch. This can be fine if you are adding backend Web servers or database servers to a cluster, but for our example it isn’t so great. Basically, we want our frontend public URL always to point to the running Amazon EC2 instance. This can be scripted to handle as part of the operating system initial configuration, but Amazon makes it much easier via the use of Elastic IPs, which are static IP addresses designed for dynamic cloud computing. An Elastic IP address is associated with your account, not a particular instance, and you control that address until you choose to explicitly release it.
Amazon EC2 provides a single Elastic IP for free, so we used that to map to our running EC2 instance.
At the end of the process, we have the following setup:
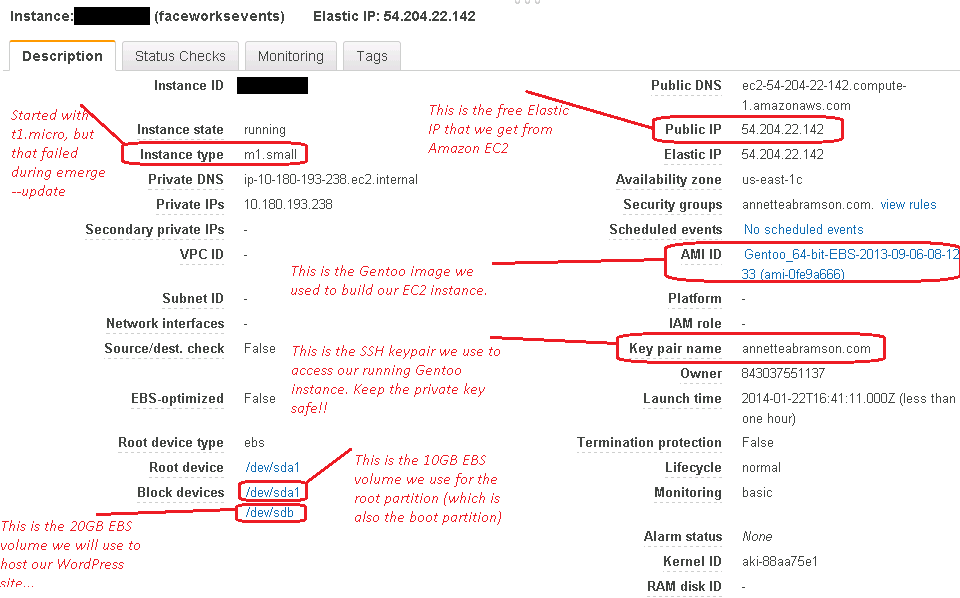
Note that we highlight all the terms we discuss above with our settings.
Setup Gentoo Linux
Follow these steps:
- Launch the instance.This required some experimentation on our part. Our first effort used the lowest-cost t1.micro size instance, but that failed when we ran
emerge --update @worldto get the system updated. We ran into this error:<...truncated for brevity...> nclude -I/var/tmp/portage/sys-devel/gcc-4.7.3-r1/work/gcc-4.7.3/gcc/../libcpp/include -I/var/tmp/portage/sys-devel/gcc-4.7.3-r1/work/gcc-4.7.3/gcc/../libdecnumber -I/var/tmp/portage/sys-devel/gcc-4.7.3-r1/work/gcc-4.7.3/gcc/../libdecnumber/bid -I../libdecnumber insn-emit.c -o insn-emit.o {standard input}: Assembler messages: {standard input}:95314: Warning: end of file not at end of a line; newline inserted {standard input}: Error: open CFI at the end of file; missing .cfi_endproc directive g++: internal compiler error: Killed (program cc1plus)The error has an easy explanation at this link; basically, the compiler ran out of memory which is a function of the limitations of using the t1.micro EC2 instance. So we use m1.small with a default 10GB root volume (minimum that Gentoo AMI allows) and a single 20GB EBS-backed storage volume. This is not the very cheapest setup but it at least allows Gentoo
Portagefunctions to complete and the compiler to build. - Connect to the running Instance. The Amazon EC2 console has a handy “Connect” button but that has some wrong instructions 🙂 So instead, follow these simple steps:
- Get the Cygwin SSH client. Of course if you are already on a Linux distribution then you have an SSH client, but if you are on Windows like we are then the Cygwin pakckage is a great alternative.
- Copy the EC2 private key to your
.sshfolder. When we created the security keys for Amazon EC2, we were prompted to save the private key in Privacy Enhanced Mail (PEM) format. So we copied that file and modified the permissions to 600 (read-write by owner only, no permissions for group or world). - Connect to the EC2 instance. To do this, you always login as
ec2-userand use thesudo su -command to become root. The Amazon instructions differ because they say to connect as therootuser which is incorrect. We added to our SSH connection command by telling the system to ignore host key changes as the host key for an Amazon EC2 instance changes upon each launch. (See this paper on SSH Host Keys for more information on this topic.)Our final SSH connection command looks like this:
sa.andy.bruce@SABSDCX01 ~
$ chmod 600 .ssh/*pem
sa.andy.bruce@SABSDCX01 ~
$ ssh -i .ssh/annetteabramsoncom.pem -o StrictHostKeyChecking=no ec2-user@54.204.22.142
ec2-user@ip-10-180-193-238 ~ $ sudo su -
ip-10-180-193-238 ~ #
In the code above, the final
sudo su -has us become therootuser on the running Gentoo instance. - Access the EBS Storage. As noted above, for this example we are using a 20GB Elastic Block Storage volume. But we need to inform the operating system about this volume; Amazon has documentation at Making an Amazon EBS Volume Available for Use and it’s pretty simple. For completeness we paste the commands we used below:
ip-10-180-193-238 ~ # lsblk
NAME  MAJ:MIN RM  SIZE RO TYPE MOUNTPOINT
xvdb  202:16   0   20G  0 disk
xvda1 202:1    0   10G  0 disk /
xvda3 202:3    0  896M  0 disk

...The 20GB xvdb entry above is our EBS volume...

ip-10-180-193-238 ~ # file -s /dev/xvdb
/dev/xvdb: data

...The above command shows that there is no filesystem on this EBS volume...
...Therefore, we format it using the next command...

ip-10-180-193-238 ~ # mkfs -t ext4 /dev/xvdb
mke2fs 1.42.7 (21-Jan-2013)
Filesystem label=
OS type: Linux
Block size=4096 (log=2)
Fragment size=4096 (log=2)
Stride=0 blocks, Stripe width=0 blocks
1310720 inodes, 5242880 blocks
262144 blocks (5.00%) reserved for the super user
First data block=0
Maximum filesystem blocks=4294967296
160 block groups
32768 blocks per group, 32768 fragments per group
8192 inodes per group
Superblock backups stored on blocks:
        32768, 98304, 163840, 229376, 294912, 819200, 884736, 1605632, 2654208, 4096000
Allocating group tables: done
Writing inode tables: done
Creating journal (32768 blocks): done
Writing superblocks and filesystem accounting information: done

...Mount the file system onto a local folder named "ebs_data_1"...
ip-10-180-193-238 ~ # mkdir /ebs_data_1
ip-10-180-193-238 ~ # mount /dev/xvdb /ebs_data_1

...Verify that the file system is valid...
ip-10-180-193-238 ~ # file -s /dev/xvdb
/dev/xvdb: Linux rev 1.0 ext4 filesystem data, UUID=3ba7f5df-c118-4565-868e-819b
2ead2b03 (needs journal recovery) (extents) (large files) (huge files)
The final step is to modify the
/etc/fstabfile so that the EBS volume is mounted on every machine reboot. We show the actual file:#################################################################### # these lines were already in the file...they are the 10GB root disk /dev/xvda1 / ext4 defaults 1 1 none /dev/pts devpts gid=5,mode=620 0 0 none /dev/shm tmpfs defaults 0 0 none /proc proc defaults 0 0 none /sys sysfs defaults 0 0 #################################################################### # this is the 20GB EBS volume we attached to the Gentoo Linux system /dev/xvdb /ebs_data_1 ext4 defaults 0 2 - Update the Gentoo distribution. Start with the latest Gentoo distribution AMI; for example, we began with the Gentoo_64-bit-EBS-2013-09-06-08-12-33 image which is EBS-compatible as of 6 September, 2013. Since we built this server in January, 2014 that means there are four months of updates! The way to update a Gentoo image is by using the
emergetool. - Synchronize:
nohup emerge --sync &. This command looks at the Gentoo distribution and figures out which packages are out-of-date. Note that we use thenohupcommand in conjunction with the&to run this tool in the background. You can check the status of the running command using thepscommand or simply by usingtail -f nohup.out. - Update Portage:
nohup emerge --oneshot portage. First, how about some great news: there was no need for us to muck with networking or operating system configurations after the instance launched! In other words…after we launched the instance Everything Just Works. That’s super easy, especially when you consider that the Gentoo Handbook is several volumes long and can take days to go through.When the
emerge --syncjob completes, you will almost certainly see the following:* An update to portage is available. It is _highly_ recommended * that you update portage now, before any other packages are updated. * To update portage, run 'emerge --oneshot portage' now.This means exactly what it says: before updating anything else, update the Portage toolchain by using the command. Do this now in the background.
- Update:
nohup emerge --update @world &. This command will take a while depending on the number of packages to update. In our case we had 34 packages that needed updating after theemerge --synccommand ran – and this included the GNU C++ compiler which is *big*. The total update time was around 4 hours, primarily because in the Gentoo world one must remember that one updates using source code and local builds. This is slower but can – with proper care – result in faster / smaller running systems than the typical operating system update which would use pre-built binaries. At the end, one will see optional messages about running additional commands (covered next). If you run into compilation errors…you gotta figure those out on your own. That’s the joy of Gentoo 🙂 - Final Configuration. Once you have the system updated, you will probably need to run
etc-updateto get configuration files setup properly. Theetc-updatecommand has its own syntax and usage; see this Gentoo post for more information on using the tool. You also may need to runemerge --depcleanto remove old references; we ran this command to remove the older GNU C++ compiler that was still on the system. - Update GNU Compiler. As we documented above, if the GNU C++ compiler version changes then it is likely that other
emergecommands won’t work until the system is rebooted. So here are some more commands to run if the GNU C compiler changes:gcc-config 1 . /etc/profileThe first command forces the GNU compiler “profile” to be updated to the first profile (the number “1” in the command). The second command forces the currently running shell to be updated.
We’ll add more commands to this final-steps section if we find we need ’em.
So at this point we are running, the system is happily updated, and we have no packages beyond what the pre-built Gentoo AMI. It is time to cut this article short and move on to the next…installing a LAMP Stack on our new Gentoo Linux!

This article has just scratched the surface of what can be done with Amazon EC2 and Gentoo, but we hope you found it useful. Happy Computing!
Team-oriented systems mentor with deep knowledge of numerous software methodologies, technologies, languages, and operating systems. Excited about turning emerging technology into working production-ready systems. Focused on moving software teams to a higher level of world-class application development. Specialties:Software analysis and development...Product management through the entire lifecycle...Discrete product integration specialist!
Leave a Reply