Jumbo Frames – Use Case for ESXi5, NetApp, and Cisco/NetGear Switches
Jumbo frames are used for iSCSI (which use 8192 byte frames) to avoid IP fragmentation, thus improving network throughput by reducing the overall number of frames transmitted. Jumbo frames are by convention 9000 bytes which is ample for iSCSI traffic (and any required VLAN tagging). This blog post guides the user through setting up jumbo frames for ESXi5, NetApp FAS2240 storage device, NetGear GS748TS switch, and Cisco-compatible (CatIOS-compatible) blade switches.
Setting up jumbo frames is a function of all elements in a communications chain:
- Network interfaces
- Switch ports
- Routers
For this use case, jumbo frames are used for iSCSI in a very simple environment: by design, iSCSI traffic is never routed (flat Layer 2 fabric). Thus, jumbo frames affect only network interfaces and switch ports. As a simple switch fabric use case jumbo frames highlight the areas to hit when modifying network communications.
Know the Network: VLANs and Subnets
Because VLANs segment network traffic, it’s important to note that jumbo frames must be enabled at the VLAN interface in addition to the physical network interface. For this use case, assume that the iSCSI (Storage) VLAN ID is 240.
Also, the network admin must know which subnet is providing the iSCSI (Storage) function: for this use case this is the 172.28.4/24 subnet. This network is – by design – non-routable so consumers and providers must be on the VLAN *and* on the related 172.248.4/24 subnet; failure on either part means that iSCSI can’t be used.
NetApp Filer and Jumbo Frames
The journey starts with the storage appliance supporting the iSCSI consumers, in this case the FAS2240 in the APG Cloud. Log into the appliance and determine the iSCSI interface. Issue command rdfile /etc/rc and look for the ifconfig lines that create and configure VLAN 240:
FAS2240001SX> rdfile /etc/rc

vlan create e0c 240

ifconfig e0c-240 172.28.4.160 netmask 255.255.255.0

ifconfig e0c-240 partner e0c-240
In the above NetApp configuration, the interface e0c has a VLAN 240 created for it (which creates a *virtual* interface called e0c-240). Note that there is no line or setting to modify the MTU to be 9000. To setup jumbo frames, issue command ifconfig e0c-240 mtusize 9000 and do not forget to update the /etc/rc file. Then the command ifconfig e0c-240 will show the following:
FAS2240001SX> ifconfig e0c-240

e0c-240: flags=0x1b4c867<UP,BROADCAST,RUNNING,MULTICAST,TCPCKSUM> mtu 9000

inet 172.28.4.160 netmask 0xffffff00 broadcast 172.28.4.255

ether 00:a0:98:19:e2:58 (auto-1000t-fd-up) flowcontrol full
Note that mtu 9000 is now part of the output. Update both NetApp filer heads the same way and the first part is done. The NetApp filer now supports jumbo frames on the iSCSI interface.
NetGear Switches and Jumbo Frames
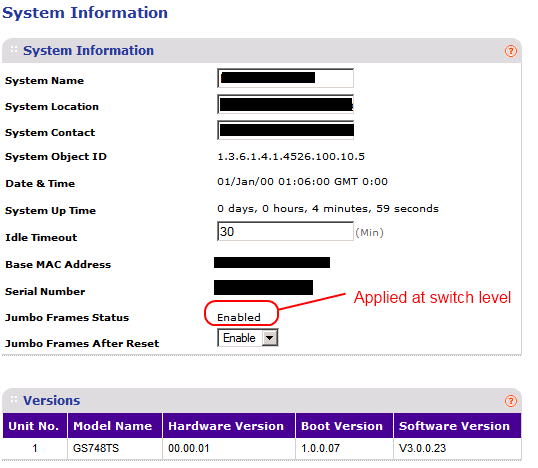
The NetGear GS748TS switches used by this use case are not truly programmable; instead, the sysadmin logs into the Web interface. Also, jumbo frames are not enabled at the port level but instead for the entire switch. Login to each NetGear switch and enable jumbo frames (requires a reboot if the switch doesn’t already support jumbo frames). The screenshot for the NetGear Switches section below shows jumbo frames enabled for the NetGear switch as a whole.
Cisco-compatible Switch and Jumbo Frames
This use case is delivering iSCSI to an ESX host that is running on Hitachi CB2000 blades within the Infrastructure rack. The blades communicate to the outside world via a Cisco-compatible switch built into the blade chassis itself; each blade has “lines” (the equivalent of CAT6 cables) that connect each NIC to the relevant switches. Furthermore, the CB2000 chassis switches offer port uplinks that are connected to the NetGear switch at the top of the rack.
Note that the CB2000 switches are almost 100% compatible to Cisco IOS-based switches. Thus, these programming instructions will apply almost identically to Cisco switches for jumbo frame support.
For this use case, two ports are involved:
- The dedicated iSCSI (Storage) port connecting the CB2000 switch to the blade.
- The CB2000 switch uplink port connecting to the NetGear switch.
For this use case these ports are both on Switch Module 1 on the CB2000 (the CB2000 has up to 6 switch modules labeled 0-5 – each blade in the chassis has up to 10 NICs connected to the various switches). The uplink port is Line 1 (which has a physical cable connecting it to the NetGear) and Line 5 (which connects to NIC 1 of blade 0 which is running the ESXi5 host).
Login to the CB2000 chassis and set the MTU size for both of these ports within the ENABLE mode:
login: [enter switch user]

Password: [enter switch user password]

Copyright (c) 2005-2010 ALAXALA Networks Corporation. All rights reserved.

> en

Password: [enter ENABLE mode password]

# conf t

(config)# show int gig 0/1

interface gigabitethernet 0/1

flowcontrol send on

mtu 9000

switchport mode trunk

switchport trunk allowed vlan 240

!

(config)# show int gig 0/5

interface gigabitethernet 0/5

speed 1000

duplex full

flowcontrol send on

mtu 9000

switchport mode trunk

switchport trunk allowed vlan 240

spanning-tree portfast trunk

!
The above shows that the MTU is set to 9000; if it wasn’t simply configure each affected interface to have the mtu 9000 setting and save the configuration.
ESXi5 and Jumbo Frames: Host vSwitch and vmknic
The final step in this use case is to extend jumbo frames to ESXi hosts. When setting jumbo frames within ESXi5, there are two considerations: standard virtual switches (vSwitch) and distributed virtual switches (dvSwitch). The setup is similar for both and explored in the following sections.
ESXi5, Jumbo Frames, and Standard Switches
Both the ESXi5 host virtual switch (vSwitch) as well as the VMkernel NIC (vmknic) must use an MTU of 9000 as well as the appropriate VLAN. Login to the ESXi5 host and check to see which vSwitch is using the NIC that is connected to the CB2000 switch module:
# esxcfg-vswitch -l
Switch Name     Num Ports  Used Ports Configured Ports MTU    Uplinks
vSwitch0Â Â Â Â Â Â Â Â 128Â Â Â Â Â Â Â Â 4Â Â Â Â Â Â Â Â Â Â 128Â Â Â Â Â Â Â Â Â Â Â Â Â Â 1500Â Â Â vmnic1
PortGroup Name       VLAN ID Used Ports Uplinks
VM Network           220     0          vmnic1
Management Network   210     1          vmnic1
Switch Name     Num Ports  Used Ports Configured Ports MTU    Uplinks
vSwitch1Â Â Â Â Â Â Â Â 128Â Â Â Â Â Â Â Â 4Â Â Â Â Â Â Â Â Â Â 128Â Â Â Â Â Â Â Â Â Â Â Â Â Â 9000Â Â Â vmnic2
PortGroup Name       VLAN ID Used Ports Uplinks
iSCSIÂ Â Â Â Â Â Â Â Â Â Â Â Â Â Â Â 240Â Â Â Â Â 1Â Â Â Â Â Â Â Â Â Â vmnic2
In the above output, the virtual switch vSwitch1 is associated with vmnic2 (which corresponds to the NIC connected to the CB2000 switch in the previous section). The MTU is already set to 9000; if it wasn’t, then the command esxcfg-vswitch -m 9000 vSwitch1 would do the trick.
Note also that a portgroup named “iSCSI” has been created; this portgroup must be on the iSCSI (Storage) VLAN 240.
Finally, the relevant VMkernel NIC (vmknic) must be created to use that VLAN 240 portgroup; this vmknic must *also* have an MTU of 9000 specified. Here is the command:
esxcfg-vmknic -a -i 172.28.4.90 -n 255.255.255.0 -m 9000 iSCSI
That command creates a vmknic on the iSCSI portgroup. Note especially that the IP address is on the configured 172.28.4/24 subnet.
At this point, jumbo frames are in place for the dvSwitch, portgroup, and vmknic.
ESXi5, Jumbo Frames, and Distributed Switches
Within a full-blown vSphere / vCenter environment and distributed virtual switches (dvSwitch), the setup is the similar to standard switches.
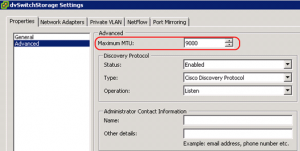
- The dvSwitch must be set to the correct MTU. The following screenshot shows this in action for the dvSwitch named
dvSwitchStorage:
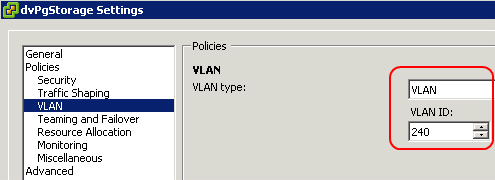
- The related distributed portgroup (dvPortGroup) must have the correct VLAN. The following screenshot demonstrates this for the dvPortGroup
dvPgStorageassigned to a distributed switch nameddvSwitchStorage:

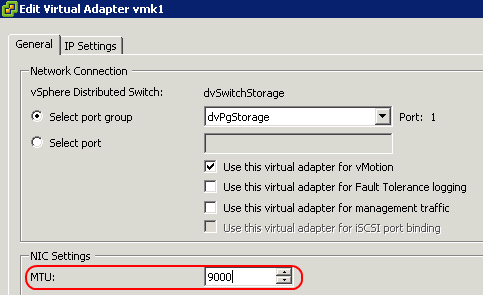
- Finally, when adding hosts to the dvSwitch the sysadmin must ensure that an appropriate VMkernel NIC (vmknic) has been created *and mapped* to that host within the portgroup. An easy way to do this is to use the vSphere Client; select the host and go to the Configuration tab, then select Networking from the blue links on the left. To create a vmknic select to “Manage Virtual Adapters” and then select to add an adapter (it will only allow a VMkernel adapter type). In the Connection Settings screen, select the dvPortGroup for iSCSI as shown below:
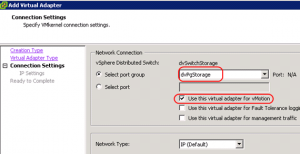
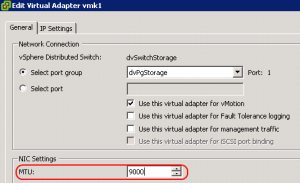
Note that the dvPortGroupdvPgStoragehas been selected and, because this storage adapter is used for vMotion, the appropriate checkbox is set (which permits the host to advertise this vmknic as supporting vMotion to neighbors within a vSphere cluster).Most likely storage networks will be IP-based so then provide the IP address based on the assigned values from the storage administrator.When finished creating the virtual adapter, go back to the settings and change the MTU to 9000 for this jumbo frames use case. (The default is 1500 which is not big enough.) See the following shot:


At this point, jumbo frames are in place for the dvSwitch, dvPortGroup, and the related virtual adapter that maps to a vmknic.
Verifying Jumbo Frames
On the affected ESXi5 host, simply use the vmkping command with options set *not* to fragment IP packets and a packet size of 1600. Because the default packet size is 1500, this means that any receiver in the network chain which cannot handle jumbo frames will disregard the packet; this returns an error. See the vmkping help for details on the command line options.
First run the command against a known target that does not have jumbo frame support (for example, the default router):
/var/log # vmkping -4 -d -I vmk0 -s 1600 172.24.1.1

PING 172.24.1.1 (172.24.1.1): 1600 data bytes

sendto() failed (Message too long)

sendto() failed (Message too long)

sendto() failed (Message too long)

--- 172.24.1.1 ping statistics ---

3 packets transmitted, 0 packets received, 100% packet loss
That failed as expected; try again against the NetApp filer which should support jumbo frames:
/var/log # vmkping -4 -d -I vmk1 -s 1600 172.28.4.160

PING 172.28.4.160 (172.28.4.160): 1600 data bytes

1608 bytes from 172.28.4.160: icmp_seq=0 ttl=255 time=0.291 ms

1608 bytes from 172.28.4.160: icmp_seq=1 ttl=255 time=0.290 ms

1608 bytes from 172.28.4.160: icmp_seq=2 ttl=255 time=0.280 ms

--- 172.28.4.160 ping statistics ---

3 packets transmitted, 3 packets received, 0% packet loss

round-trip min/avg/max = 0.280/0.287/0.291 ms
That succeeded, which proves that jumbo frames are working correctly. At this point the system designer can rest assured that iSCSI traffic can travel as efficiently as possible over the IP network.
Team-oriented systems mentor with deep knowledge of numerous software methodologies, technologies, languages, and operating systems. Excited about turning emerging technology into working production-ready systems. Focused on moving software teams to a higher level of world-class application development. Specialties:Software analysis and development...Product management through the entire lifecycle...Discrete product integration specialist!
Hi,
Very infromative article!
On the NetApp Filer step, would you also apply jumbo frames to the physical interface i.e
ifconfig e0c mtu 9000
along with
ifconfig e0c-240 mtu 9000?
Thanks
Abz
I had that originally, but there was no need – from the docs I saw that settings on the VLAN totally replace the individual settings on the ports making up the VLAN. Which makes sense…
I just put up another article on link aggr which points to the same thing: the VIF for FAS2240 also totally replaces the individual settings on the port.
Keep in mind that the uplinks on the FAS2240 are just via a built-in switch. From what I learned, all three switches involved – CB2000 (Cisco-compatible), NetGear, and FAS2240 – document that individual interface settings are subsumed when you go into link aggr mode. That makes perfect sense when you think about it…
Although it still irks me that for link aggr I could not get uplink selection via src port / dst port hash to work. I still blame the NetGear switch. src ip / dst ip hash will always result in same uplink being used – which seems to defeat purpose in link aggr.
Hello … Thanks for this very good article. Can you please provide some tips on changing to jumbo frames on a prod environment? Can it cause an outage?
Thanks!
Hello Alberto – depends on your switching capabilities. The problem is that switching to jumbo frames may not actually improve performance. I just spent a day implementing jumbo frames on SMB equipment with results that do not indicate any improvement in throughput…because of CPU congestion due to the increased number of sent iSCSI packets.
Best of luck!