Multiple WordPress Blogs, Gentoo Linux, and Amazon EC2
This is the third post article on Gentoo Linux and Amazon EC2. This article discusses multiple WordPress installs within a single Gentoo running instance (to keep EC2 hosting costs down).
Our other articles on this topic covered running Gentoo Linux on Amazon EC2 and setting up a LAMP Stack on the running instance. Now we are ready to install WordPress, which is a trivial task. The only complexity is that we want multiple independent WordPress sites; there is a WordPress article on multiple blogs that we use as a starting point. For our example, we will install each WordPress into its own folder and simply share a single MySQL database.
Quick Recap
For reference, here’s where we are right now:
- Hosting Platform. We are using Amazon EC2 with a “previous generation” m1.small instance type. This gives us 1.7GB of RAM, 1 Intel Xeon processor, and 1 “EC2 Compute Unit” (ECU). See the Amazon EC2 FAQ Page for information on what an ECU is and why Amazon uses it.
- Operating System. We are using Gentoo Linux. This adds some complexity because this Linux variant is based upon source distributions and local compile / build of all modules. (Well, that’s not completely true as certain modules like KDE or OpenOffice are almost always installed from pre-built binaries.) One side effect of selecting Gentoo Linux is that the
emerge --update @worldcommand failed due to out-of-memory with our initial EC2 “t1.micro” instance (that size instance has only .67GB of RAM). So using Gentoo Linux is actually costing us more per hour – $0.06 per hour for m1.small instance size as opposed to $0.02 per hour for t1.micro instance size. Ah, well, it’s only money and life is short and Gentoo Linux is a fast, elegant, and strangely beautiful creature. - LAMP Stack. We are using the standard Linux (Gentoo), Apache, MySQL, and PHP software stack. It is *possible* to run WordPress on other databases but not really supported. As such, of course, it appeals to our nature as programmers to use that approach…we have found that the best programmers are by nature contrarian, idiosyncratic, somewhat esoteric, quirky, and prickly. This is in addition to hubris, laziness, and some third characteristic which we are too lazy to lookup, and which since we can’t recall it instantly is of absolutely no importance whatsoever. (Get it?)
It is also quite possible to run WordPress on non-Apache Web servers. For example, the WordPress used for this blog today is running on a cheapie little Windoze server with IIS (that particular install really did take about 5 minutes as opposed to this long, drawn-out effort we’re documenting in these articles). So do not be constrained in your own choices…explore and have fun with the technology!
That’s where we stand right now. Thus it is time to get WordPress running on this Gentoo Linux we have – with the single added twist of running multiple independent blogs. As in we could allow wp-admin to be writable for each blog owner with no impact on other blogs.
Let’s Go WordPress!
Here are our steps:
- Planning the File Structure. Begin with the Official WordPress Installation Instructions. You will quickly realize that the key to any WordPress install is the combination of where to install the software and how the supporting database will be used. For simple installs this planning is minimal or even non-existent; just run the installer and let the default answers take care of you. For a shared-database install as we will do as well as for independent WordPress installs there is more to plan. In our case we have a 20GB Amazon EBS volume that we use mounted as
/ebs_data_1. We use the virtual host Apache Web server capability to keep our WordPress blogs separate, and each hosted WordPress blog will be in its own dedicated area. Here is the file layout we have setup and plan to use:-
File structure for all blogs. Each blog will be under
/ebs_data_1/sites. The following output shows our first site which will be used to host faceworksevents.com:ip-10-168-36-161 vhosts.d # ls -la /ebs_data_1/sites total 12 drwxr-xr-x 3 root root 4096 Jan 22 21:45 . drwxr-xr-x 5 root root 4096 Jan 22 21:25 .. drwxr-xr-x 5 root root 4096 Jan 22 22:39 faceworksevents_comWe tie this into the existing Apache site structure using soft links:
ip-10-168-36-161 vhosts.d # ls -la /var/www/
total 12
drwxr-xr-x  3 apache root 4096 Jan 22 21:29 .
drwxr-xr-x 11 root   root 4096 Jan 22 20:29 ..
drwxr-xr-x  3 root   root 4096 Jan 22 20:35 localhost
lrwxrwxrwx  1 root   root   17 Jan 22 21:29 sites -> /ebs_data_1/sites
This approach ensures that we keep everything tidy and separate but that we can treat the WordPress site folders as though they were a part of the default Apache install.
- File structure for each blog. We want each blog to be completely self-contained from all other hosted WordPress blogs. This allows us to update / theme each blog independently (although the backing database will always be the same version for all blogs). Let’s take a look at our proposed blog file structure:
ip-10-168-36-161 vhosts.d # cd /ebs_data_1/sites/faceworksevents_com
ip-10-168-36-161 faceworksevents_com # ls -la
total 20
drwxr-xr-x 5 root root 4096 Jan 22 22:39 .
drwxr-xr-x 3 root root 4096 Jan 22 21:45 ..
drwxr-xr-x 2 root root 4096 Jan 22 23:13 apache_configs
drwxr-xr-x 2 root root 4096 Jan 22 22:46 logs
drwxr-xr-x 2 root root 4096 Jan 23 09:04 public_html
For each blog, we store the Apache virtual host configuration file within the
apache_configsfolder and use a soft link to allow Apache to load it (for example,ln -fs /ebs_data_1/sites/faceworksevents_com/apache_configs/faceworksevents_com.conf /etc/apache2/vhosts.d/20_faceworksevents_com.conf). We store each Apache log within thelogsfolder so that we can track site access individually by hosted blog. And we store the HTML pages inpublic_html…and that last location is where we’ll place our WordPress install. Specifically, we’ll install to thepublic_html/wordpressfolder to match typical WordPress standards.
-
File structure for all blogs. Each blog will be under
- Planning the Database Approach. For this article we will install multiple WordPress blogs but they will each share a single database. Additionally, we won’t muck with the dreaded phpMyAdmin to setup the database due to repeated phpMyAdmin security flaws; phpMyAdmin is simply not necessary for a successful install.
For maximum isolation, we’ll plan on separating the database access for each hosted entry. We’ll use separate usernames, passwords, and table prefixes within php_config.ini as documented here. The result should be a simple and reliable but safe installation.
- Pull down the WordPress code. Because we’re installing each blog separately, we pull down and build WordPress into a blog-specific folder:
ip-10-168-36-161 faceworksevents_com # cd /ebs_data_1/sites/faceworksevents_com/
ip-10-168-36-161 faceworksevents_com # cd public_html
ip-10-168-36-161 public_html # wget http://wordpress.org/latest.tar.gz
--2014-01-24 13:20:05--  http://wordpress.org/latest.tar.gz
Resolving wordpress.org... 66.155.40.250, 66.155.40.249
Connecting to wordpress.org|66.155.40.250|:80... connected.
HTTP request sent, awaiting response... 200 OK
Length: 5869727 (5.6M) [application/x-gzip]
Saving to: 'latest.tar.gz'

100%[======================================>] 5,869,727   4.72MB/s   in 1.2s

2014-01-24 13:20:07 (4.72 MB/s) - 'latest.tar.gz' saved [5869727/5869727]

ip-10-168-36-161 public_html # tar -xzvf latest.tar.gz
...[output cut]...
ip-10-168-36-161 public_html # ls -la
total 5756
drwxr-xr-x 3 root   root       4096 Jan 24 13:20 .
drwxr-xr-x 5 root   root       4096 Jan 22 22:39 ..
-rw-r--r-- 1 root   root         49 Jan 22 22:01 index.html
-rw-r--r-- 1 root   root    5869727 Jan 23 20:18 latest.tar.gz
-rw-r--r-- 1 root   root         69 Jan 23 08:38 phpinfo.php
drwxr-xr-x 5 nobody nogroup    4096 Jan 23 20:17 wordpress
That sets up the software and now it’s on to configuration.
- Setup MySQL Database for WordPress. While it is perfectly possible to install either separate MySQL database instance for WordPress or to use the same database instance and database for multiple blogs, our example’s approach uses a single MySQL database instance and specific databases within that instance for each hosted blog. This database creation could be performed any number of ways; see WordPress Installation Documentation. Here are the commands we ran for our target WordPress site:
ip-10-235-60-161 ~ # mysql -u root -p
Enter password:
Welcome to the MySQL monitor.  Commands end with ; or \g.
Your MySQL connection id is 6
Server version: 5.1.70-log Gentoo Linux mysql-5.1.70

Copyright (c) 2000, 2013, Oracle and/or its affiliates. All rights reserved.

Oracle is a registered trademark of Oracle Corporation and/or its
affiliates. Other names may be trademarks of their respective
owners.

Type 'help;' or '\h' for help. Type '\c' to clear the current input statement.

mysql> create database faceworksevents_com;
...[output cut]...
mysql> grant all privileges on faceworksevents_com to "wp_fwe_com"@"localhost"
  identified by "password";
...[output cut]...
mysql> flush privileges;
...[output cut]...
mysql> exit;
In the code above, the
grant all privilegescommand specifies the user name (“wp_fwe_com”). We originally planned for this to be faceworksevents_com but there is a 16-character name length limit in MySQL. So we shortened the name; you will want to do likewise. Just document your standards and choices! - Configure WordPress
wp-config.php. The next step is to modify thewp-config.phpfile located in the blog’s WordPress folder. For our example, this is/ebs_data_1/sites/faceworksevents_com/public_html/wordpress/, because we are installing WordPress into the blog-specific folder. If you take a pre-built “5-minute install” then probably yourwp-config.phpwill be auto-populated based upon your choices – for our more manual process we have just a few steps to enter. There’s even a great, simple WordPress article you can use; we’ll cover our specific steps here for completeness:- Create
wp-config.php. As installed, WordPress creates a filewp-config-sample.phpin the WordPress folder. So simply copy that over; we usedcp ./wp-config-sample.php ./wp-config.phpand that sets up basic file. - Setup database connection. Open
wp-config.phpin your favorite Linux editor and set the database connection entries; we’ve pasted in ours.// ** MySQL settings - You can get this info from your web host ** // /** The name of the database for WordPress */ define('DB_NAME', 'faceworksevents_com'); /** MySQL database username */ define('DB_USER', 'wp_fwe_com'); /** MySQL database password */ define('DB_PASSWORD', 'strong-password'); /** MySQL hostname */ define('DB_HOST', 'localhost'); /** Database Charset to use in creating database tables. */ define('DB_CHARSET', 'utf8'); /** The Database Collate type. Don't change this if in doubt. */ define('DB_COLLATE', ''); - Setup “Authentication Salts”. As an additional security measure, WordPress wants you to encrypt various site elements by using some *very* strong random keys. The
wp-config.phpediting page goes over this step and even provides an online generation tool you can use.
- Create
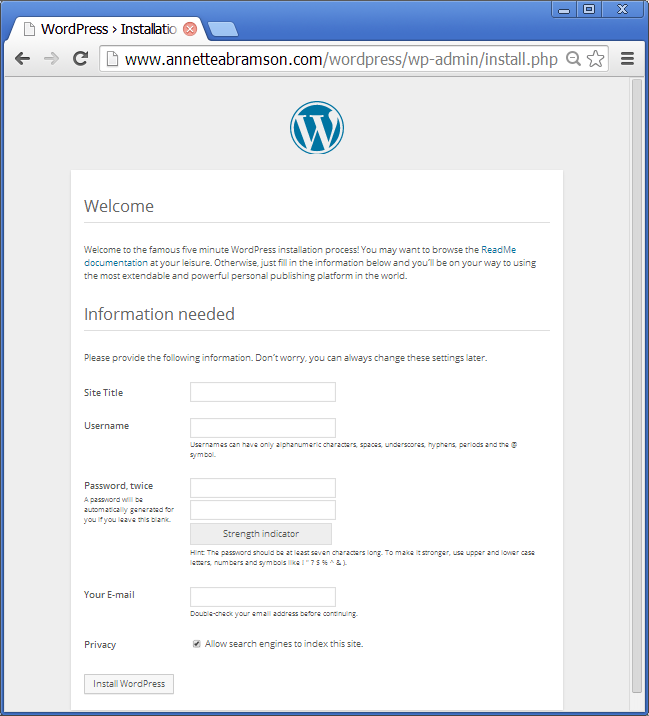
- Verify Basic Operation. Here’s a real milestone…can you get to your shiny new WordPress site? In our case this meant we changed our DNS entry for the
annetteabramson.comdomain to point to our free EC2 Elastic IP and tried to open up the site annetteabramson.com/wordpress/…with success!

There are some real problems with the above that we want to get straightened out real soon…namely, that we are using HTTP instead of HTTPS. But let’s live dangerously and install our WordPress site in cleartext for just a few minutes! This is even easy because our “installation” is done. All this screen is doing is prompting you to specify a username and password, then you can login to the WordPress administration panel.
This is probably enough for one post – we’ve got our WordPress installed and configured for basic operations in a way that permits us to host multiple blogs within a single Linux, Apache, and MySQL configuration. Next up will be a bit of hardening and overall configuration that is independent of Gentoo Linux and Amazon EC2 – so we will put those useful steps in their own article.
Happy Computing!
Team-oriented systems mentor with deep knowledge of numerous software methodologies, technologies, languages, and operating systems. Excited about turning emerging technology into working production-ready systems. Focused on moving software teams to a higher level of world-class application development. Specialties:Software analysis and development...Product management through the entire lifecycle...Discrete product integration specialist!
Leave a Reply