Update JRE and Firefox on Windows Servers – Improved
Click here to download “3rd-Party Updates” now!
Found great link at Use a batch file and group policy to cleanly update Java but my use case was different: lots of machines are not in domain (eck), I don’t want to install updated JRE on any machine that doesn’t absolutely need it, and I want to install the correct JRE. For example, if a machine had 32bit JRE installed then I want to install the 32bit update.
Updated post as of 26 JUN 2013 with instructions on how to get CAB / MSI from JRE download.
For Linux (and Windows) I’d prefer Puppet but that isn’t feasible for the Windows boxes as we do not have time / authorization to install the agent. So I have a much more elaborate vbscript that updates the JRE based on analysis of Windows Registry. The beauty is that it can be run directly from a batch file deployed using GPO.
My first cut worked OK but failed because I couldn’t get to the share (as others have written). I solved this and a few other issues:
- Worked thru the master driver script
- Solved some issues when using various Windoze flavors (Win7, W2K8 x86, W2K8 x64, R2)
- Documented instructions on setting up for AD GPO
My vbscript does *not* bother with uninstall; in our environment I know there’s exactly one JRE installed (or not). So I take advantage of the fact that newer JRE updates will replace the old code.
The rest of this email contains instructions on how to get the MSI / CAB file for auto-install, and then how to setup to a file share:
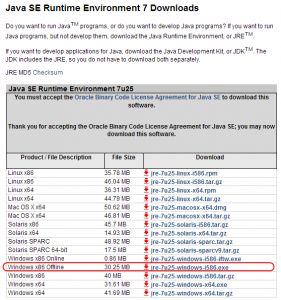
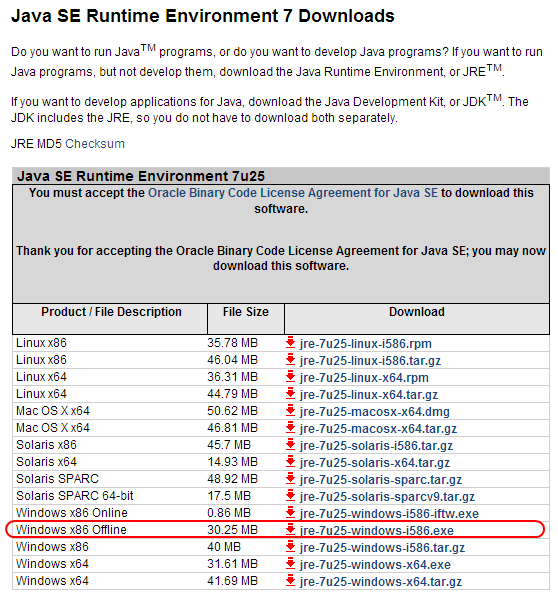
- First step is to explain how to get the MSI and CAB files necessary for the automatic installation from a JRE distribution. Pull down a JRE distribution (such as JRE7 U25) as shown below:
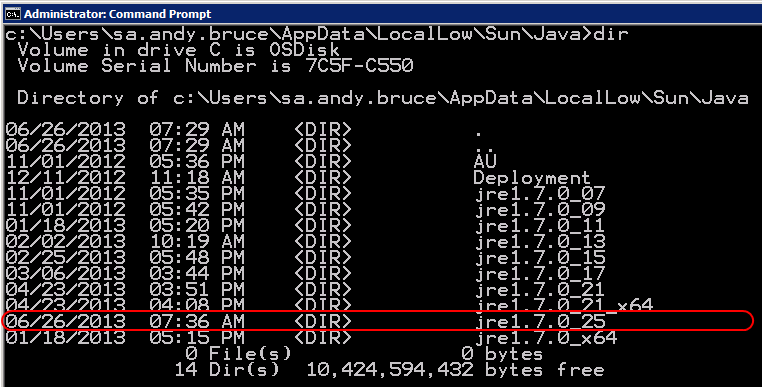
Next, on a single machine simply run the update manually. This extracts necessary CAB / MSI files – but only while the installer is still open!! For example, on my test box running Windows Server 2008 R2 this extracted the files into
C:\Users\sa.andy.bruce\AppData\LocalLow\Sun\Java: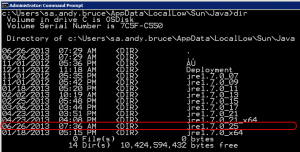
Inside the JRE version folder you should find the CAB and MSI files as shown below. Once again–only while the JRE installer is still open!
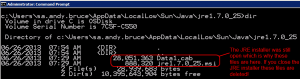
These are the files to copy to the shared drive. Once you have them available continue to the next step.
- Create directory structure and copy files. On one machine (file server) create a top-level folder and copy the attached ZIP files to that folder. For example, this results in a structure like the following:
C:\AnonRead
    -> Firefox (contains MSIs)
    -> JRE (contain MSIs)
    -> MgmtScripts (scripts)
    -> MgmtScriptsOut (output logs / errors from hosts)
You might be worried about space; no need. Even with lots of MSI files and host logfiles, you will never come close to even 1GB of space. That is because only the latest MSI files need to be in place, plus the scripts automatically clean up log files in the MgmtScriptsOut (10 days of logs are kept for each host). The log files are tiny (just a couple K for each run).
- Set NTFS permissions. The top-level folder should have “Read & Execute”, “List Folder Contents”, and “Read” permissions for Everyone and ANONYMOUS LOGON. The MgmtScriptsOut folder underneath should have “Full Control” for Everyone and ANONYMOUS LOGON. That is because output results are automatically stored under the MgmtScriptsOut folder for each machine.
- Create network share. This share must allow anonymous access for non-domain computers to get to it. This is an IA finding but there’s no other way I could think of to give access (perhaps cURL and a Web site would do it but that seemed too complex).
- Recommend that the share is called AnonRead.
- The share must have “Change” and “Read” permissions for Everyone and for ANONYMOUS LOGON.
- Be sure that the local security policy “Computer Configuration -> Windows Settings -> Security Settings -> Local Policies -> Security Options -> Network access: Shares that can be accessed anonymously” has the name of the share.
- Modify the “MgmtScripts\Do_Run_ALL.cmd” file. This file must contain the full path to the network share. Look for the line “SET Do_Run_All_NetPath” at the top of the script and modify the path.
- Handle domain servers: Create GPO. For APG, created a GPO named “3rd-PartyUpdates” and linked / enforced it to the domain. The only setting it has is in “Policies -> Windows Settings -> Scripts (Startup/Shutdown) -> Startup”. Once in that setting, click the “Show Files…” and copy the Do_Run_ALL.cmd to the GPO folder. Then you can browse and select the Do_Run_ALL.cmd file. You do not need to pass any arguments.
- Handle non-domain servers without UAC: Use “PsExec”. You can use any tool that allows remote commands to be executed in an *elevated context*. PsExec does this, it is free, and it is part of the SysInternals suite from Microsoft. You can use it to execute a command for a whole set of computers; simply enter each computer name in a file. Use the following syntax from an elevated command prompt:
psexec -i -h @[file_containing_IPs] \\[file_server]\[share]\MgmtScripts\Do_Run_ALL.cmd
The “-i” tells psexec to perform an interactive session. The “-h” tells psexec to use the elevated context.
- Handle non-domain servers with UAC: Use Scheduled Task. If you have UAC enabled on the remote machine, the PsExec won’t work. Neither will WMI or any other tools; this is by design since UAC prevents elevated commands from running. To handle this, there is a file “MgmtScripts\Run 3rd-Party Software Updates.xml” that can be used to setup a scheduled task on each remote machine. It’s simple to do this; just open Task Scheduler on the remote machine and import the XML file. It is already setup to run at machine reboot *and* at 12:30 AM each day.
- Verify that it works. From any machine, run “\\[fileserver]\[share]\MgmtScripts\Do_Run_ALL.cmd”. For example, a command might be “\\172.24.0.33\AnonRead\MgmtScripts\Do_Run_ALL.cmd”. This will create a new folder underneath the “MgmtScriptsOut” folder with the name of the host with 2 files: an error file (hopefully zero bytes) and a log file. Here is some output showing FireFox auto-upgrade while JRE is at the latest rev-level:
Running '\\3rdparty-updates.mylocal.mydomain\AnonRead\MgmtScripts\' at 20130426-0100
Running as nt authority\system
Deleted 0 file(s).
***Run_ALL: \\3rdparty-updates.mylocal.mydomain\AnonRead\MgmtScripts\impl_10_Check_JRE.cmd: BEGIN
2013-04-26 13:00:26 check_jre.vbs: BEGIN
2013-04-26 13:00:26 Detected 32-bit JRE version '1.7.0_21'
2013-04-26 13:00:26 Reference JRE version matches; nothing to do
2013-04-26 13:00:26 check_common.vbs: END
***OK***
Batch file completed.
***Run_ALL: \\3rdparty-updates.mylocal.mydomain\AnonRead\MgmtScripts\impl_10_Check_JRE.cmd: END
---
***Run_ALL: \\3rdparty-updates.mylocal.mydomain\AnonRead\MgmtScripts\impl_30_Check_Firefox.cmd: BEGIN
2013-04-26 13:00:26 check_firefox.vbs: BEGIN
2013-04-26 13:00:26 Detected 32-bit Firefox version '20.0.1'
2013-04-26 13:00:26 Reference Firefox version is '20.0.1.0'; need to upgrade
2013-04-26 13:00:26 Reference Firefox src dir 'Firefox-20.0.1'
2013-04-26 13:00:26 Clearing intermediate local TEMP folder 'Firefox-20.0.1'
2013-04-26 13:00:26 Copying '\\3rdparty-updates.mylocal.mydomain\AnonRead\MgmtScripts\..\Firefox\Firefox-20.0.1' to local TEMP folder
2013-04-26 13:00:27 getMSI: Looking at 'C:\windows\TEMP\Firefox-20.0.1'
2013-04-26 13:00:27 getMSI: Ext='msi'
2013-04-26 13:00:27 Copied and identified Firefox 'C:\windows\TEMP\Firefox-20.0.1\Firefox-20.0.1-en-US.msi'
2013-04-26 13:00:27 Running: C:\windows\system32\msiexec.exe /L*v C:\windows\system32\msiexec.exe /I C:\windows\TEMP\Firefox-20.0.1\Firefox-20.0.1-en-US.msi /qn /norestart
***OK***
Batch file completed.
***Run_ALL: \\3rdparty-updates.armycloud.cloud.army.mil\AnonRead\MgmtScripts\impl_30_Check_Firefox.cmd: END
---
***Run_ALL: Batch file completed.
- Updating the JRE and Firefox. If you look under the JRE or the Firefox folders, you will see that there is a file called “winver.txt” that contains the latest version to check for. That “winver.txt” also points to the name of the local folder that holds the MSI file for installation. To update, it is as simple as getting the MSI for the latest upgrade and testing it locally as needed. After you know the MSI update works, just copy it to the appropriate version folder and update the “winver.txt” file to point to that updated MSI. There is no need to hold on to the older MSI files.

Enjoy!
Team-oriented systems mentor with deep knowledge of numerous software methodologies, technologies, languages, and operating systems. Excited about turning emerging technology into working production-ready systems. Focused on moving software teams to a higher level of world-class application development. Specialties:Software analysis and development...Product management through the entire lifecycle...Discrete product integration specialist!
Leave a Reply