Audit All File Partition Access Failures – without killing your clicker!
Download WindowKiller runtime files here!
If you work in a secure environment, you will almost certainly find that you need to harden your operating system images. As one example, the Defense Information Systems Agency (DISA) has a set of Security Template Implementation Guides (STIGs) that provide a thorough set of practices and actions to ensure that deployed systems are compliant to run on Department of Defense (DoD) networks. Read on to see how to satisfy NTFS partition file auditing requirements without destroying your mouse.
One of these STIG requirements applies to Windows disk partitions – its name is “SV-32247r1_rule” and it specifies:
Check Content:Â If system-level auditing is not enabled, or if the system and data partitions are not installed on NTFS partitions, then mark this as a finding.
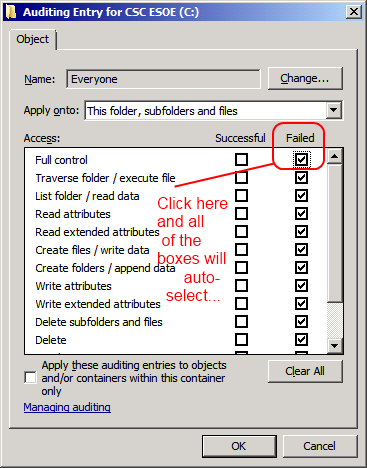
Open Windows Explorer and use the file and folder properties function to verify that the audit settings on each partition/drive is configured to audit all “failures” for the “Everyone” group.
If any partition/drive is not configured to at least the minimum requirement, then this is a finding.
Fix Text:Â Configure auditing on each partition/drive to audit all “Failures” for the “Everyone” group.
The fix for this is easy – from Windows Explorer, open properties for each partition (such as C:) and then select “Advanced” from the Security tab. Then select the “Auditing” tab which initially shows as empty:
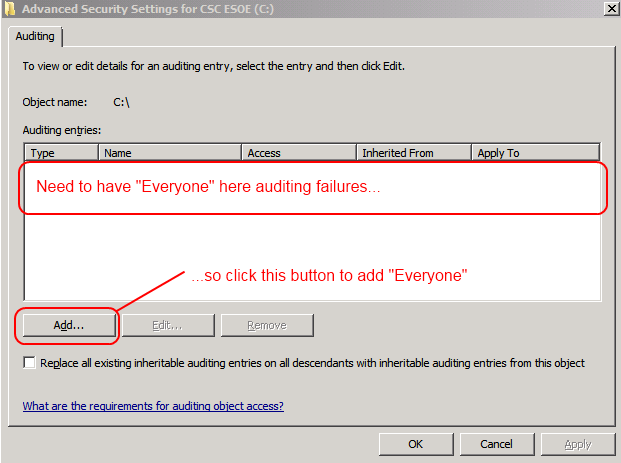
Click the “Add…” button and then add Everyone as shown below:
After you click “OK” then Everyone failure auditing will be added to the partition. Except for one small problem…if you start from a properly hardened OS baseline you will be prompted for every file / directory that your user can’t set the auditing upon. For example, “C:\Documents and Settings” as shown below but also you’ll see all of the files used by your corporate antivirus.
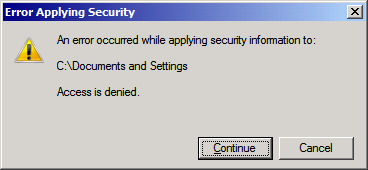
The prompt itself is not a problem – you simply click “Continue” and then let the auditing setting continue onwards. (As long as the root partition is set correctly as well as writable parent folders, the failure auditing will be in force just fine.) However, on the Army Golden Master (AGM) baseline Windows images I start from, there can be literally hundreds of these warning dialogs to click through.
To fix this I wrote the “WindowKiller”. It is a simple concept, as easy as 1-2-3:
- Allow the user to search for a window (dialog) on the screen by text;
- Indicate the button to click within the identified window (dialog);
- Send that button a click event.
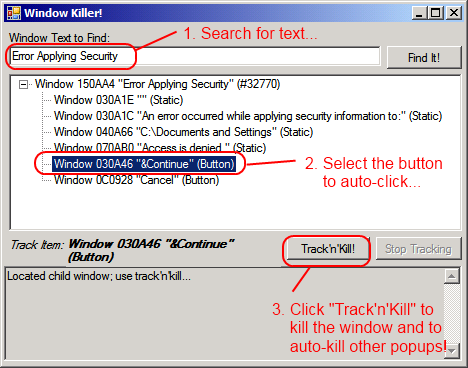
To install, simply unzip to a folder and run it; the program requires the .NET framework 3.5 or greater, and has been tested on 32-bit and 64-bit systems. As the program runs it tells you which windows it found and killed using the window handle as shown below:
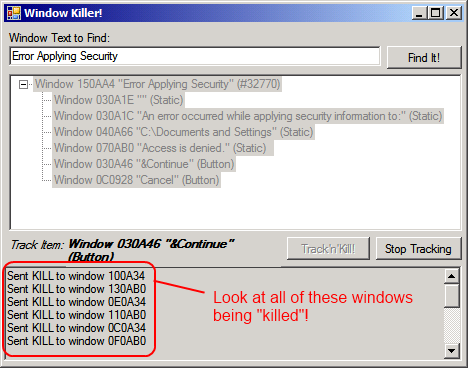
You can work in other programs while the WindowKiller is functional (I’m writing this blog while it’s running right now). Once the long-running process is complete, just click on the “Stop Tracking” button and close the application. To uninstall, simply delete the unzipped files.
Enjoy – and let it save your click finger!
Team-oriented systems mentor with deep knowledge of numerous software methodologies, technologies, languages, and operating systems. Excited about turning emerging technology into working production-ready systems. Focused on moving software teams to a higher level of world-class application development. Specialties:Software analysis and development...Product management through the entire lifecycle...Discrete product integration specialist!
Leave a Reply