Google Analytics and Goal URLs
Use Google Analytics as a low-cost (read: free) solution for getting traffic counts. Analytics offers several features to make this easier, including the ability to define a Goal URL, which Google defines as a measure of how often visitors take or complete specific actions. For a travel site, a Goal URL might be the “Submit” button for creating a reservation. For this particular project, we used the “Contact Us” page from the FaceWorks web site.
While writing a blog on Search Engine Optimization (SEO) and WordPress, I found that there was way too much information to put out in a single post. So I broke up the post into multiple sections with individual blog entries for each section where possible. Here is the section on a “Google Goal” within Analytics.
To setup the Goal URL:
- Login to the Google Analytics page.
- Navigate to the Products page to get to Google Analytics. As of this writing this is kinda stupid interface-wise, see our other post on Google Product access.
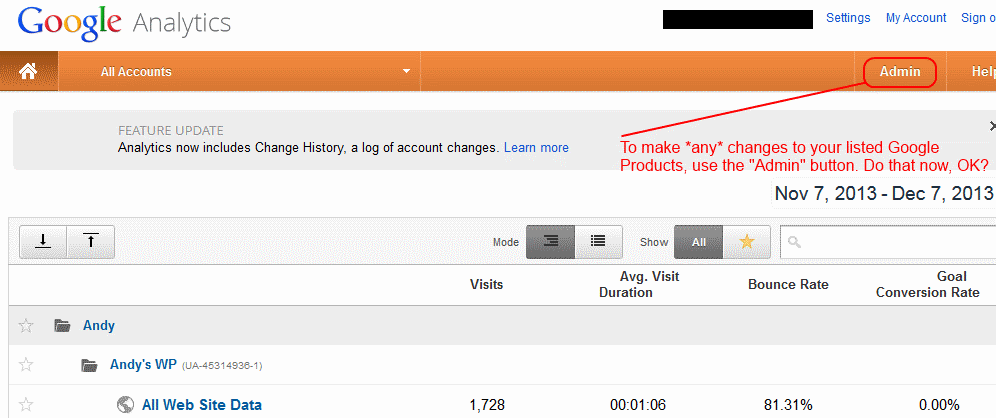
- Click on the “Admin” button at the top of the screen. Let’s show it below since screenshots are *so much fun* to do in WordPress. Not.

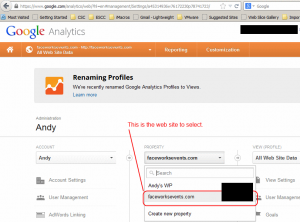
- Select the web site. OK – now you should be in the Admin page. So first make sure you select the web site you want to modify. For this post, it’s the “faceworksevents.com” site. Of course, to edit the particular web site within Google Analytics, you do not select something named “Web Site”. Instead, you select the “Property”. And if you are not currently monitoring any Web site? You “Create a new property”. Of course. Natch. What could be more intuitive from the second largest IT firm in the world? At least as of 2012. Which of course is ancient news. Probably Google has shuttered down to either Larry’s or Sergey’s mom’s garage by now. Things move fast in Internet time! So the picture is below…
-
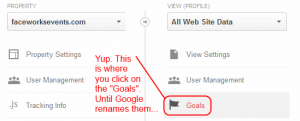
Select “Goals” from the “All Web Site Data” view (profile). The only thing to note here? The “View” shown below is a relatively new artifact; as of August, 2013 Views are Renamed as Profiles. So here’s another picture…am I a clever programmer or what?
-
Select the Goal URL(s). This last step is to define what a “goal” is – think of goals as calls to action for your readers. In my example, there are *two* goals I want to track:
- Access to “Contact Us” page. For my friend’s site, this is the Contact Us page from her site. If a user gets here, they were interested enough to: a) find the site (kewl!); and, b) possibly want to get in touch with her (read: possible $$). So let’s track that page for sure.
- Submit the “Contact Us” form. Ah. This is the kicker…a real user filling in the Contact Us form and clicking the Submit button. This means that we have a real live almost-conversion going on!
By tracking both pages I can see what level of interest there is in FaceWorksEvents.com *and* I can see how many of those interested people were intrigued enough to want a response.


The actual steps for submitting Goal URLs are presented below:
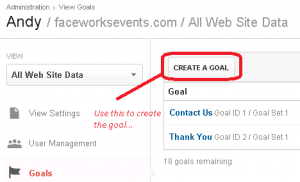
- First, here’s a picture of my friend’s site with two Goals defined. I’ve circled the “Create a Goal” link that you use to define a goal.
- Select a “Template.” A Template is simply a starting point for the Goal. For this example you can see I’ve started with the “Register Online” template as it pretty well defines what I want to track. The benefit of Templates is that they let you track just how your users are interacting with your site’s content. Google has a good writeup
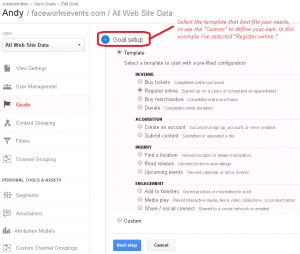
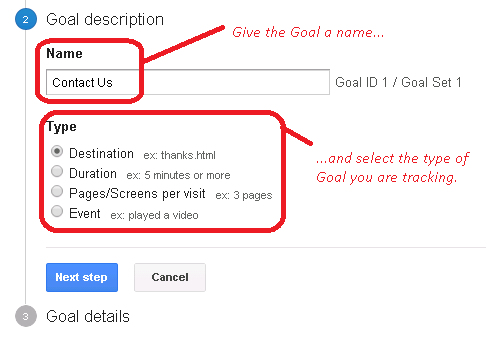
- Select the Destination Type. Depending on your needs, a Goal can be a number of things. For my example Goal, I’m just tracking if the user got to a particular page. You can also track if the user sticks around on the page for some amount of time, or if the user has interacted with your site to a particular limit such as number of pages clicked, or if the user played a video you provided or took some other action.

- Fill in Goal Details. OK, this is cool. For my simple example where I just want to track who makes it to a particular page, all I do is provide the destination URL (note that I use a relative path and not an absolute path). But if you select a different Goal type, you have other options. And you can provide a monetary value to the Goal so you can track real or potential return-on-investment (ROI) for this Goal. You can even define a “Funnel” which basically tracks an entire path to the Goal; use this feature to see if new calls to action you place in your site are shaping traffic the way you intended. All in all – very powerful stuff!


When you are done, you save the Goal and then you can enable Goal tracking using the simple on-off links as shown below. For my friend’s site, both Goals are tracked:
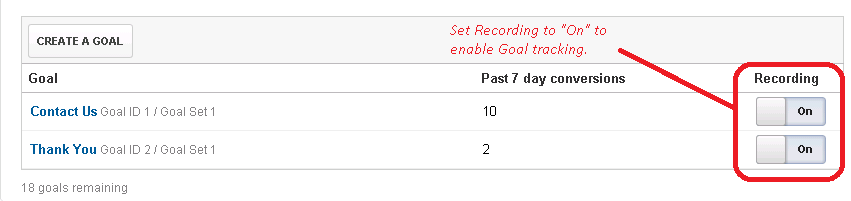
At this point your Google Analytics will start to track and show Goal “conversions” – the number of times that a Goal popped. And the good news? My friend has gotten quite a few hits over the past 10 days and a couple of real conversions – that is, where a user has filled in a Contact Us form and clicked on Submit. What a treat!
I hope you found this quick tutorial useful. Please let me know if you did and Happy WordPressing!
Team-oriented systems mentor with deep knowledge of numerous software methodologies, technologies, languages, and operating systems. Excited about turning emerging technology into working production-ready systems. Focused on moving software teams to a higher level of world-class application development. Specialties:Software analysis and development...Product management through the entire lifecycle...Discrete product integration specialist!
Leave a Reply