ESXi5 and Windows CIFS
Hello All – another chapter in the long-running story of ESXi integration in a significant project I have worked on for the 6 months: namely, the decision to upgrade ESX from 3.5 to version 5.1 was made. As all of you know, ESXi is not the “full” ESX of 3.5; instead, it is a minimal hypervisor (“bare-metal” to use VMware marketing terms). This article covers the challenges and opportunities I found in integrating the Common Internet File System (CIFS) via Windows 2008 (not R2) with ESXi5. It was a bit of a shock to an ESXi n00b13 like myself. There is no mount command; instead, the admin must use esxcfg-nas. But that isn’t all…not by a long shot. For my ESXi hosts to access my Windows CIFS file server I had to take quite a few steps. This article provides three views of the problem space:
- “Common Setup” – Things to setup on the Windows side ahead of time.
- “Read-Write Access Shares” – How to get read-write access working.
- “Read-Only Access Shares” – Slightly easier as no write access required.
Common Setup for ESXi
In my case, I followed these steps for any CIFS (Windows 2008) server that requires ESXi consumer access:
- Install Services for Network File System. Do not reboot after mapping.
- Setup user mapping or allow anonymous access. User mapping requires many steps but would be preferred especially since Server 2008 only supports Linux-to-AD mapping. The blog entry at Scott Lowe’s Windows 2008 Linux-AD Integration provides excellent detail on this process. For my environment, however, this was too complex given the small number of Linux servers. Therefore, an alternate approach to modify GPO to enable anonymous access. I created an ActiveDirectory GPO “NAS Servers with Linux CIFS” and set it as follows:
Computer Configuration -> Policies -> Windows Settings -> Security Settings -> Local Policies -> Security Options -> “Network access: Let
Everyonepermissions apply to anonymous users”. - Configure other NFS settings. From admin command prompt:
nfsadmin server config mountprotocol=tcp - Reboot the server. This must be done for the group policy and NFS settings to be applied properly.
- NFS Share Requirements. NFS shares must be exposed such that ESXi hosts can access them. The ESXi hosts use
esxcfg-naswhich does not support many of the functions and options that themountcommand does. So we must relax permissions on the NAS server to accommodate this. The trick is to relax permissions as minimally as possible:- Define client groups. On the NAS server from an elevated command prompt, create a group for the ESXi hosts. For my environment this was initially done as follows with a single HDS blade used as the ESXi5 server:
nfsadmin server creategroup ESXiHostsnfsadmin server addmembers ESXiHosts 172.24.1.90 - Analyze shares and expose via
nfsshare. This command-line tool can be used to grant NFS permissions to defined client groups and is the preferred way to refine privilege escalation on specific folders. The following sections detail the differences between read-write (full) and read-only permissions with practical examples. - Set NTFS permissions. NTFS permissions define actual permissions on specific folder trees. The following sections show how the
Everyonegroup can be granted read-only or read-write (full) control on individual folders based on the share need.
See the following sections for read-write (full) vice read-only share access.
Read-Write NFS Shares for ESXi
As an example, consider a share named “Backups” on a Windows 2008 host
//172.24.0.33; this is the share which ESXi5 hosts use to write backups and as such requires read-write permissions. Follow these steps:- Expose via
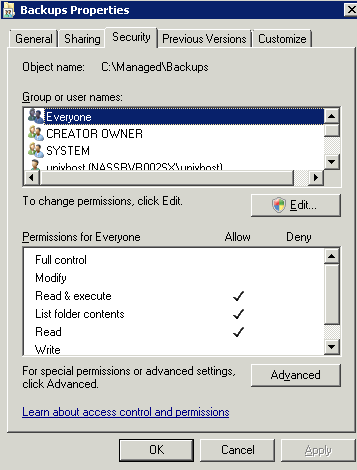
nfsshare. As an example, an ESXi host used which must access backed-up VM images. So the following command allows the defined ESXi hosts to access the share with full NFS permissions (as opposed to NTFS permissions).nfsshare Backups=C:\Managed\Backups -o rw=ESXiHosts -o root=ESXiHosts -o anon=yes - Set NTFS permissions. The above command grants NFS “root” and “read-write” permissions to all hosts in the ESXiHosts group. Creating a share on an ESXi host will report success; however, trying to access that share will fail unless the
Everyonegroup on the CIFS server is explicitly granted permissions (NTFS permissions). Best practice is to limit the number of folders whereEveryonehas permissions just to those absolutely required. In the case of the VM backups folder, the approach is to provide read-only access to the base “Backups” share as shown below:
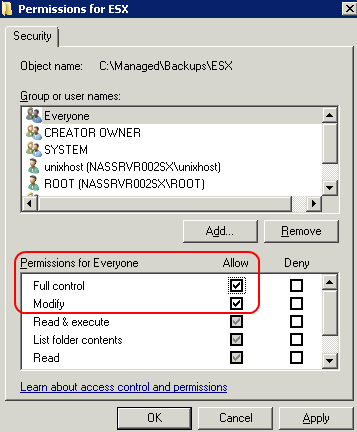
For the lower-level ESX folder that is used for backups, the
Everyonegroup requires full permissions as shown:
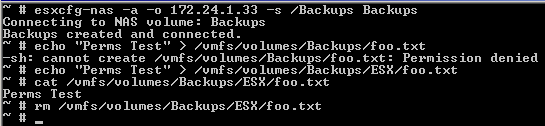
The above steps are not perfect and using Active Directory Linux User Mapping might be a way to provide finer control over permissions. But the above process does work as shown in the following screen shot from a running ESXi host:
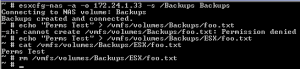
In the above shot, a share has been created. Then the file
foo.txtwas written to within the top-level share (“/Backups”). NTFS permissions on the NAS server provide the ESXi5 host with read-only permissions (via theEveryonegroup) so that failed. However, under the “/Backups/ESX” folder read-write permissions are available as well as delete.Read-Only NFS Shares for ESXi5
The use case is the “Software” share on //172.24.0.33, which must be available to ESXi hosts so that we can access an ESXi patch depot. It is easier as read-only is the default access. Follow these steps:
- Expose via
nfsshare. For example, assume an ESXi host must access a backup partition. The following command allows the defined ESXi hosts to access the share with full NFS permissions (as opposed to NTFS permissions).nfsshare Software=C:\Managed\Software -o rw=ESXiHosts -o root=ESXiHosts -o anon=yes - Set NTFS permissions. The above command grants NFS
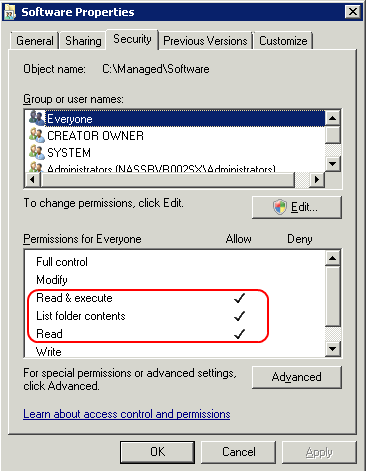
rootand “read-only” permissions to all hosts in the ESXiHosts group. Creating a share on an ESXi host will report success; however, trying to access that share will fail unless theEveryonegroup is explicitly granted read-only permissions at NTFS level. (By default, theEveryonegroup has no permissions on any folder.) The following shows the permissions being set for read-only access: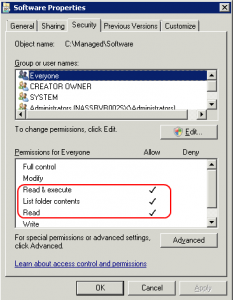
No more steps should be necessary, running the
esxcfg-nasshould work on the ESXi host. Here is an example from an ESXi5 host “ESXHost011HB” running on the first CB2000 blade within my Infrastructure rack: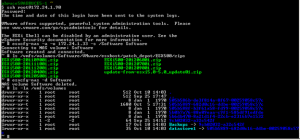
In the above example, the user first logs in to the ESXi host (
ssh root@172.24.1.90), then creates the share mapped to a local datastore (esxcfg-nas -a -o 172.24.0.33 -s /Software Software), then lists the contents of the mounted data folder (ls /vmfs/volumes/Software/VMware/esxhost/patch_depot/ESX500/zips), and finally deletes the mount point (esxcfg-nas -d Software). This last point about deleting the mount point is a good habit; do not leave mounts unless they are needed. - Define client groups. On the NAS server from an elevated command prompt, create a group for the ESXi hosts. For my environment this was initially done as follows with a single HDS blade used as the ESXi5 server:

Team-oriented systems mentor with deep knowledge of numerous software methodologies, technologies, languages, and operating systems. Excited about turning emerging technology into working production-ready systems. Focused on moving software teams to a higher level of world-class application development. Specialties:Software analysis and development...Product management through the entire lifecycle...Discrete product integration specialist!
Great article, thanks for posting.
I don’t see any CIFS here. It looks like it is all NFS?